
Last Updated: 2023-03-02
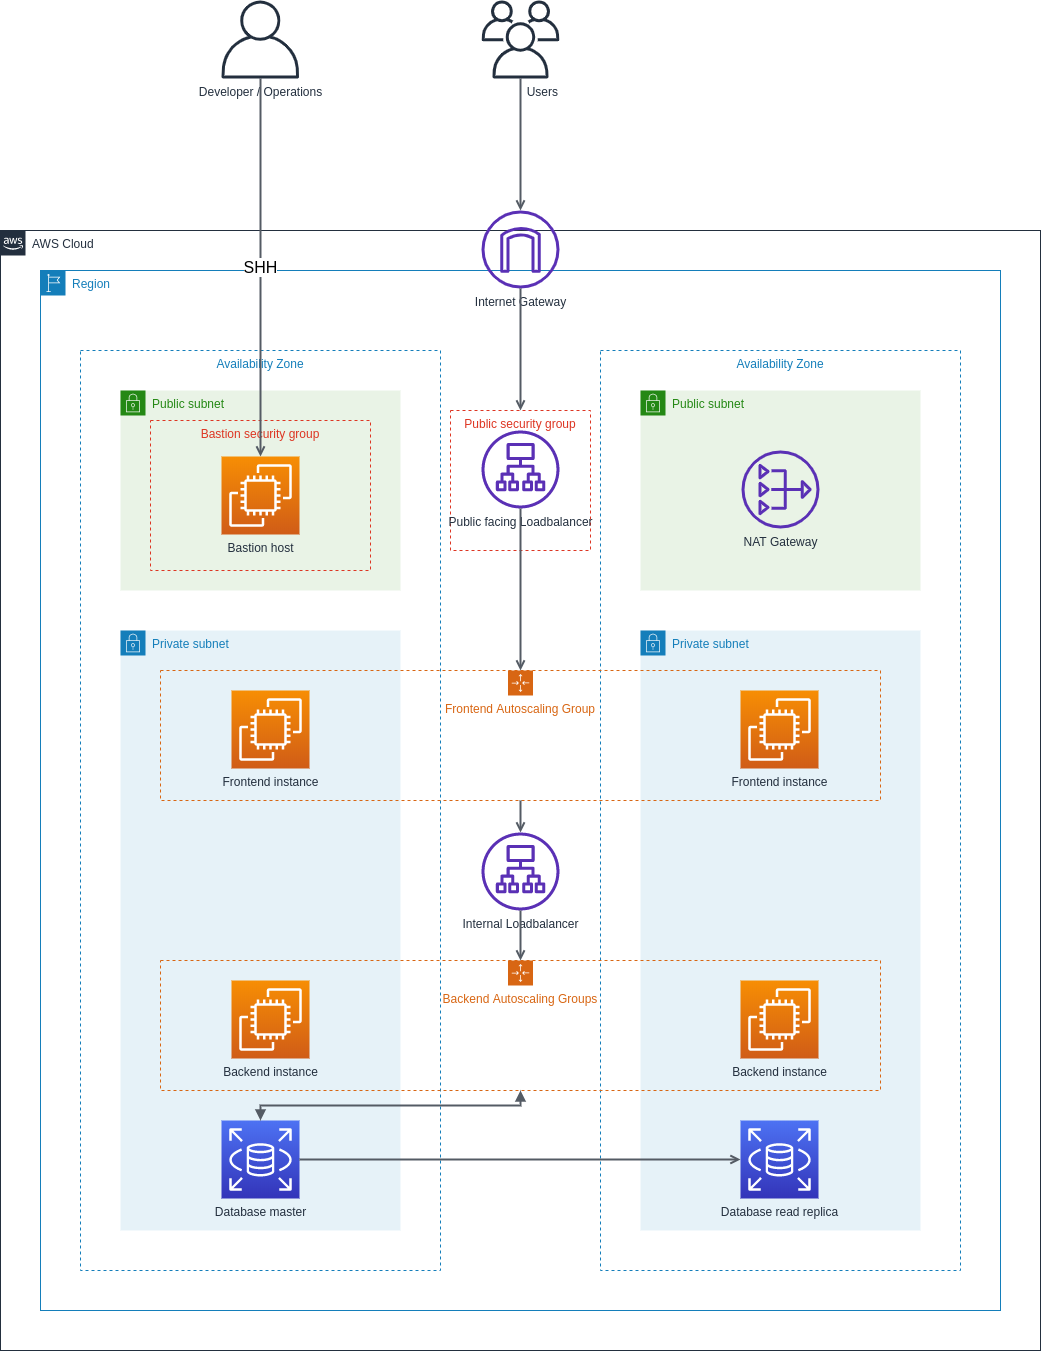
What is 3 Tier Architecture?
A three-tier architecture is a software architecture pattern where the application is broken down into three logical tiers:
- Presentation layer,
- Business logic layer,
- Data storage layer.
This architecture is used in a client-server application such as a web application that has:
- frontend,
- backend,
- database.
Each of these layers or tiers does a specific task and can be managed independently of each other. This a shift from the monolithic way of building an application where the frontend, the backend and the database are both sitting in one place.
In this lab, you will use the following AWS services to design and build a three-tier cloud infrastructure:
- Elastic Compute Cloud (EC2),
- Auto Scaling Group, Virtual Private Cloud(VPC),
- Elastic Load Balancer (ELB),
- Security Groups
- Internet Gateway.
Your infrastructure will be designed to be highly available and fault tolerant.
Architecture Design Goals
Modularity
The essence of having a three-tier architecture is to modularize your application so that each part can be managed independently of each other. With modularity, teams can focus on different tiers of the application and make changes as quickly as possible. Also, modularization helps you recover quickly from an unexpected disaster by focusing solely on the faulty part.
Scalability
Each tier of the architecture can scale horizontally to support the traffic and request demand coming to it. This can easily be done by adding more EC2 instances to each tier and load balancing across them. For instance, assuming you have two EC2 instances serving your backend application and each of the EC2 instances is working at 80% CPU utilization, you can easily scale the backend tier by adding more EC2 instances to it so that the load can be distributed. You can also automatically reduce the number of the EC2 instances when the load is less.
High Availability
With the traditional data center, your application is sitting in one geographical location. If there is an earthquake, flooding or even power outage in that location where your application is hosted, your application will not be available. With AWS, you can design our infrastructure to be highly available by hosting your application in different locations known as the availability zones.
Fault Tolerant
You want your infrastructure to comfortably adapt to any unexpected change both to traffic and fault. This is usually done by adding a redundant system that will account for such a spike in traffic when it does occur. So instead of having two EC2 instances working at 50% each, such that when one instance goes down, the other instance will be working at 100% capacity until a new instance is brought up by your Auto Scaling Group, you have extra instances making it three instances working at approximately 35% each. This is usually a tradeoff made against the cost of setting up a redundant system.
Security
You want to design an infrastructure that is secured and protected from the prying eyes of hackers. As much as possible, you want to avoid exposing your interactions within the application over the internet. This simply means that the application parts will communicate with each other using a private IP. The presentation (frontend) tier of the infrastructure will be in a private subnet (the subnet with no public IP assigned to its instances) within the VPC. Users can only reach the frontend through the application load balancer. The backend and the database tier will also be in the private subnet because you do not want to expose them over the internet. You will set up the Bastion host for remote SSH and a NAT gateway for your private subnets to access the internet. The AWS security group helps us limit access to your infrastructure.
What you'll build
In this codelab, you're going to build a 3 Tier Web application.
Your app will be:
- Highly available.
- Fault tolerant.
- Secure.
What you'll learn
- How to create and manage Auto Scaling Groups
- How to create and manage Load Balancers
- How to have a secure SSH connection using Bastion host
This codelab is focused on building a 3 Tier infrastructure. Non-relevant concepts and code blocks are glossed over and are provided for you to simply copy and paste.
What you'll need
- A recent version of your favorite Web Browser
- Basics of BASH
- AWS CLI
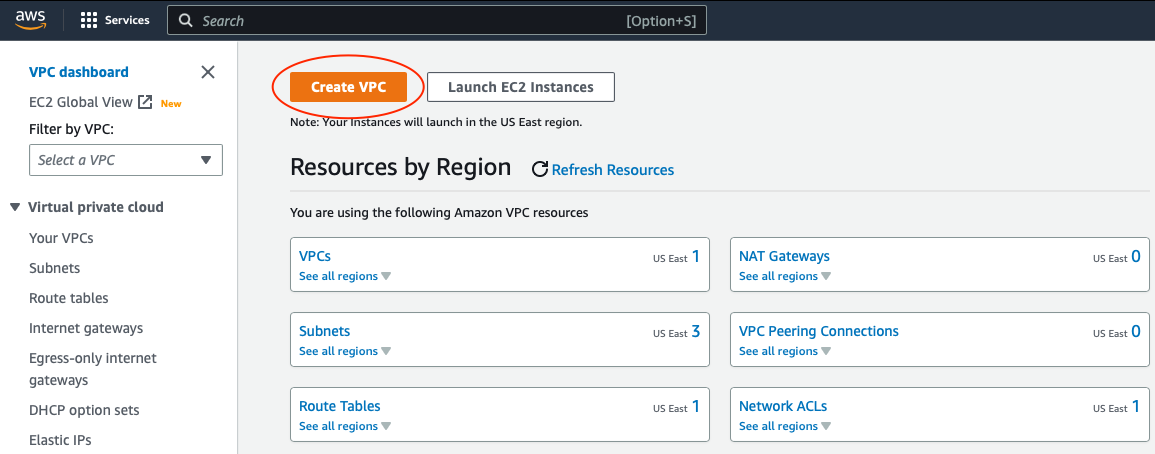
Virtual Private Cloud (VPC)
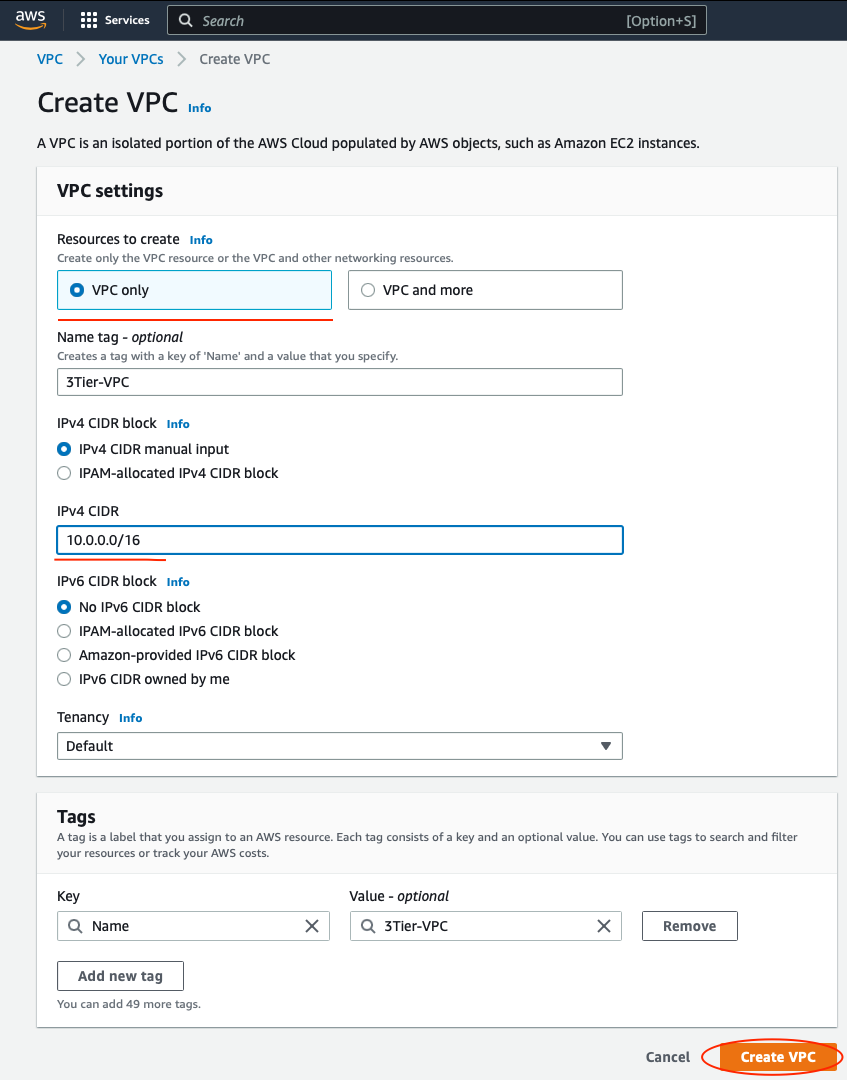
Virtual Private Cloud (VPC) is a virtual network where you create and manage your AWS resources in a more secure and scalable manner. Go to the VPC section of the AWS services, and click on the Create VPC button.
Select VPC Only. Give your VPC a name and a CIDR block of 10.0.0.0/16
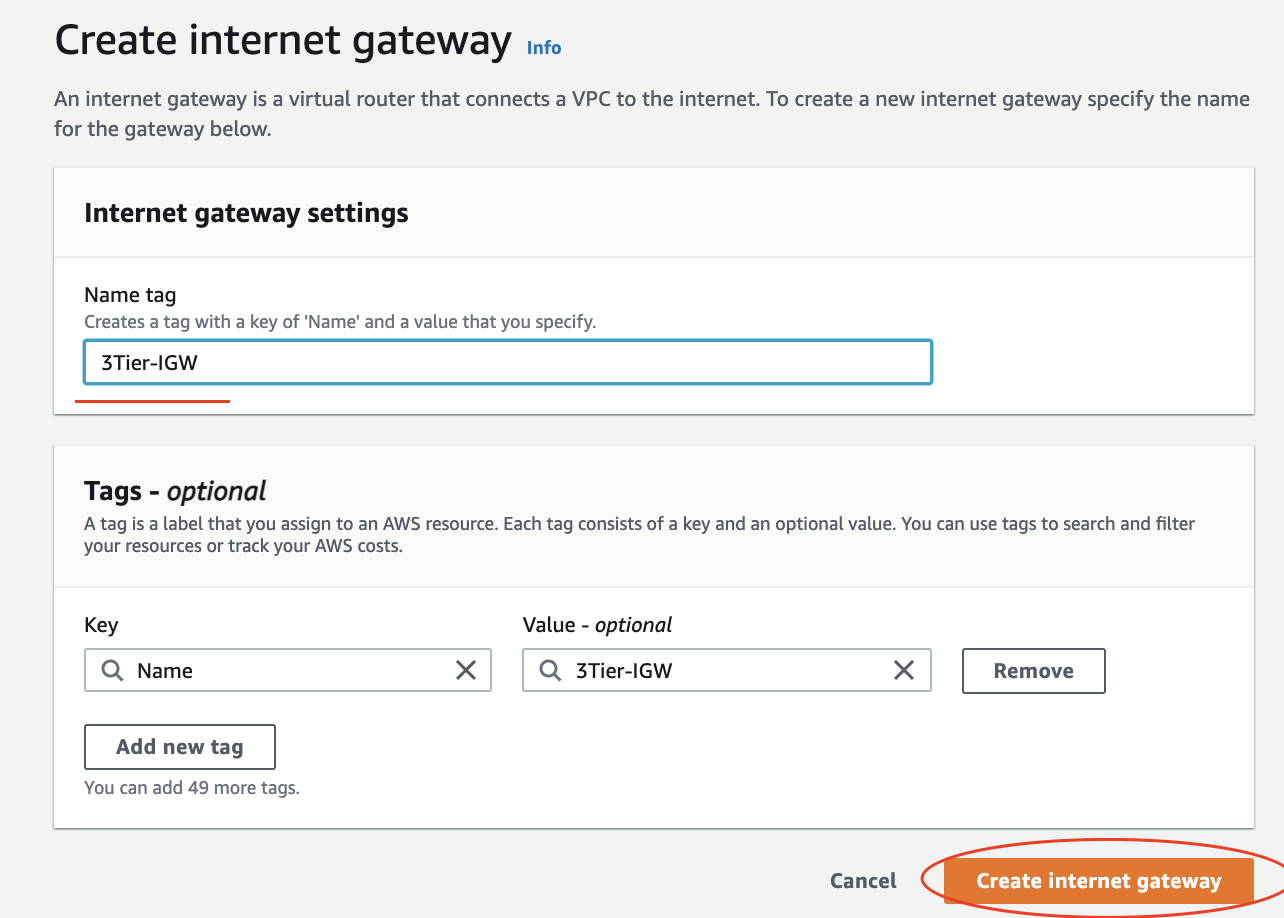
Internet Gateway
The Internet Gateway allows communication between the EC2 instances in the VPC and the Internet. To create the Internet Gateway, navigate to the Internet Gateways page and then click on Create internet gateway button.

Give it a name and click Create.
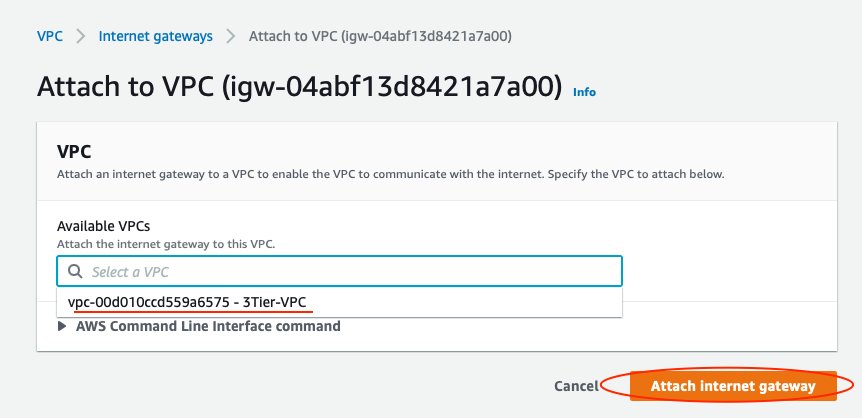
You need to attach your VPC to the internet gateway. To do that:
- Select the internet gateway
- Click on the Actions button and then select Attach to VPC.
- Select your VPC to attach the internet gateway and click Attach

Subnets
The subnet is a way for you to group our resources within the VPC with their IP range. A subnet can be public or private. EC2 instances within a public subnet have public IPs and can directly access the internet while those in the private subnet do not have public IPs and can only access the internet through a NAT gateway.
For your setup, you will create the following subnets with the corresponding IP ranges.
- public-subnet-1 | CIDR (10.0.1.0/24) | Availability Zone (us-east-1a)
- public-subnet-2 | CIDR (10.0.2.0/24) | Availability Zone (us-east-1b)
- private-subnet-1 | CIDR (10.0.3.0/24) | Availability Zone (us-east-1a)
- private-subnet-2 | CIDR(10.0.4.0/24) | Availability Zone (us-east-1b)
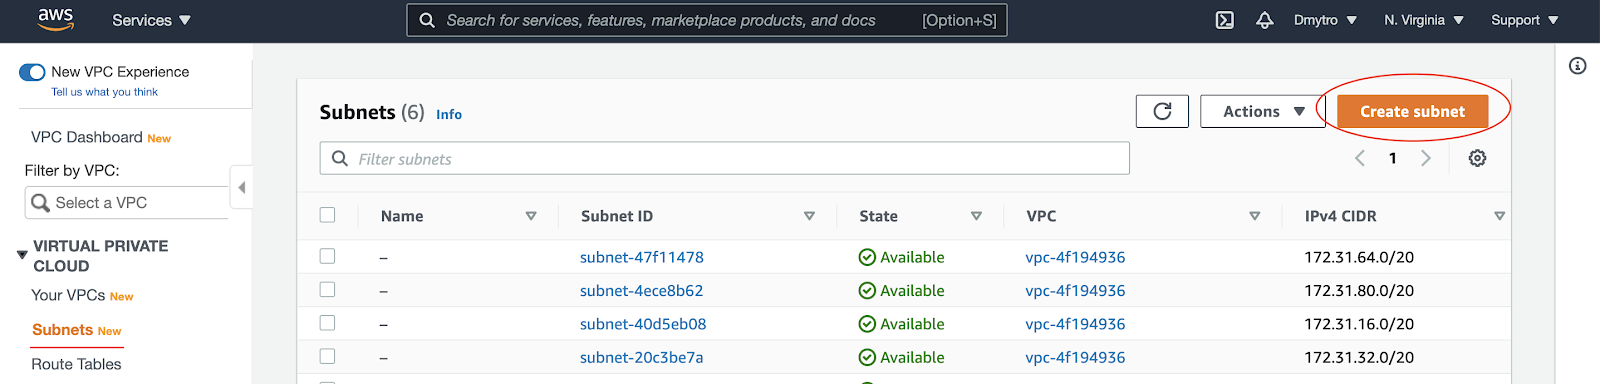
Go to the Subnets section of the AWS services, and click on the Create subnet button.
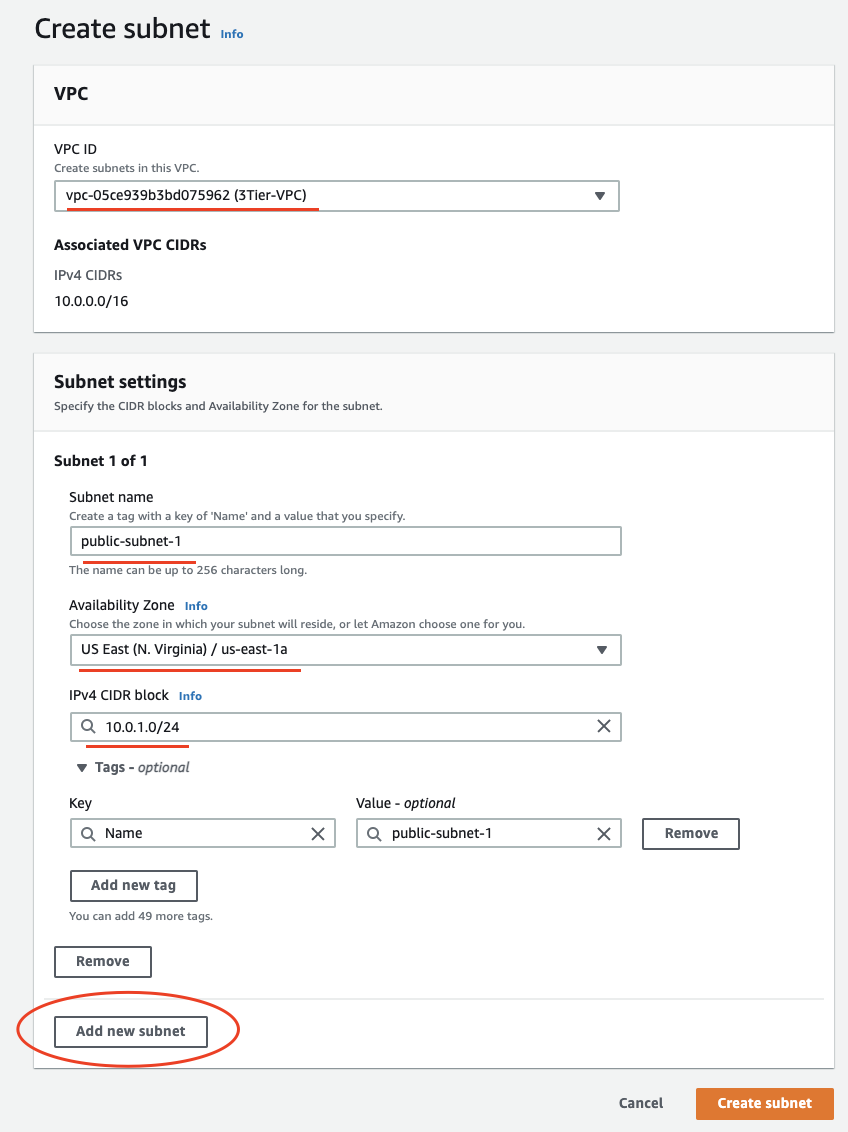
Click Add new subnet and add other subnets.
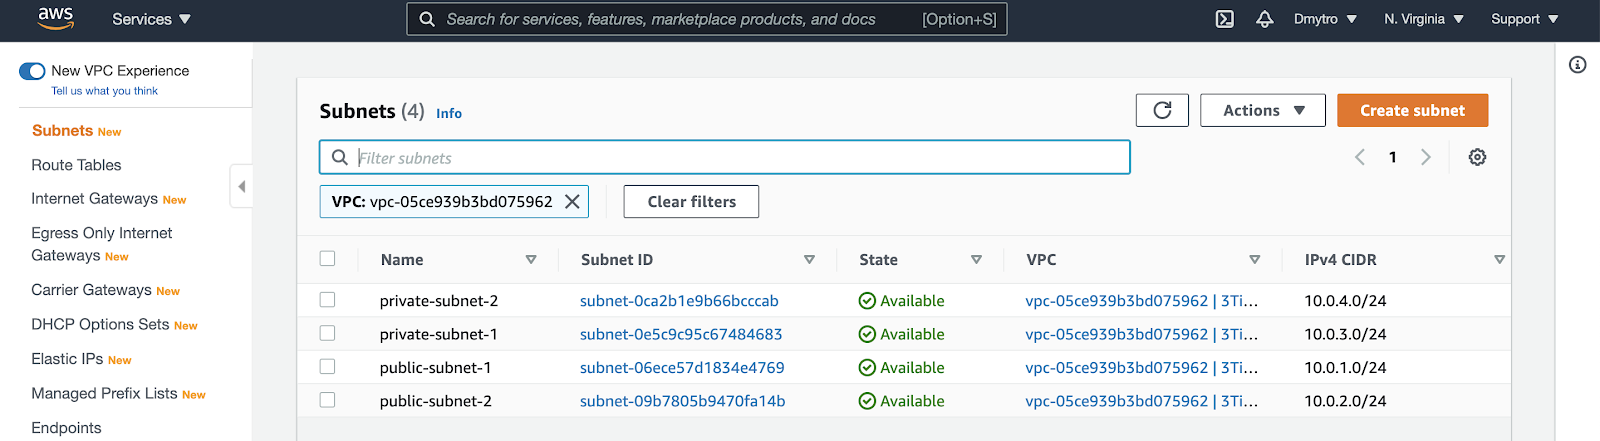
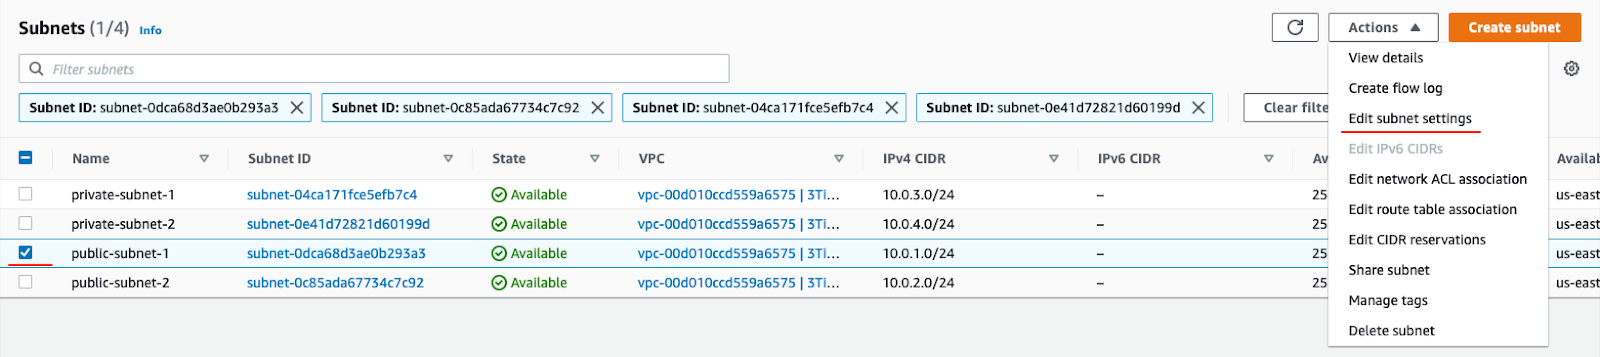
When you're done - click Create. You should have four subnets as follows:
Next, edit both public subnets to enable auto-assignment of public IPs.
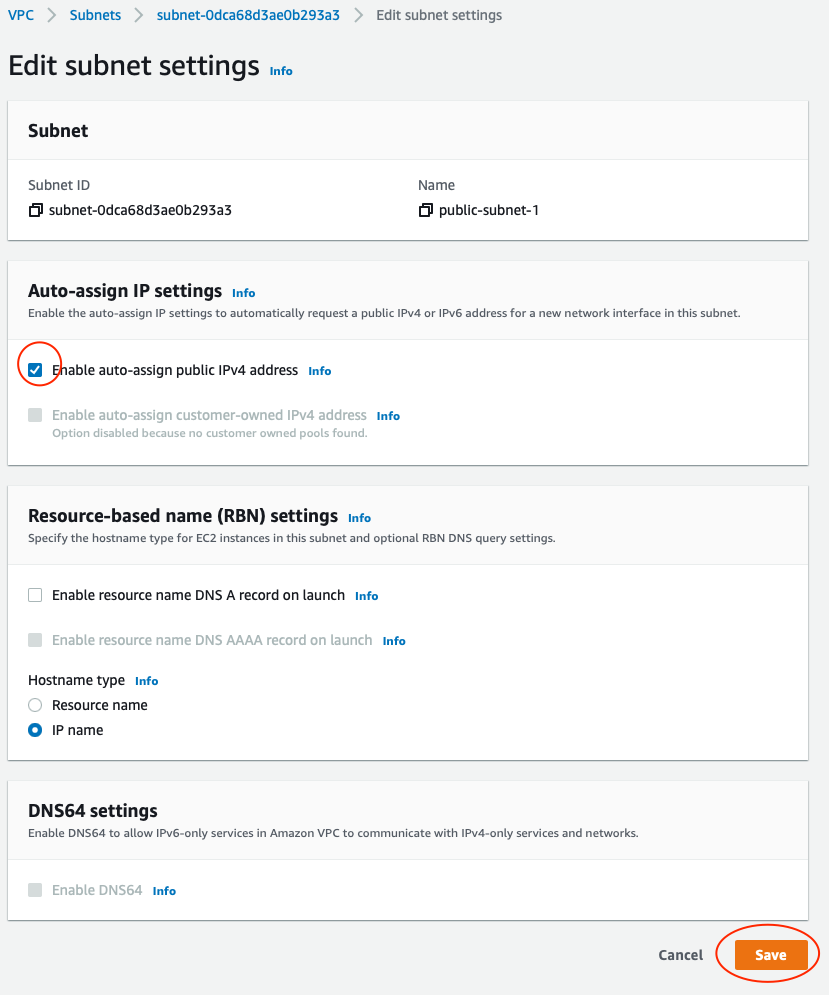
Choose a subnet and click Actions → Edit subnet settings → Auto-assign IP.
In the settings screen tick the enable checkbox and save.
Route Tables
Route tables are a set of rules that determine how data moves within your network. You need two route tables:
- private route table
- public route table.
The public route table will define subnets that will have direct access to the internet (i.e., public subnets) while the private route table will define which subnets should go through the NAT gateway (i.e., private subnet).
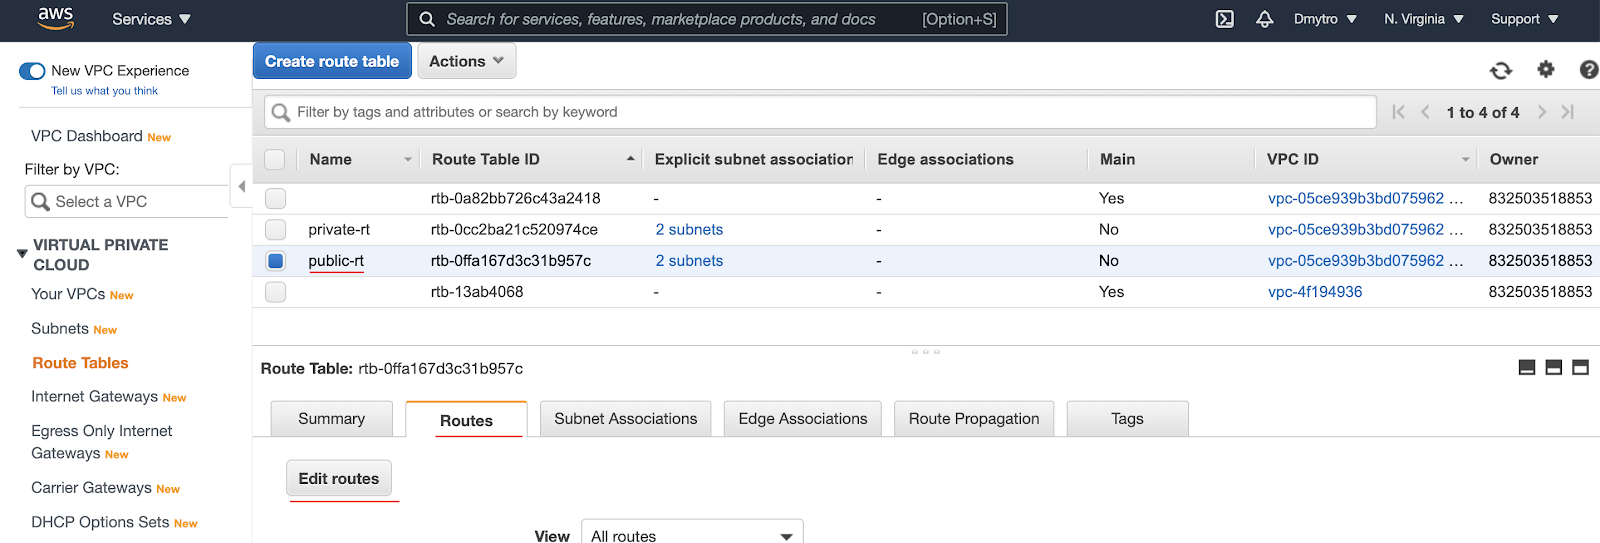
To create route tables, navigate over to the Route Tables page and click on the Create route table button.

Create a private route table (choose your 3Tier-VPC).
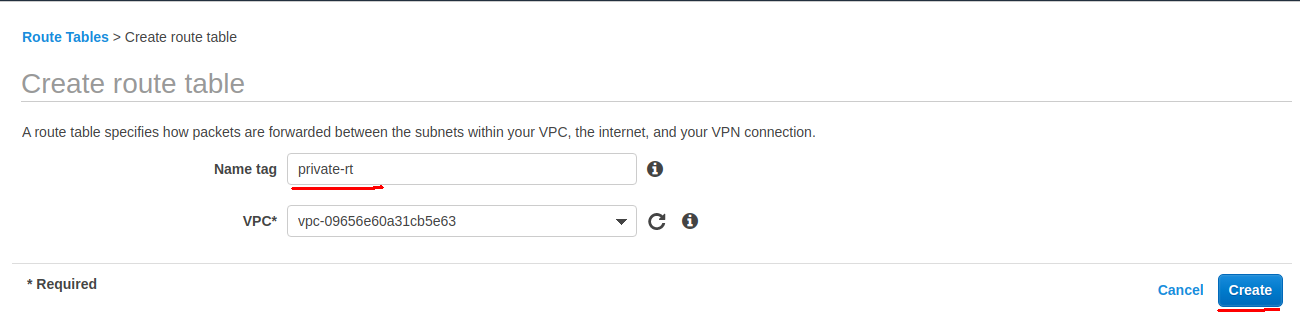
Create a public route table (choose your 3Tier-VPC).

The public and the private subnet needs to be associated with the public and the private route table respectively.
To do that, you select the route table and then choose the Subnet Association tab. Then click the Edit Subnet Associations button.
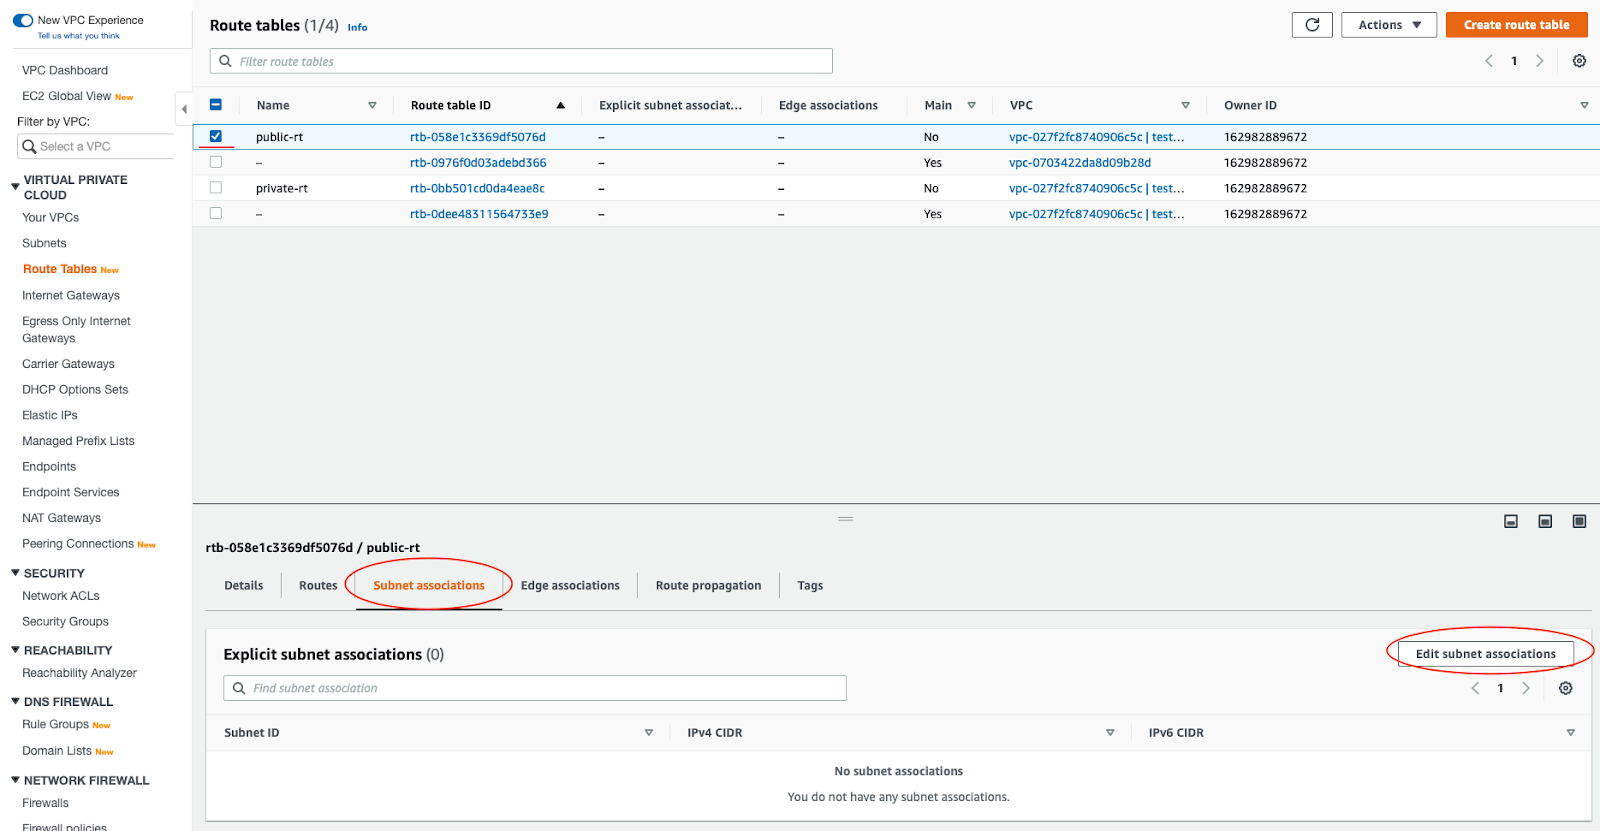
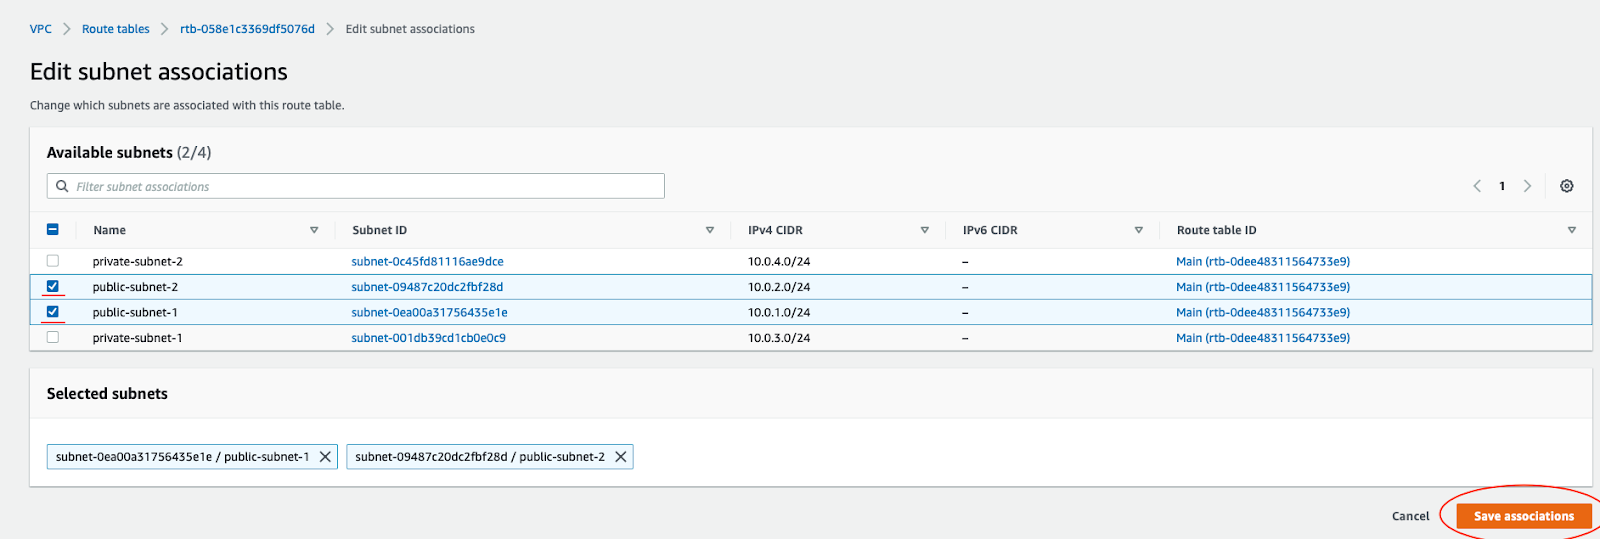
Repeat for the private route table and private subnets.

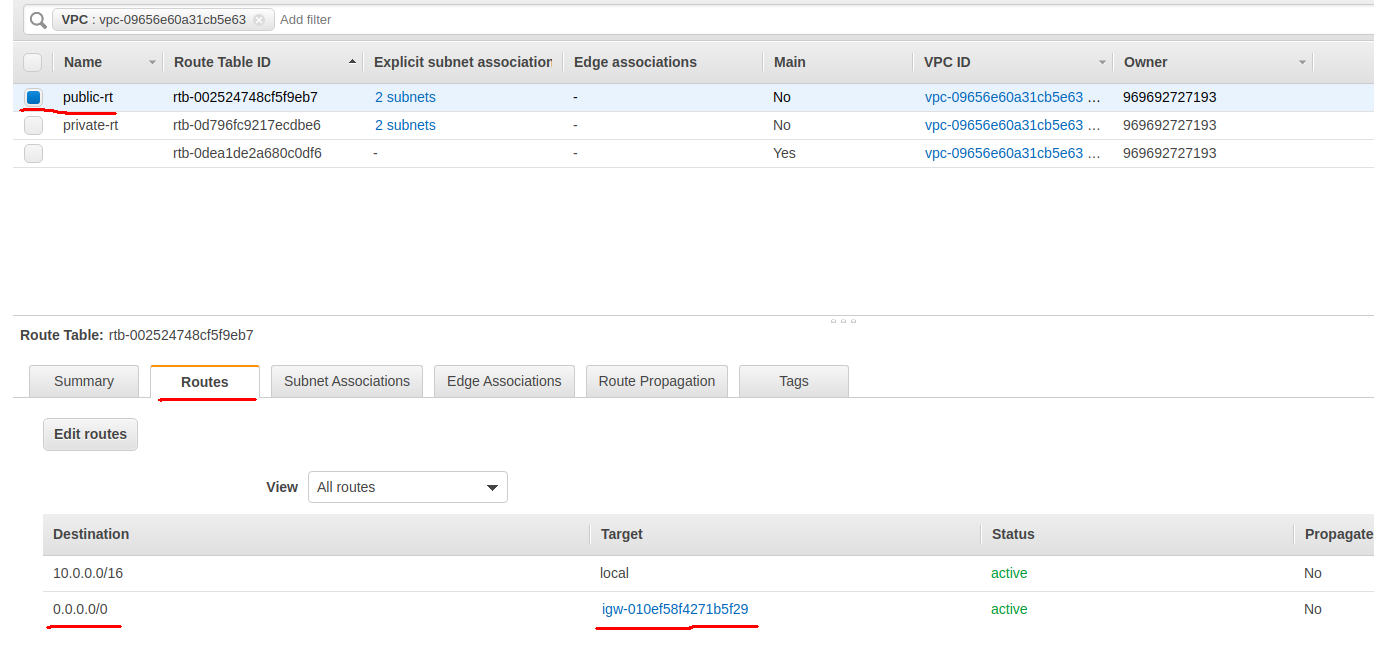
You also need to route the traffic to the internet through the internet gateway for our public route table.
To do that select the public route table and then choose the Routes tab and click Edit Routes.
Add a new route. The rule should be similar to the one shown below:
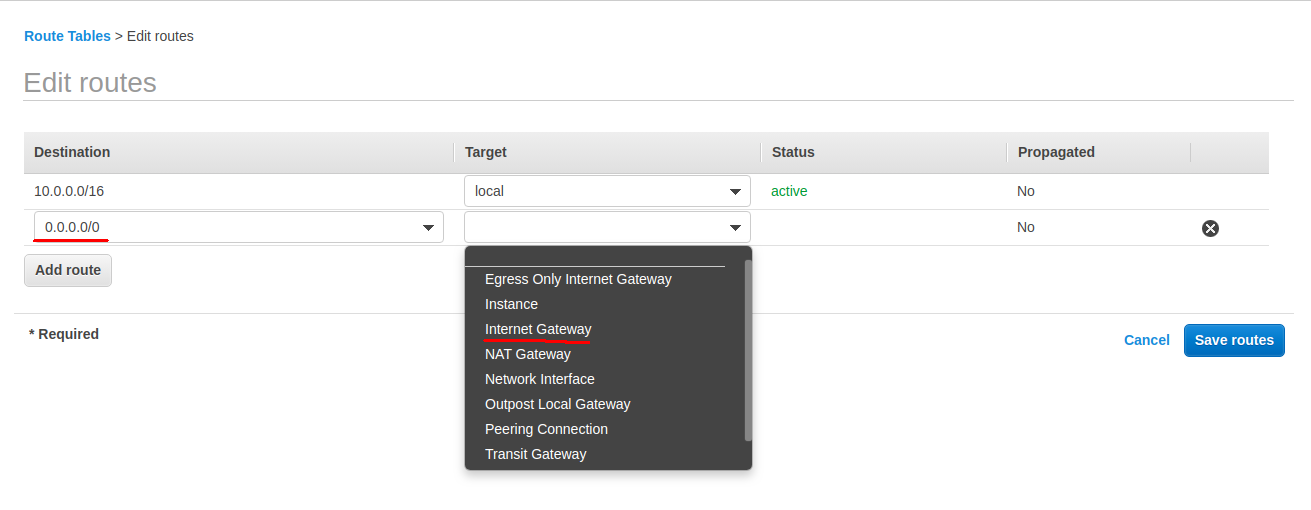
You should see your two routes.
NAT Gateway
The NAT gateway enables the EC2 instances in the private subnet to access the internet. The NAT Gateway is an AWS managed service for the NAT instance. To create the NAT gateway, navigate to the NAT Gateways page, and then click on the Create NAT Gateway.
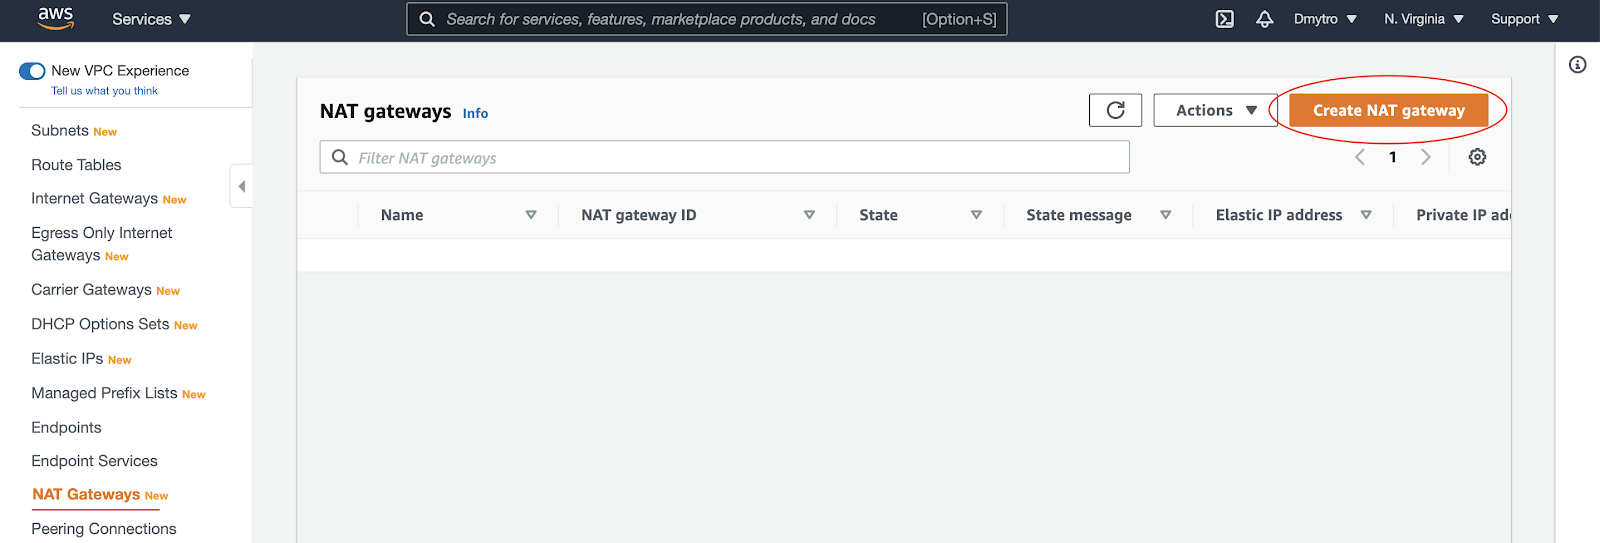
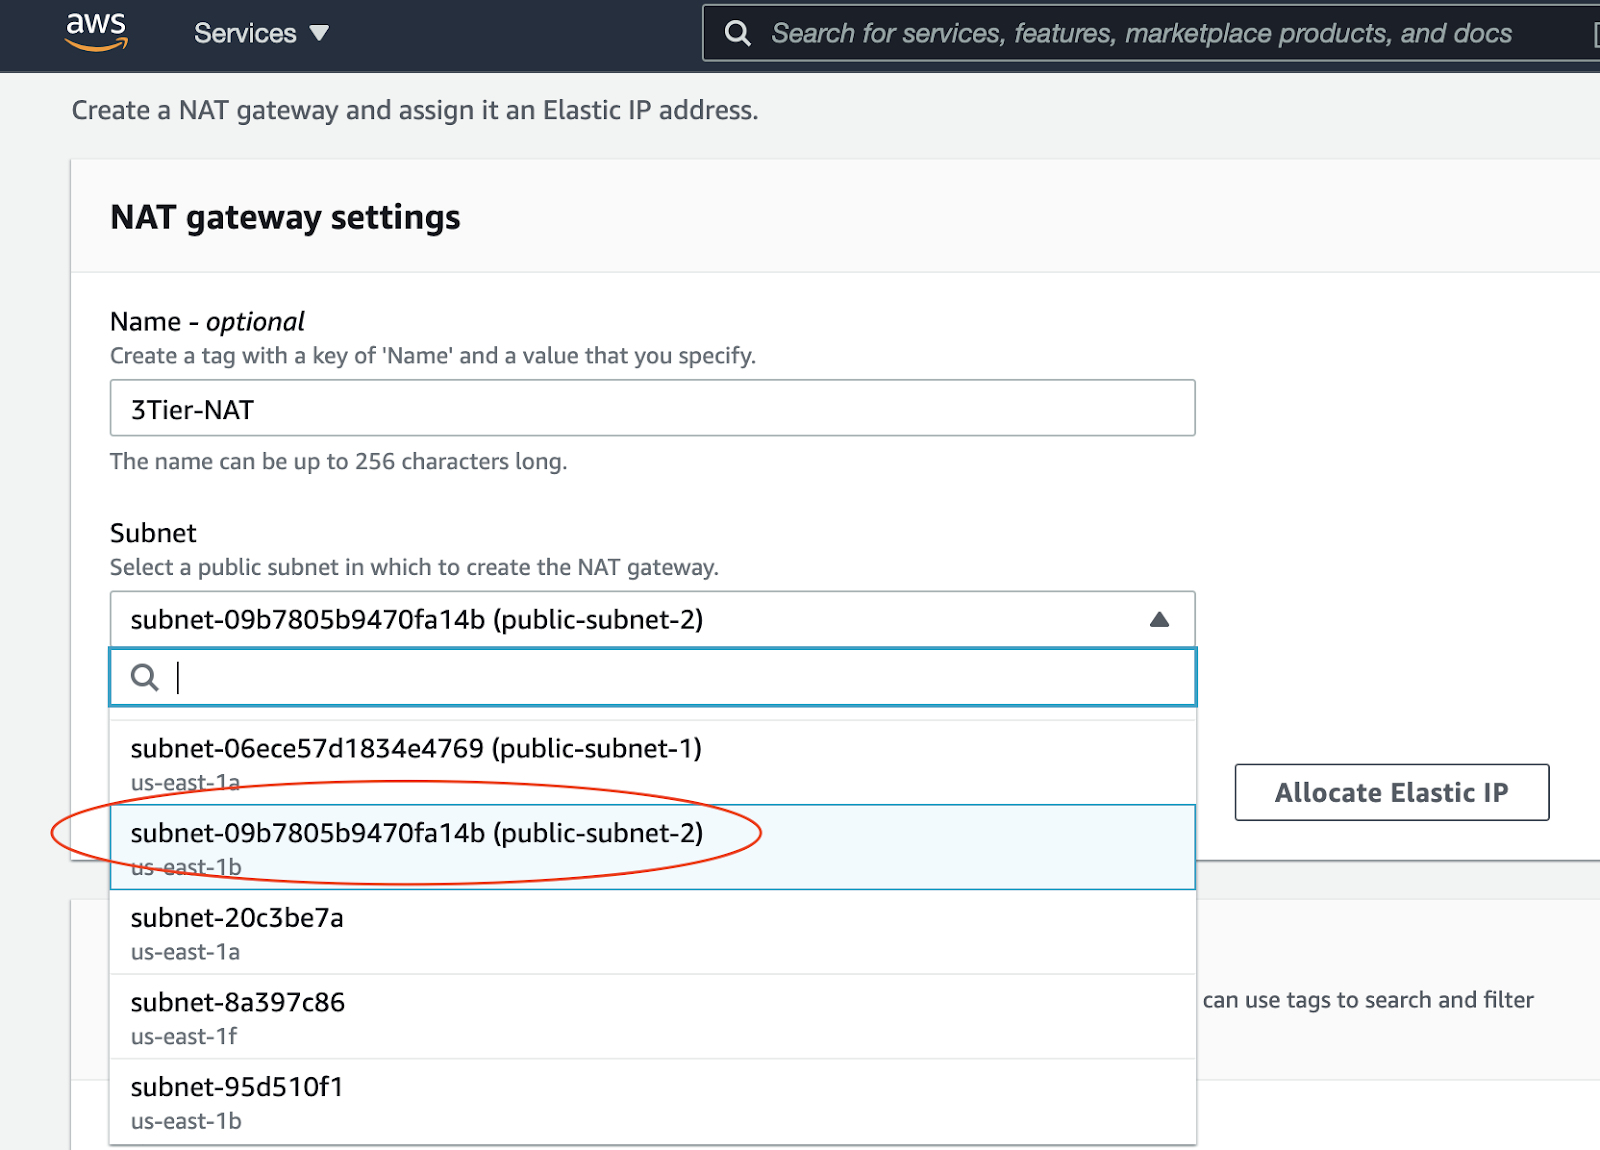
You will also need to allocate a public IP for your NAT Gateway.

Now that you have the NAT gateway, you need to edit the private route table to make use of the NAT gateway to access the internet.
Navigate over to the Route Tables page, select the private route table and then choose the Routes tab and click Edit Routes.
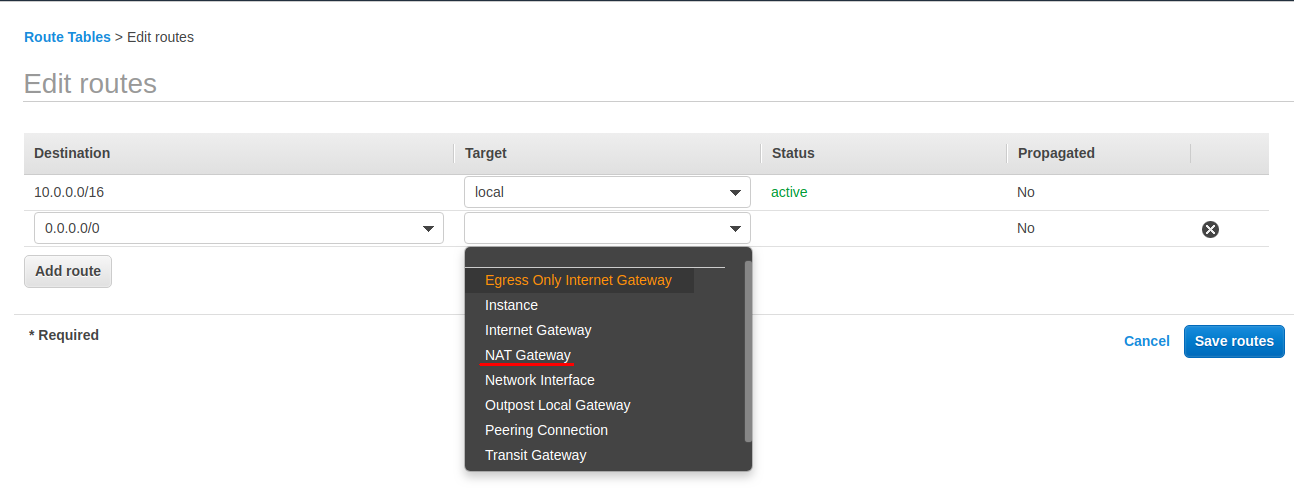
You should see your two routes.

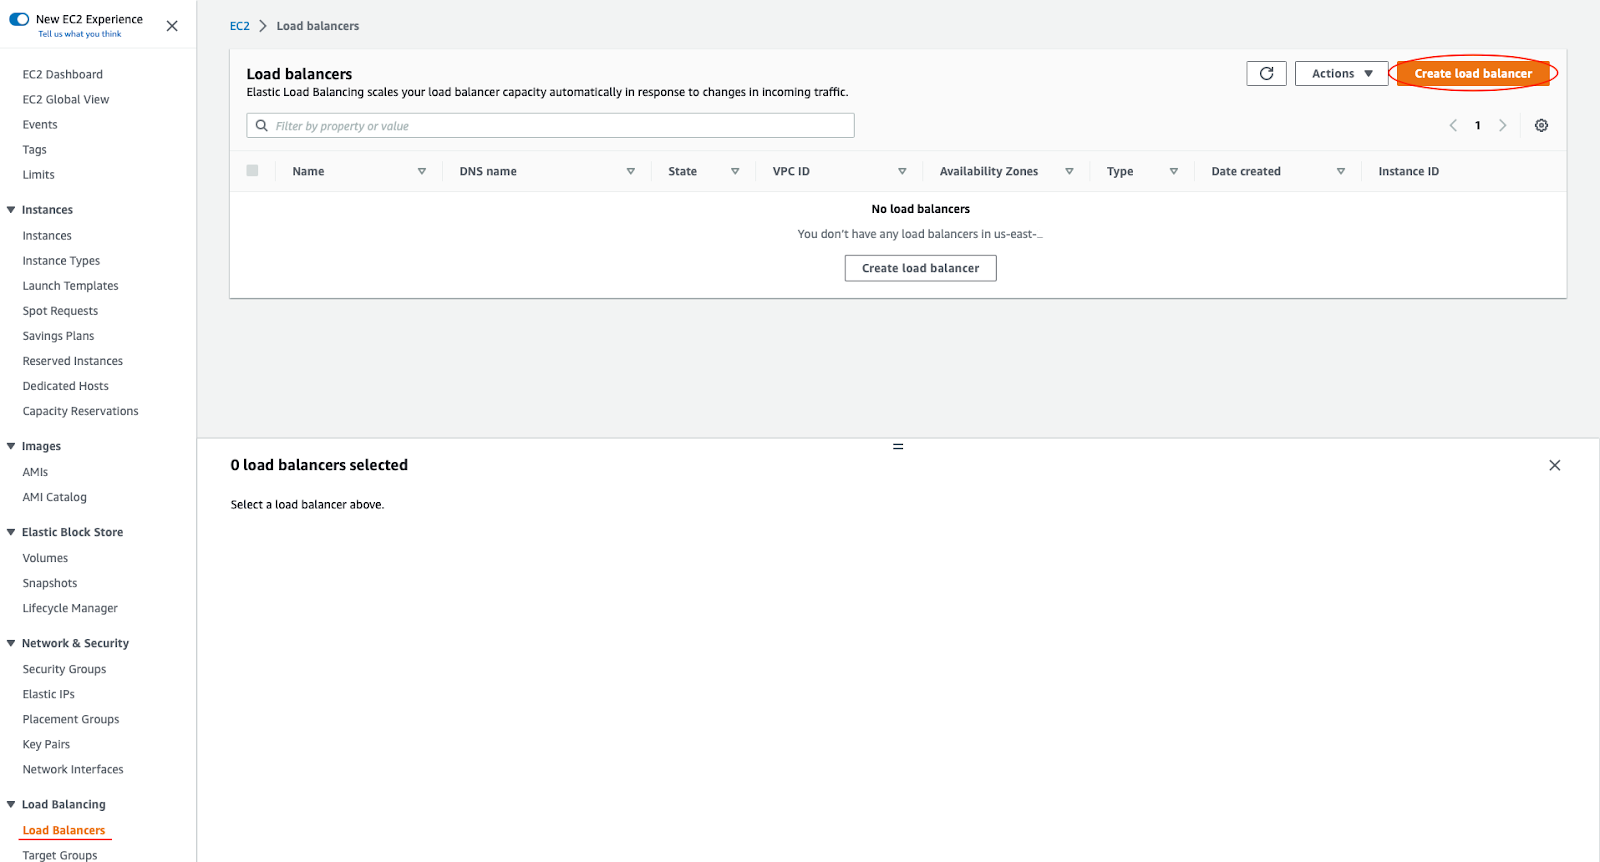
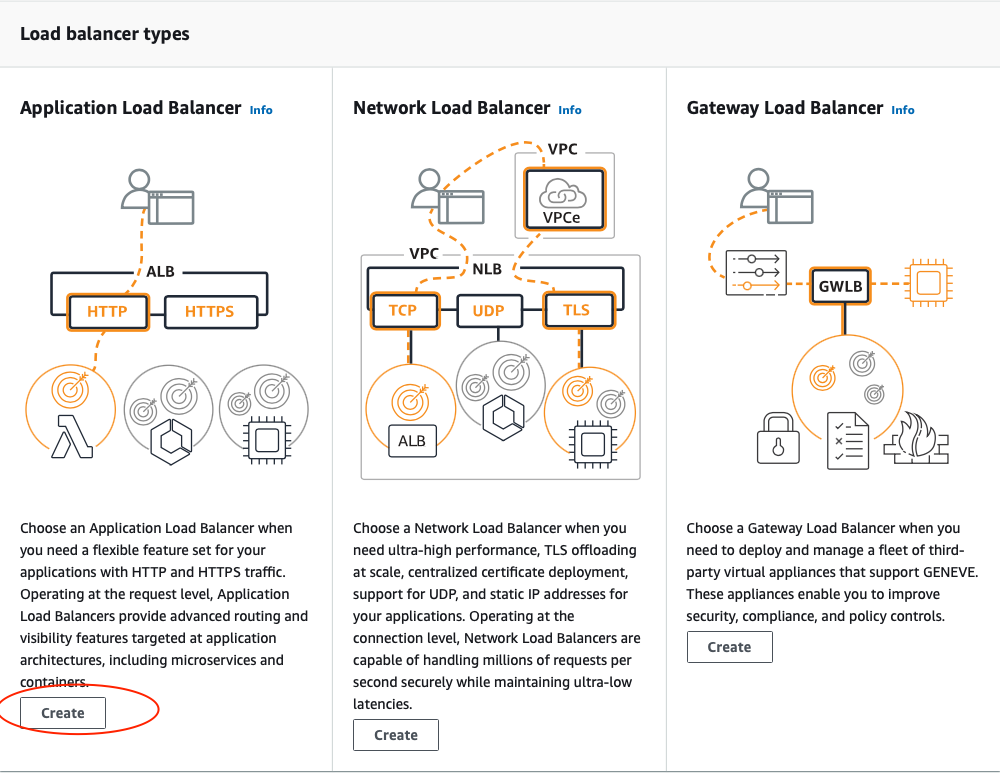
In the given architecture, your frontend tier can only accept traffic from the elastic load balancer which connects directly with the internet gateway while your backend tier will receive traffic through the internal load balancer. The essence of the load balancer is to distribute load across the EC2 instances serving the application. If however, the application is using sessions, then the application needs to be rewritten so that sessions can be stored in either the Elastic Cache or the DynamoDB. To create the first of two load balancers needed in your architecture, navigate to the Load Balancer page and click on Create Load Balancer.
Internet facing load balancer
Select the Application Load Balancer. Click on the Create button.
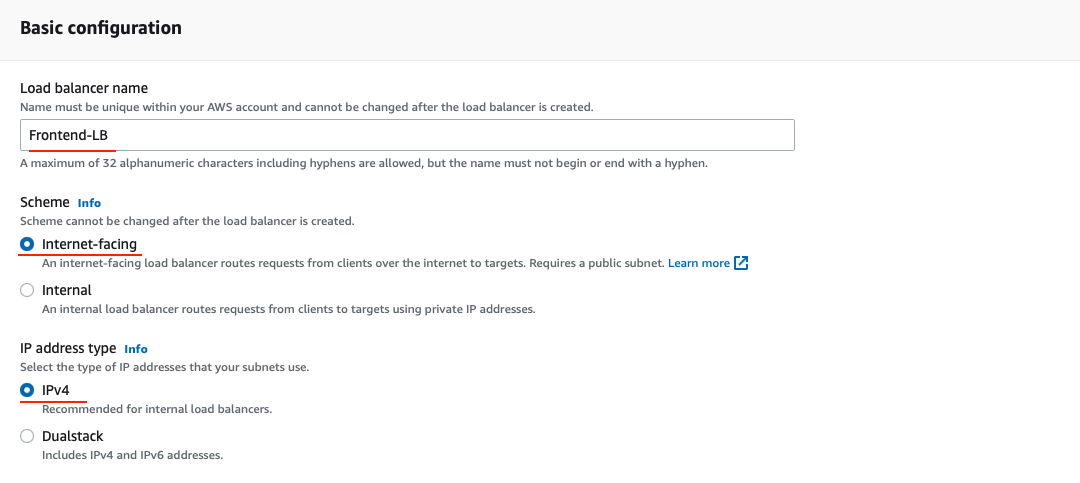
Configure the Load Balancer with a name. Select the internet facing for the load balancer that you will use to communicate with the frontend.
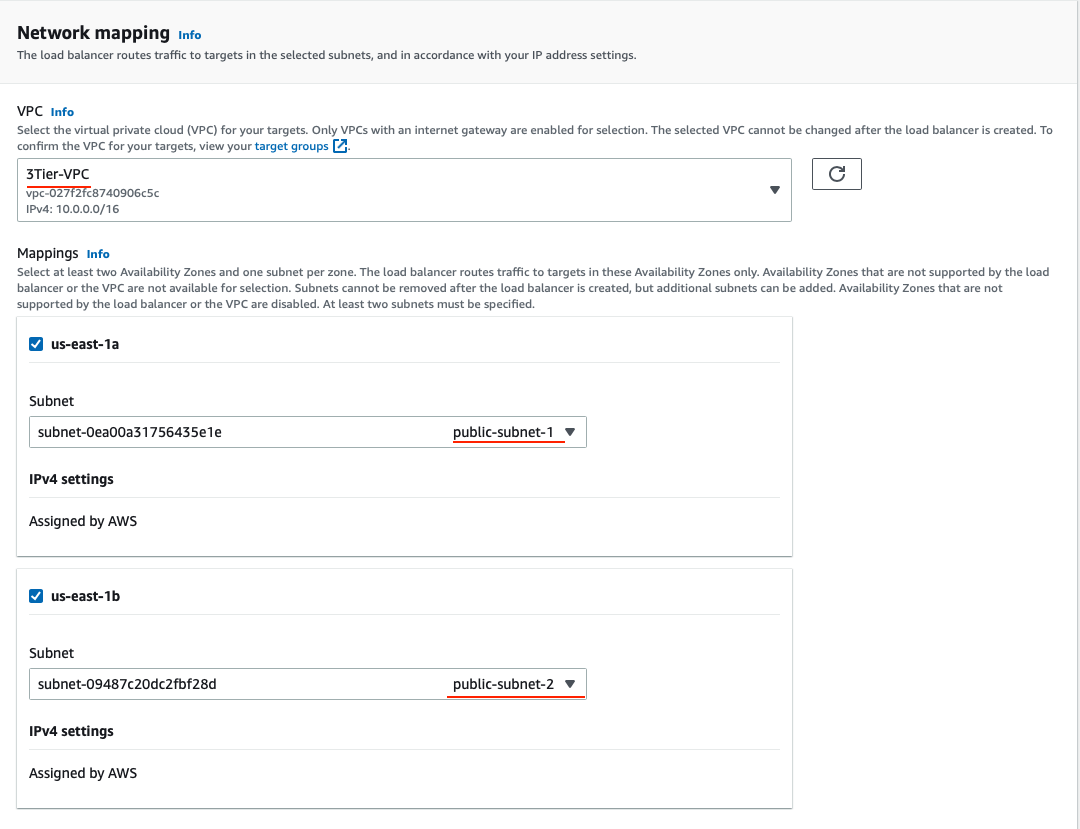
Under the Availability Zone, select the two public subnets from our VPC. Click Configure Security Groups.
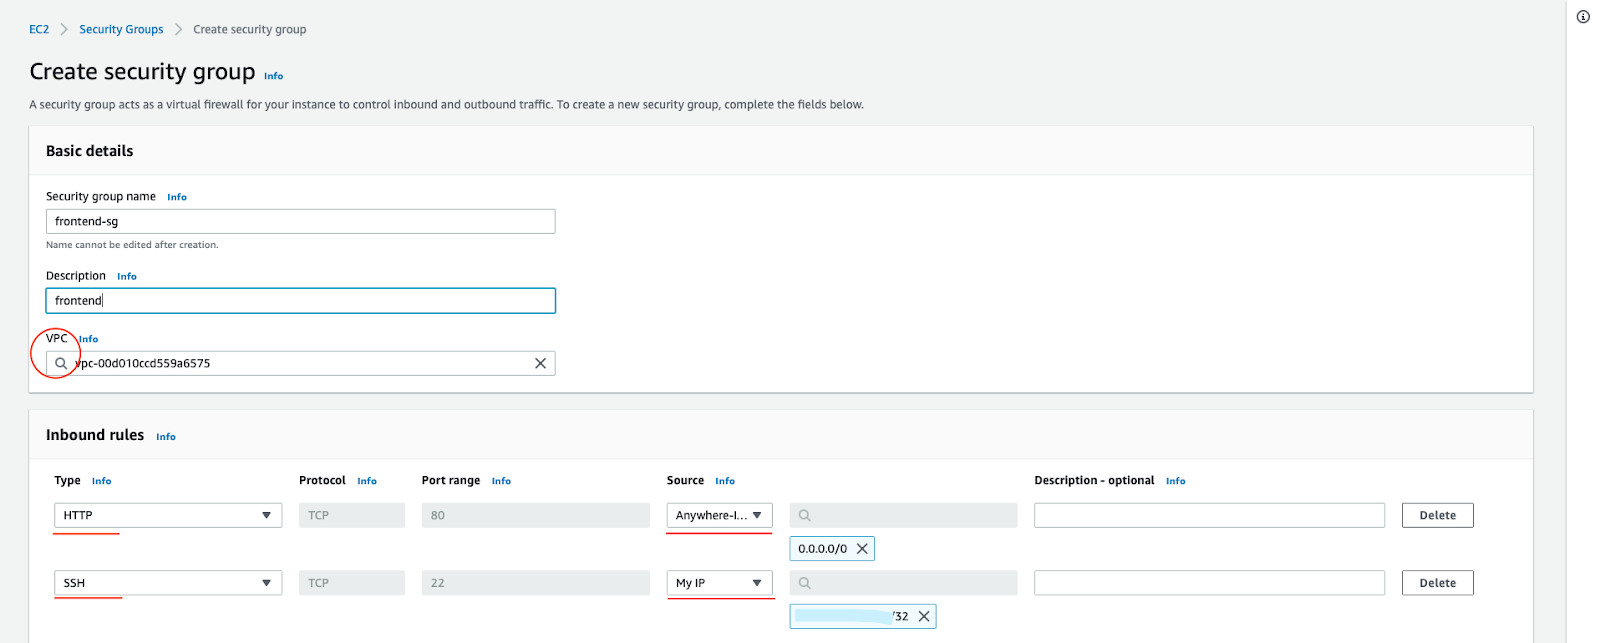
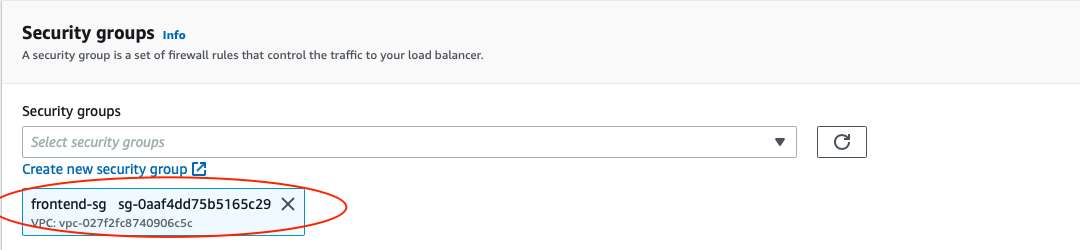
Under the Security Group, create a new security group and only allow ports that the application needs.

For instance, you need to allow HTTP port 80 on your internet facing load balancer. Also specify the SSH port 22 from your personal IP.
Back in the Load Balancer configuration, make sure your new Security Group is the only one selected.
Next, under the Listeners and Routing, you need to configure your Target Group to have the Target type of instance. Give the Target Group a name that will enable you to identify it. This will be needed when you will create your Auto Scaling Group. For example, you can name the Target Group of our frontend to be Frontend-TG.
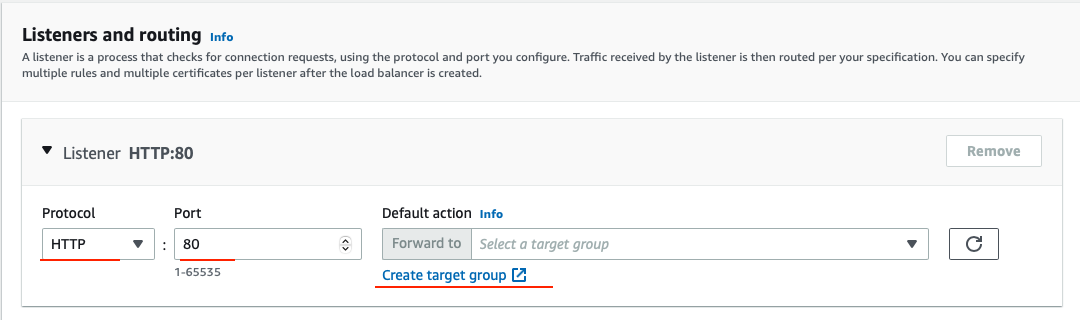
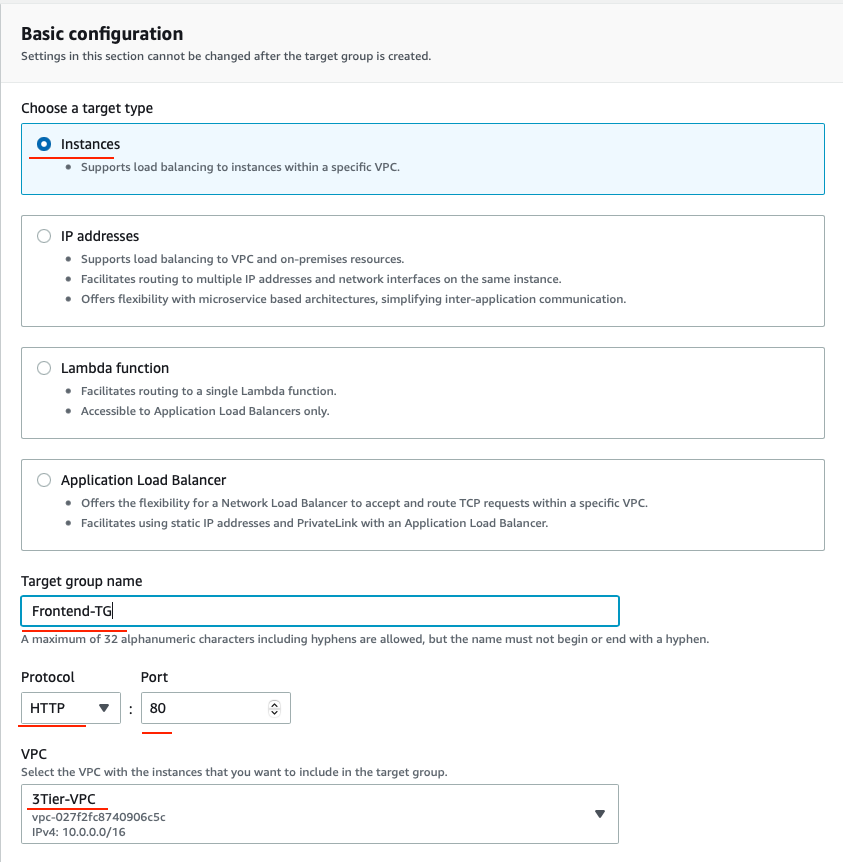
Leave rest as their default values and click Next. Skip the Register Targets and then go ahead and click on the Create target group button.
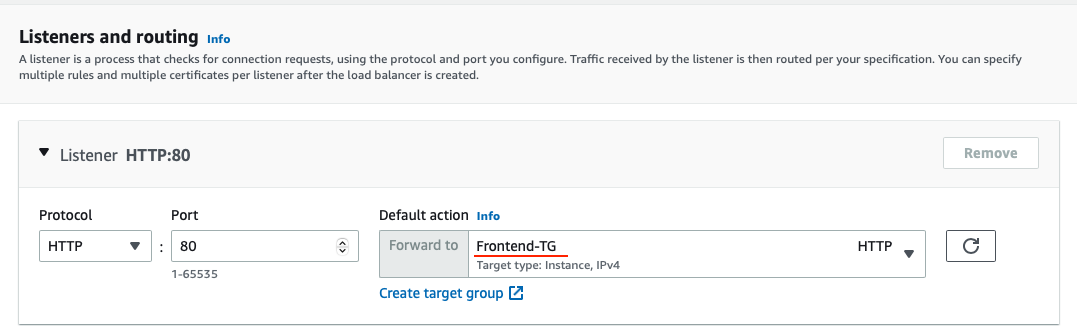
Back in the Load Balancer configuration make sure you select your newly created target group.
Scroll down to the summary, it should look similar to this:
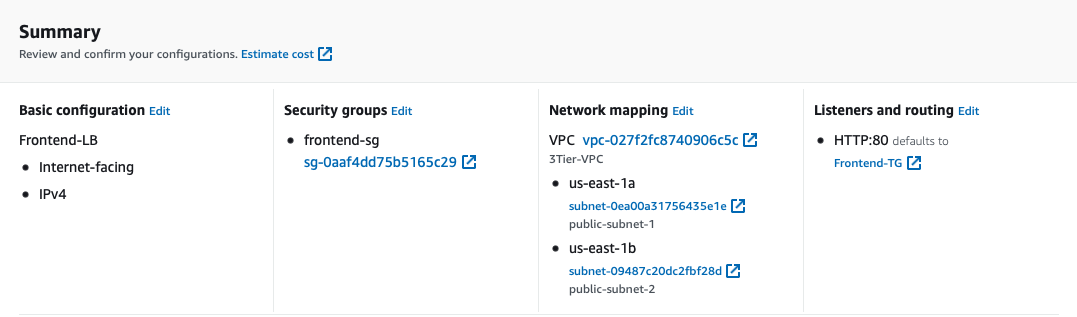
Review it and click Create load balancer.
Internal load balancer
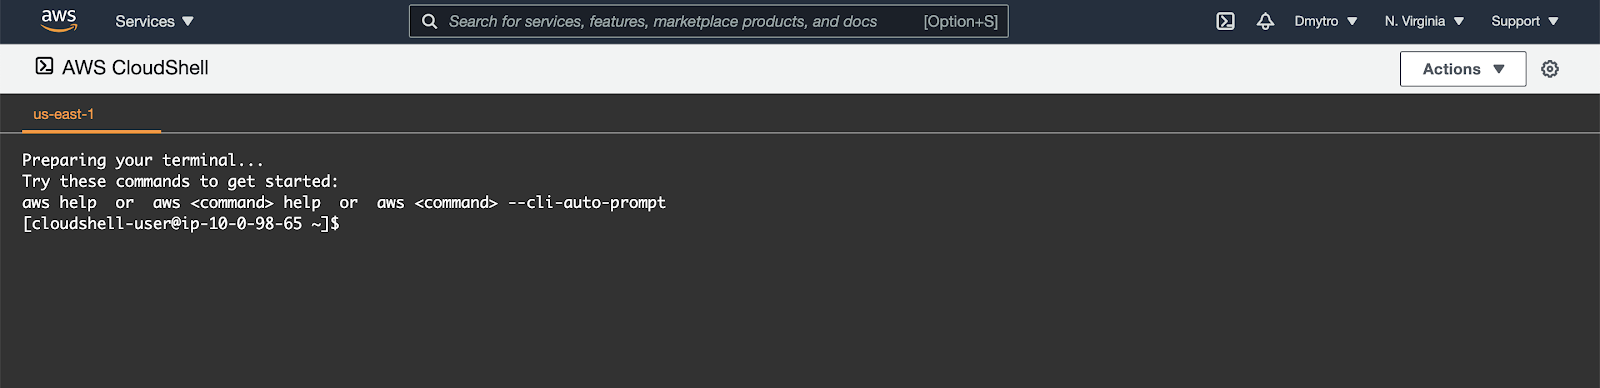
You will do some of the work from the Amazon Cloud Shell, a command line environment running in the Cloud. This virtual machine is loaded with all the development tools you'll need (aws cli, python) and offers a persistent 1GB home directory and runs in AWS, greatly enhancing network performance and authentication. Open the Amazon Cloud Shell by clicking on the icon on the top right of the screen:

You should see the shell prompt open in the new tab:
First, we need to find the IDs of our private subnets as well as VPC and our frontend security group and save them to variables.
$ export PRIVATE_SUB_1=$(aws ec2 describe-subnets \
  --filter Name=tag:Name,Values=private-subnet-1 \
  --query 'Subnets[0].SubnetId' \
  --output text)
$ export PRIVATE_SUB_2=$(aws ec2 describe-subnets \
--filter Name=tag:Name,Values=private-subnet-2 \
--query 'Subnets[0].SubnetId' \
--output text)$ export VPC=$(aws ec2 describe-vpcs \
--filter Name=tag:Name,Values=YOUR_VPC_NAME \
--query 'Vpcs[0].VpcId' \
--output text)$ export PUBLIC_SG=$(aws ec2 describe-security-groups \
--filter Name=group-name,Values=frontend-sg \
--query 'SecurityGroups[0].GroupId' \
--output text)Next, we need to create and configure a backend security group to allow access only from the front end security group to SSH port and traffic port, and also VPC CIDR to traffic port for health checks. This will allow only the frontend to have access to the backend within your architecture.
$ export PRIVATE_SG=$(aws ec2 create-security-group \
  --group-name backend-sg \
  --description "Backend security group" \
  --vpc-id ${VPC} --query 'GroupId' \
  --output text)
Now configure the rules:
$ aws ec2 authorize-security-group-ingress \
  --group-id ${PRIVATE_SG} \
  --protocol tcp \
  --port 80 \
  --cidr 10.0.0.0/16
$ aws ec2 authorize-security-group-ingress \
  --group-id ${PRIVATE_SG} \
  --protocol tcp \
  --port 22 \
  --source-group ${PUBLIC_SG}
$ aws ec2 authorize-security-group-ingress \
  --group-id ${PRIVATE_SG} \
  --protocol tcp \
  --port 80 \
  --source-group ${PUBLIC_SG}
Next, create a backend load balancer:
$ aws elbv2 create-load-balancer \
  --name Backend-LB \
  --type application \
  --subnets ${PRIVATE_SUB_1} ${PRIVATE_SUB_2} \
  --scheme=internal \
  --security-groups ${PRIVATE_SG} \
  --ip-address-type ipv4


Output:
{
    "LoadBalancers": [
        {
            "LoadBalancerArn": "arn:aws:elasticloadbalancing:us-east-1::loadbalancer/app/Backend-LB/xxxxx",
            "DNSName": "internal-Backend-LB-xxxxxx.us-east-1.elb.amazonaws.com",
            ...
    ]
}
As an output of the previous command you should receive a JSON with LB attributes. Note the DNSName, as we're going to need it later.
Finally, create a target group and save the target group's Amazon Resource Number for later use.
$ export BACKEND_TG_ARN=$(aws elbv2 create-target-group \
  --name Backend-TG \
  --protocol HTTP \
  --port 80 \
  --health-check-port 80 \
  --health-check-path / \
  --vpc-id ${VPC} --query 'TargetGroups[0].TargetGroupArn' \
--output text)$ cat <<EOF > ~/variables.sh
export PRIVATE_SG=$PRIVATE_SG
export BACKEND_TG_ARN=$BACKEND_TG_ARN
export PRIVATE_SUB_1=$PRIVATE_SUB_1
export PRIVATE_SUB_2=$PRIVATE_SUB_2
EOFYou can simply create like two EC2 instances and directly attach these EC2 instances to your load balancer. The problem with it is that your application will no longer scale to accommodate traffic or shrink when there is no traffic to save cost. With Auto Scaling Group, you can achieve this feat. Auto Scaling Group can automatically adjust the size of the EC2 instances serving the application based on need. This is what makes it a good approach rather than directly attaching the EC2 instances to the load balancer.
Frontend ASG
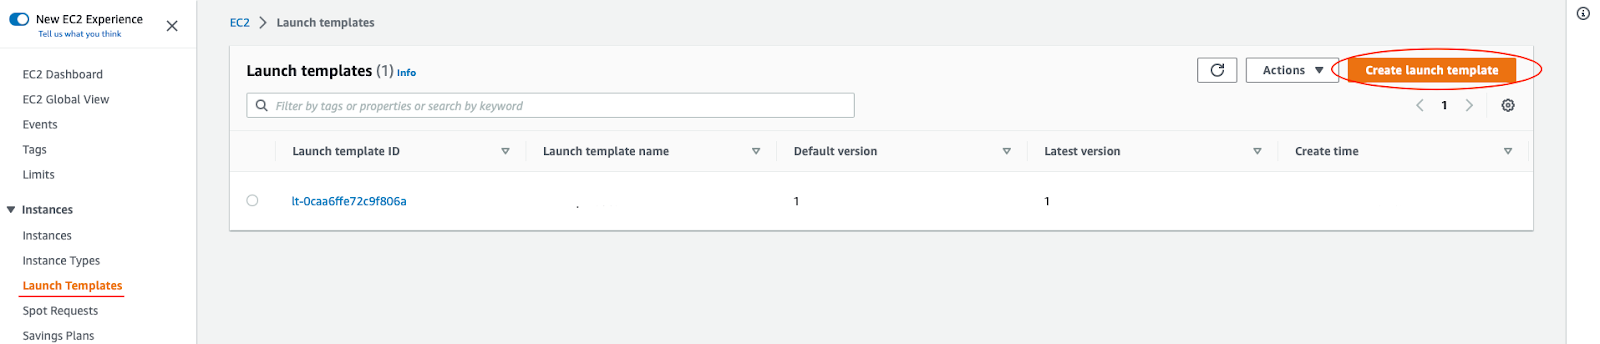
To create an Auto Scaling Group, they need to have a common configuration that instances within it will have. Navigate to the EC2 Launch Templates page, Click on the Create Launch template button.
Under the Launch template name, give it a name, e.g. Frontend-LT.
Also, select the Auto Scaling guidance to let AWS help you with what options are required for using this template with ASG.
In Launch template content, under the Application and OS Images, the best practice is to choose the AMI which contains the application and its dependencies bundled together. For this, you can also create your custom AMI in AWS. But for wow you will use the Amazon Linux 2 AMI. Select the Quick start tab and Amazon Linux option:

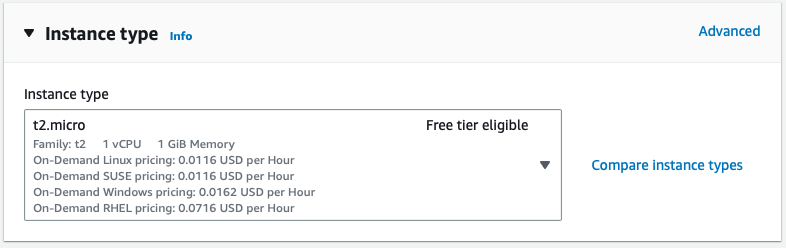
Choose the appropriate instance type. For this lab, I recommend you choose t2.micro so that you do not incur charges.
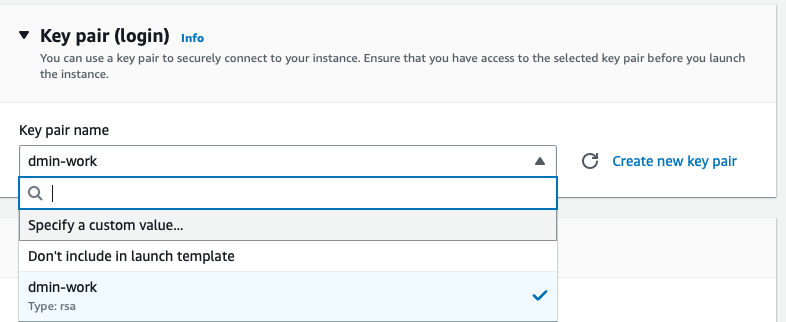
In the Key pair (login) section go ahead and create a new key pair or use your if you already have one. Ensure you download it before proceeding.
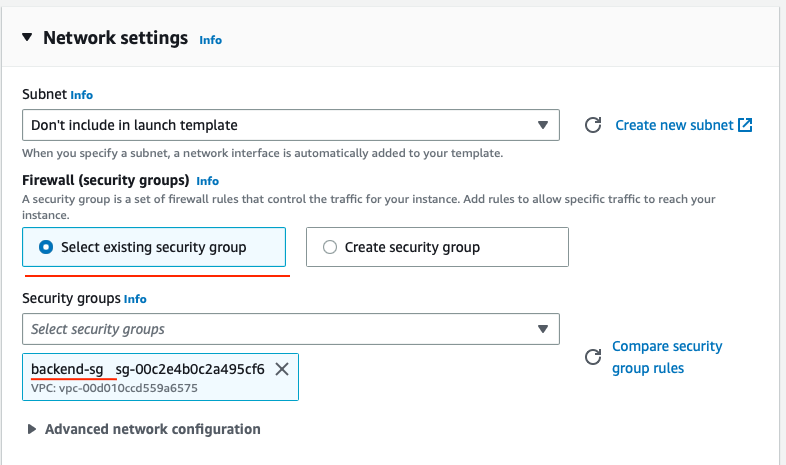
In the Network settings section choose backend-sg.
Also, under the Additional details scroll all the way down and paste the following script as the User data that is needed to install dependencies and start the application. You will use a simple NGINX to emulate a frontend application.
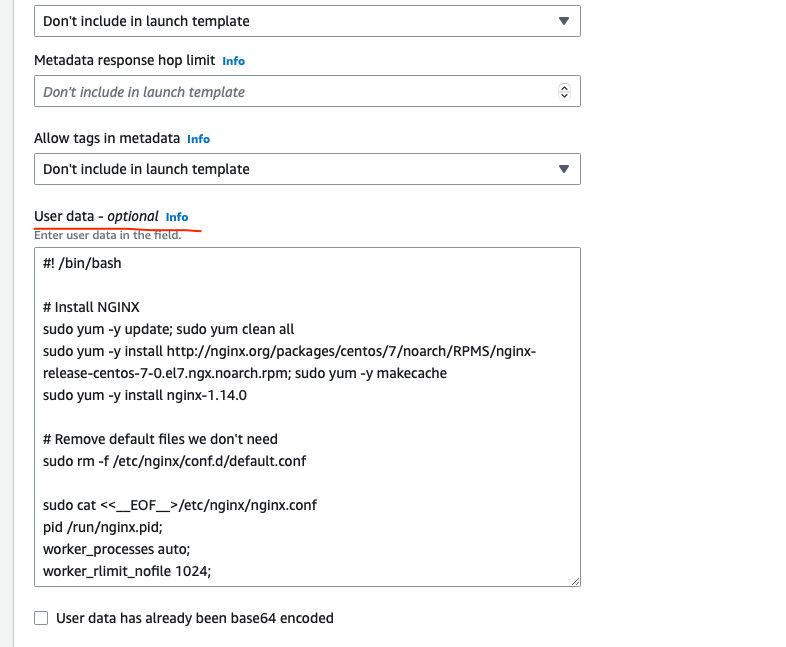
#! /bin/bash

# Install NGINX
sudo yum -y update; sudo yum clean all
sudo yum -y install http://nginx.org/packages/centos/7/noarch/RPMS/nginx-release-centos-7-0.el7.ngx.noarch.rpm; sudo yum -y makecache
sudo yum -y install nginx-1.14.0

# Remove default files we don't need
sudo rm -f /etc/nginx/conf.d/default.conf

sudo cat <<__EOF__>/etc/nginx/nginx.conf
pid /run/nginx.pid;
worker_processes auto;
worker_rlimit_nofile 1024;

events {
        multi_accept on;
        worker_connections 1024;
}

http {
    upstream myapp {
        server INTERNAL_LOADBALANCER_DNS_NAME;
    }

    server {
        listen 80 default_server;
        server_name "";
        location / {
            proxy_pass http://myapp;
            proxy_set_header Host \$host;
            proxy_http_version 1.1;
            proxy_read_timeout 120s;
        }
    }
}
__EOF__
sudo systemctl restart nginx
Review the Configuration and Click on Create Launch Template button.
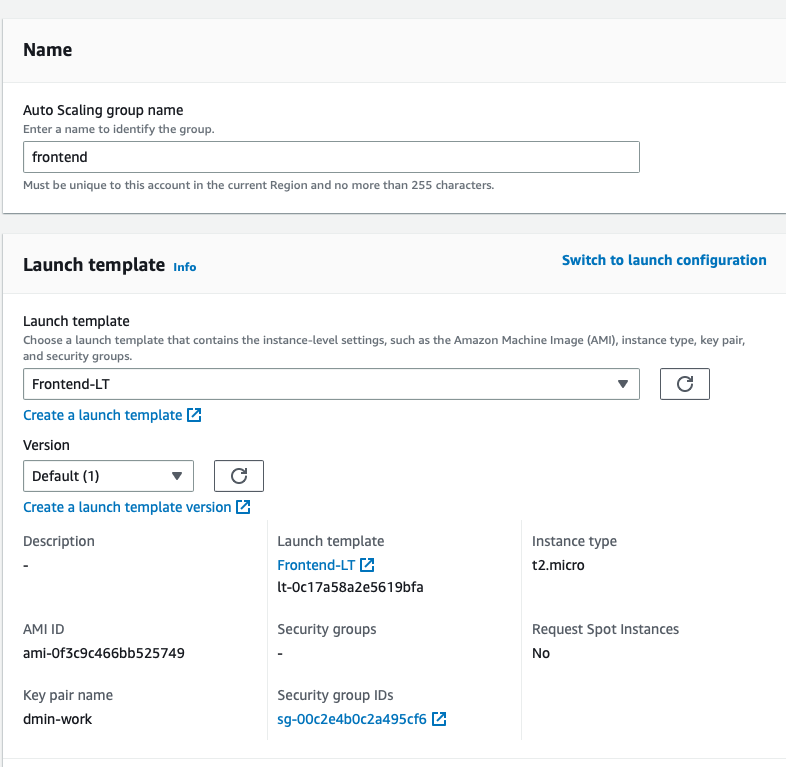
Now you have your Launch Template, you can finish up with the creation of our first Auto Scaling Group. Go to the Autoscaling Groups console and click Create Auto scaling group.
Enter a name for your ASG and switch to the launch configuration and choose your Launch Template (e.g, Frontend-LT). Then click Next.
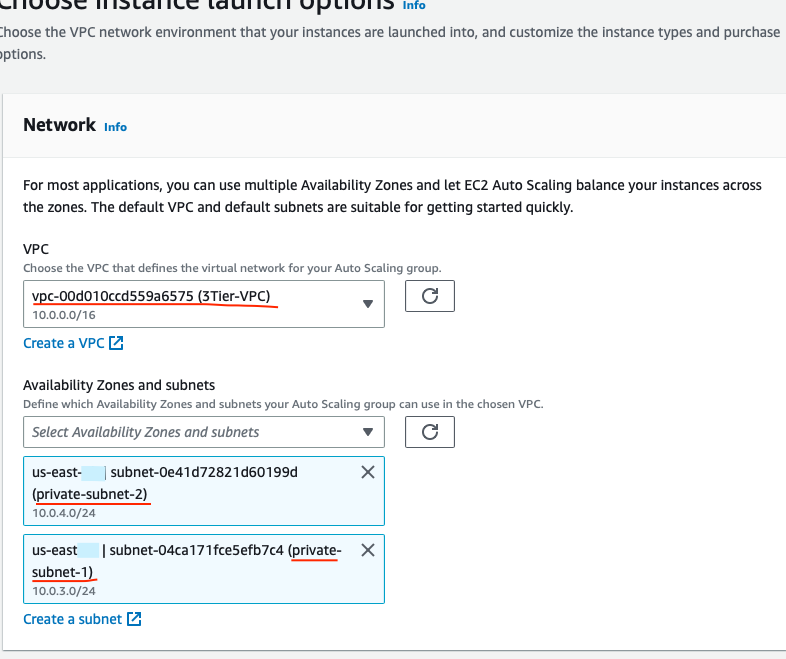
In Configure settings choose your 3Tier-VPC and two private subnets. Click Next.
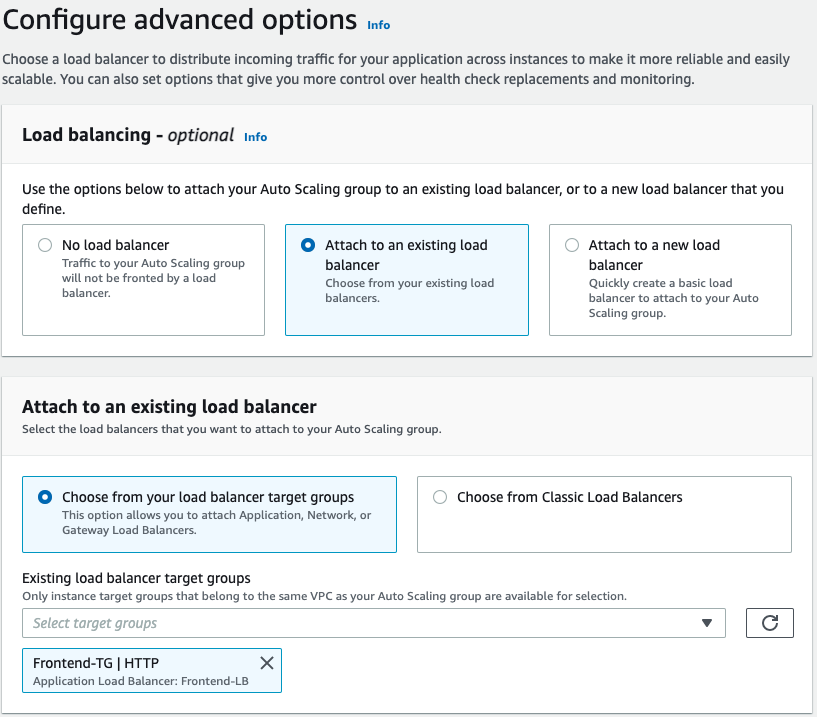
In the Configure advanced options section choose Attach to an existing load balancer. In the Existing load balancer target groups select your Frontend-TG target group.
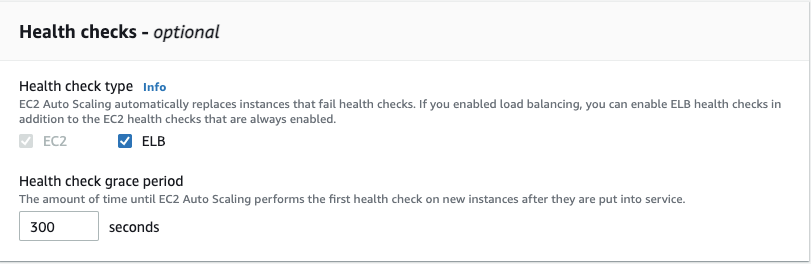
Scroll down to the Health checks. Tick the ELB health check checkbox. Click Next.
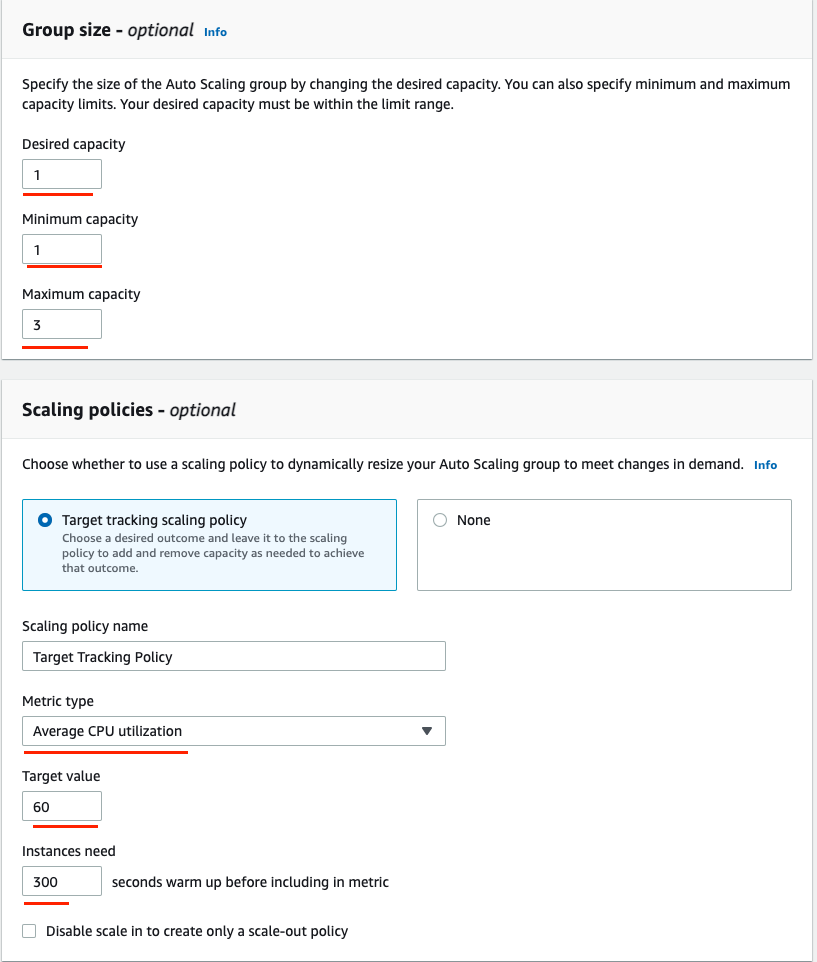
Under the Configure group size and scaling policies, you want to add instances when the CPU is greater than or equal to 60%. Use the following image as a template. Click Skip to Review.
In Review and scroll down and click on the Create Auto Scaling group button.
Backend ASG
For the backend - switch to the Cloud Shell tab.
First, create a User Data file:
$ vi ~/script.shPaste the following content and save the file. We will use a simple HTML game to serve as an example application.
#! /bin/bash

sudo apt-get update
sudo apt-get install -y git apache2
cd /var/www/html
sudo rm index.html -f
sudo git init
sudo git pull https://github.com/DmyMi/2048.git
TOKEN=`curl -X PUT "http://169.254.169.254/latest/api/token" -H "X-aws-ec2-metadata-token-ttl-seconds: 21600"`
ZONE=$(curl -H "X-aws-ec2-metadata-token: $TOKEN" http://169.254.169.254/latest/meta-data/placement/availability-zone)
sed -i "s|zone-here|$ZONE|" /var/www/html/index.html
sudo systemctl restart apache2
Find a suitable Ubuntu AMI:
$ export AMAZON_AMI_ID=$(aws ec2 describe-images \
  --filters "Name=root-device-type,Values=ebs" \
  "Name=name,Values=ubuntu/images/hvm-ssd/ubuntu-jammy-22.04-amd64-server-*" \
  "Name=owner-alias,Values=amazon" \
--query 'Images[0].ImageId' --output text)Before creating a Launch Template, export your Key pair name you used in previous step:
$ export KEY_PAIR=your_key_pair_name_hereTo create a Launch Template we need to have its configuration specified as JSON.
$ cat <<EOF > ~/backend.json
{
    "ImageId": "${AMAZON_AMI_ID}",
    "InstanceType": "t2.micro",
    "SecurityGroupIds": [
        "${PRIVATE_SG}"
    ],
    "KeyName": "${KEY_PAIR}",
    "MetadataOptions": {
        "HttpEndpoint": "enabled"
    },
    "UserData": "$(cat ~/script.sh | base64 -w 0)"
}
EOF
With the configuration ready we can create the Launch Template:
$ export LT_ID=$(aws ec2 create-launch-template \
  --launch-template-name Backend-LT \
  --launch-template-data file://${HOME}/backend.json \
  --query 'LaunchTemplate.LaunchTemplateId' \
  --output text)
Now, you are ready to create an autoscaling group.
$ aws autoscaling create-auto-scaling-group \
  --auto-scaling-group-name backend \
  --launch-template LaunchTemplateId=${LT_ID} \
  --min-size 1 \
  --max-size 3 \
  --desired-capacity 1 \
  --target-group-arns ${BACKEND_TG_ARN} \
  --vpc-zone-identifier ${PRIVATE_SUB_1},${PRIVATE_SUB_2} \
  --health-check-type ELB \
  --health-check-grace-period 300
Finally, create a create a listener for your load balancer with a default rule that forwards requests to your target group:
$ export LB_ARN=`aws elbv2 describe-load-balancers --names Backend-LB --query 'LoadBalancers[0].LoadBalancerArn' --output text`
$ aws elbv2 create-listener \
  --load-balancer-arn ${LB_ARN} \
  --protocol HTTP --port 80  \
  --default-actions Type=forward,TargetGroupArn=${BACKEND_TG_ARN}
Get the Frontend LB DNS Name:
$ aws elbv2 describe-load-balancers --names Frontend-LB | jq -r .LoadBalancers[0].DNSNameWait for ~5 minutes till the instances are health checked and navigate to the LB in the browser. You should see a HTML game :)
You have almost set up your architecture. However, you cannot SSH into the EC2 instances in the private subnet. This is because you have not created your bastion host. Creating a Bastion host is fairly simple.
The bastion host is just an EC2 instance that sits in the public subnet. The best practice is to only allow SSH to this instance from your trusted IP. To create a bastion host, navigate to the EC2 instance page.
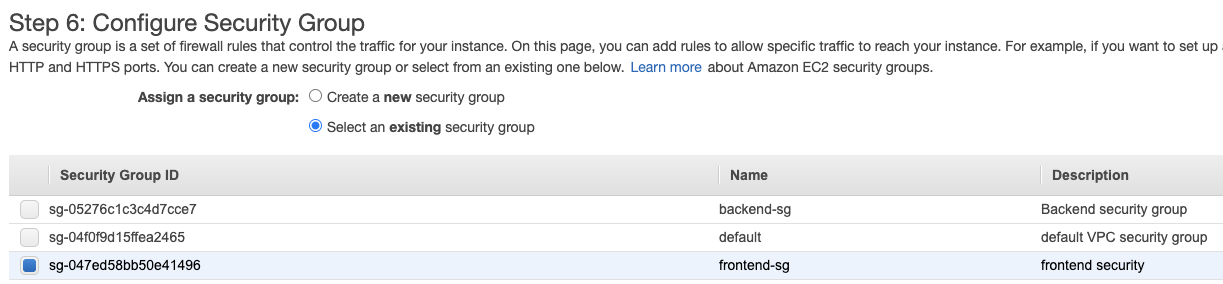
Create an EC2 instance in the public-subnet-1 subnet within your VPC. Also, ensure that it has public IP.
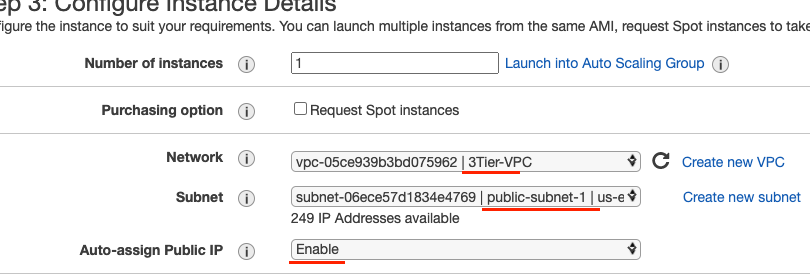
Ensure it has the Frontend security Group attached to it.
To SSH to your private instances from the Bastion Host you need to use it as a jump host from the computer that has your private SSH key:
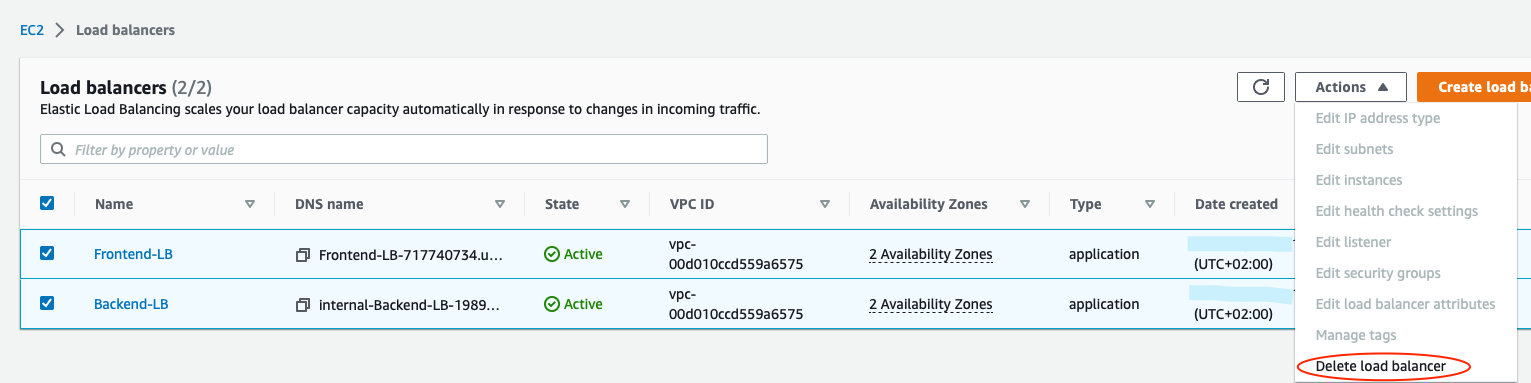
$ ssh -J ec2-user@BASTION_PUBLIC_IP ubuntu@BACKEND_INSTANCE_PRIVATE_IPGo to Load Balancers page
Select both load balancers and in Actions choose delete.
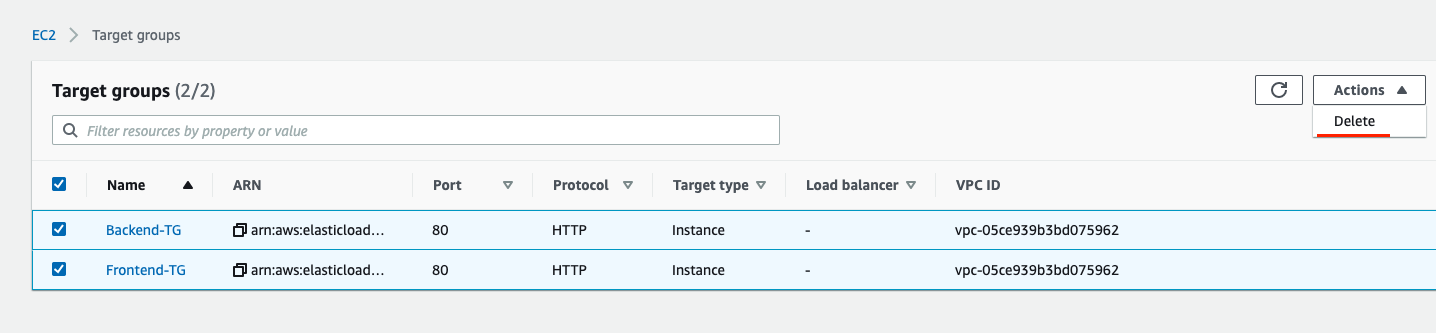
Do the same for Target Groups.
Next, clean up Auto scaling groups.

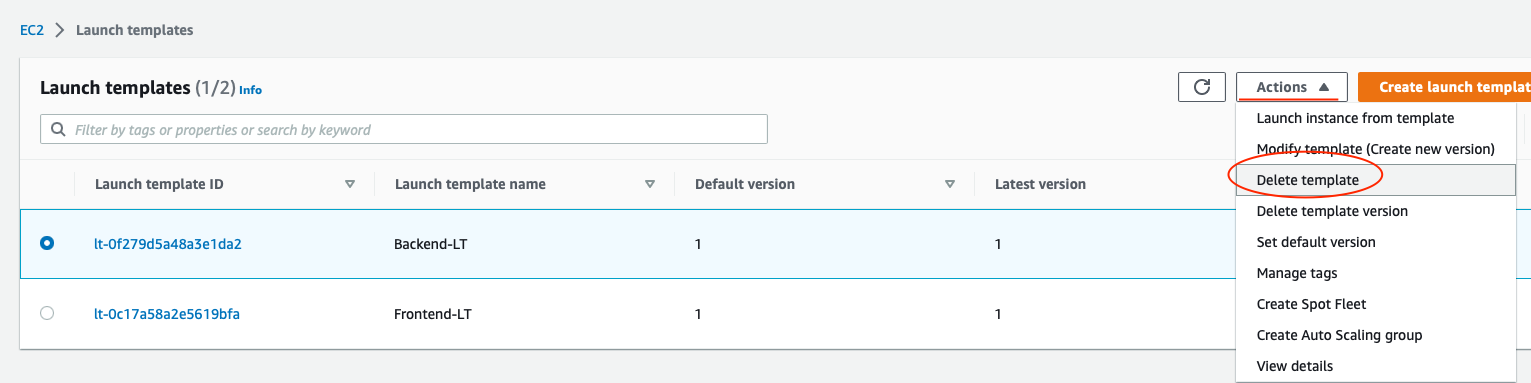
And Launch templates. You need to delete each individually.
Next, go to NAT Gateways and delete the NAT Gateway.

Wait till the NAT Gateway is deleted and release its static IP (might need to wait for up to 5 minutes till the IP is detached from interface).

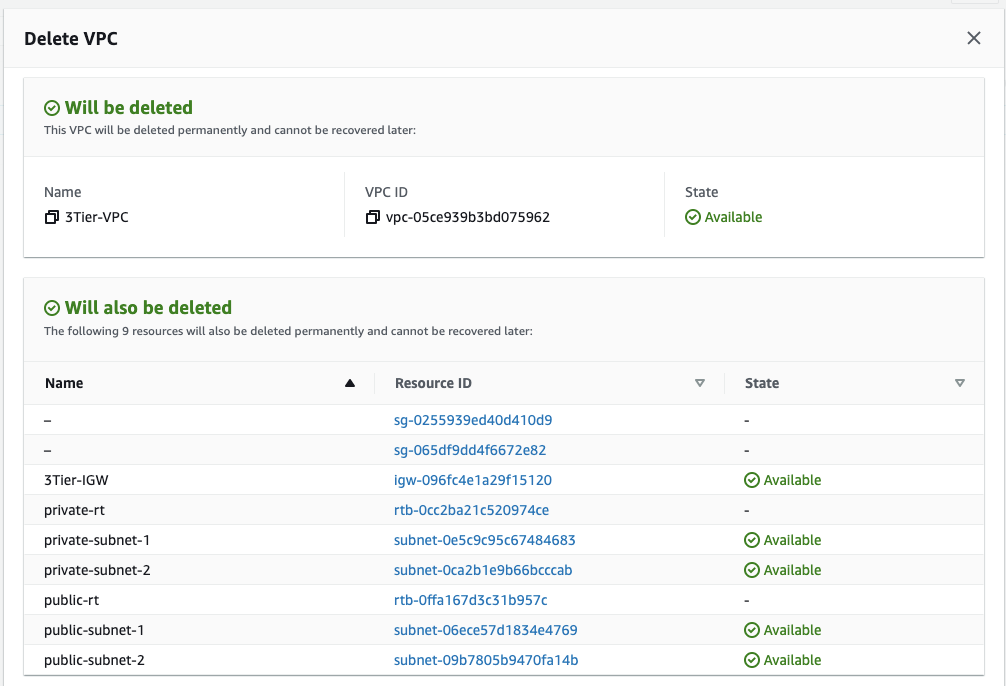
Finally, go to VPCs.
And delete it.

It should cascade delete other network resources associated with it.
What's next?
More AWS functionality ;)