Last Updated: 2023-03-27
CodePipeline
AWS CodePipeline is a fully managed continuous delivery service that helps you automate your release pipelines for fast and reliable application and infrastructure updates. CodePipeline automates the build, test, and deploy phases of your release process every time there is a code change, based on the release model you define. This enables you to rapidly and reliably deliver features and updates.
You can easily integrate AWS CodePipeline with third-party services such as GitHub or with your own custom plugin. With AWS CodePipeline, you only pay for what you use. There are no upfront fees or long-term commitments.
What you'll build
In this codelab, you will configure CodePipeline to build and deploy a small application to Kubernetes using Helm.
What you'll need
- A recent version of your favorite Web Browser
- Basics of BASH
Open Cloud Shell
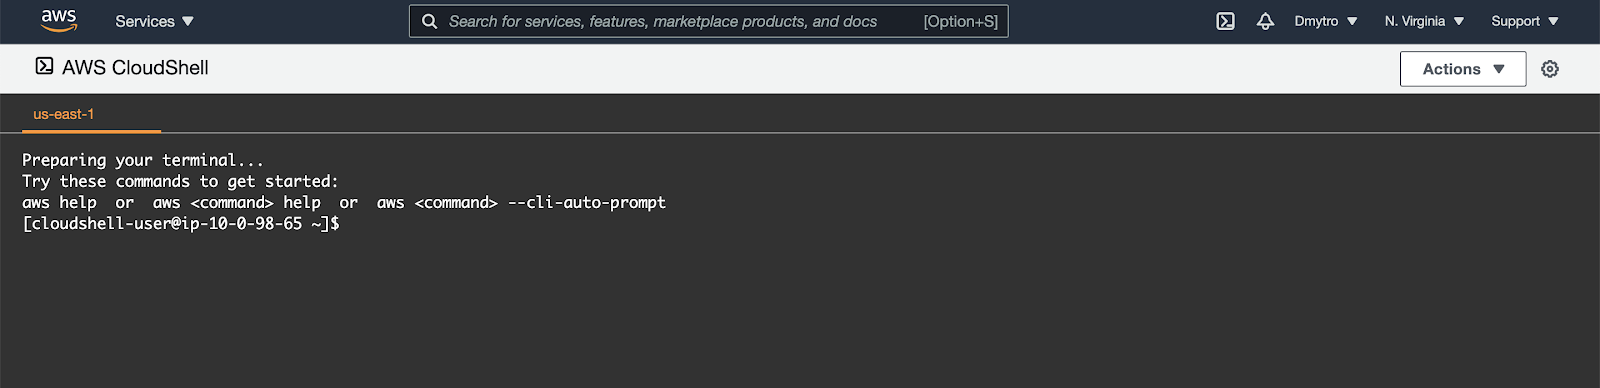
You will do some of the work from the Amazon Cloud Shell, a command line environment running in the Cloud. This virtual machine is loaded with all the development tools you'll need (aws cli, python) and offers a persistent 1GB home directory and runs in AWS, greatly enhancing network performance and authentication. Open the Amazon Cloud Shell by clicking on the icon on the top right of the screen:

You should see the shell prompt open in the new tab:
Install Helm
Start by installing the helm command line client.
$ wget https://get.helm.sh/helm-v3.11.2-linux-amd64.tar.gz
$ tar -zxvf helm-v3.11.2-linux-amd64.tar.gz
$ sudo mv linux-amd64/helm /usr/local/bin/helm
Setup Amazon ECR
Export the required variables:
$ export REGION="us-east-1"
$ export REPO_PREFIX="your-name"
After that you can run the following command to create a repository for the demo project.
$ aws ecr create-repository \
  --repository-name "${REPO_PREFIX}-coolapp" \
  --image-scanning-configuration scanOnPush=true \
  --region "${REGION}"
Initial setup
Before creating a cluster, you must install and configure the following tools:
kubectl– A command line tool for working with Kubernetes clusters.eksctl– A command line tool for working with EKS clusters that automates many individual tasks.
To install eksctl, run the following:
$ curl --silent --location "https://github.com/weaveworks/eksctl/releases/latest/download/eksctl_$(uname -s)_amd64.tar.gz" |\
  tar xz -C /tmp
$ sudo mv -v /tmp/eksctl /usr/local/bin
Confirm the eksctl command works:
$ eksctl versionTo install kubectl, run the following:
$ curl -Lo kubectl https://storage.googleapis.com/kubernetes-release/release/$(curl -s https://storage.googleapis.com/kubernetes-release/release/stable.txt)/bin/linux/amd64/kubectl
$ chmod +x ./kubectl
$ sudo mv ./kubectl /usr/local/bin/kubectl
Create a Cluster
Using eksctl you can create a cluster by simply running the eksctl create cluster command and supplying all the required flags. But as there are many configuration options the command can become very large. Instead, we can create a YAML file with all the options and supply it as input (replacing your_name_here with your name):
$ export ACCOUNT_ID=`aws sts get-caller-identity --query "Account" --output text`
$ export YOUR_NAME=your_name_here
$ cat << EOF > ekscfg.yaml
---
apiVersion: eksctl.io/v1alpha5
kind: ClusterConfig

metadata:
  name: ${YOUR_NAME}-eks
  region: us-east-1

iam:
  serviceRolePermissionsBoundary: "arn:aws:iam::${ACCOUNT_ID}:policy/CustomPowerUserBound"

managedNodeGroups:
- name: nodegroup
  desiredCapacity: 3
  instanceType: t2.small
  ssh:
    allow: false
  iam:
    instanceRolePermissionsBoundary: "arn:aws:iam::${ACCOUNT_ID}:policy/CustomPowerUserBound"
cloudWatch:
  clusterLogging:
    enableTypes: ["api", "audit", "controllerManager"]
availabilityZones: ['us-east-1a', 'us-east-1b', 'us-east-1c', 'us-east-1d']
EOF
Next, create the cluster:
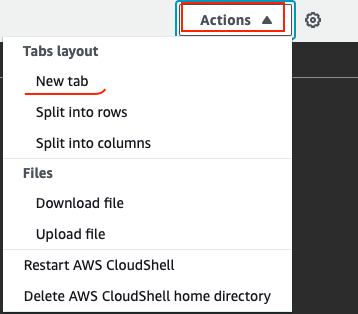
$ eksctl create cluster -f ekscfg.yamlWe won't need the cluster for some time, so while it's being created, open a new Terminal tab in Cloud Shell and go to the next section.
Go to the AWS Developer Tools console.
From the Developer tools left menu, in the Source section, choose Get started and then Create Repository button.
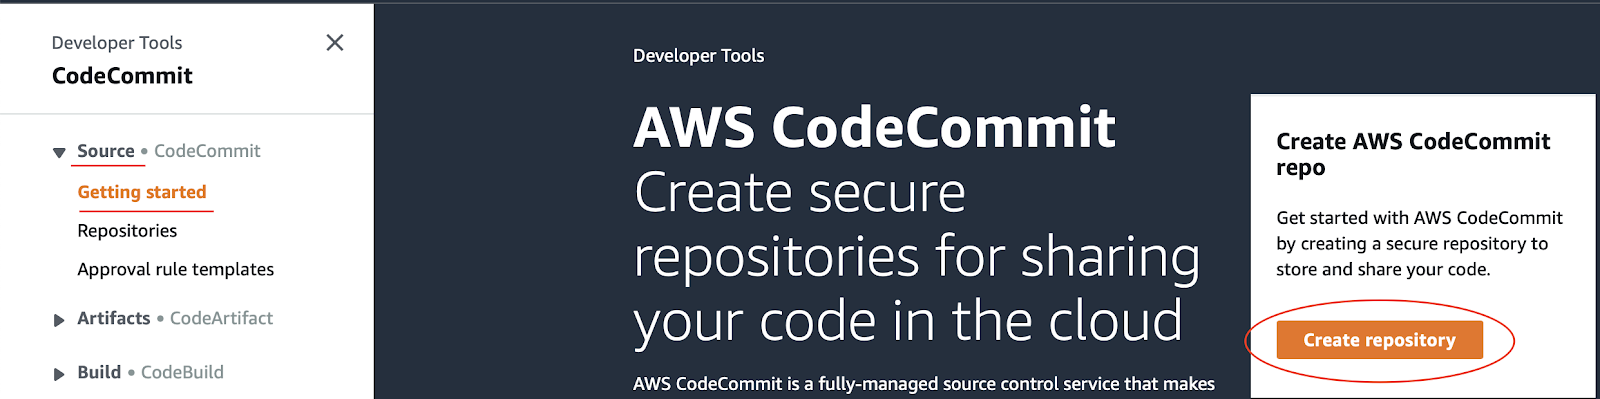
Provide a Repository Name of YOUR_NAME-codepipeline (replacing YOUR_NAME with your name 😀 ) and click Create.

In the Cloud Shell, enter the following to create a folder called devops. Then change to the folder you just created.
$ mkdir devops
$ cd devops
Now clone the empty repository you just created.
$ export YOUR_NAME=your-name-here
$ git clone codecommit::us-east-1://${YOUR_NAME}-codepipelineThe previous command created an empty folder called YOUR_NAME-codepipeline. Change to that folder.
$ cd ${YOUR_NAME}-codepipelineCreate the application
You need some source code to manage. So, you will create a simple Go web application.
In Cloud Shell, type the following to create a Golang module.
$ go mod init example.devopsNext, type the following to create a Golang starting point.
$ vi main.goIn the Vi Editor paste the following:
package main

import (
        "fmt"
        "log"
        "net/http"
        "os"
)

type Server struct{}

func (s *Server) ServeHTTP(w http.ResponseWriter, r *http.Request) {
        environment := "production"
        if en := os.Getenv("DEVOPS_ENV"); en != "" {
            environment = en
        }
        w.WriteHeader(http.StatusOK)
        w.Header().Set("Content-Type", "application/json")
        w.Write([]byte(fmt.Sprintf(`{"message": "hello from %s"}`, environment)))
}

func main() {
        s := &Server{}
        http.Handle("/", s)
        log.Fatal(http.ListenAndServe(":8080", nil))
}Add a new file called gitignore.
$ vi .gitignoreIn the Vi Editor add the following code and save the file.
# Binaries for programs and plugins
*.exe
*.exe~
*.dll
*.so
*.dylib

# Test binary, built with `go test -c`
*.test

# Output of the go coverage tool, specifically when used with LiteIDE
*.out

# Dependency directories (remove the comment below to include it)
vendor/

.DS_Store
You have some files now, let's save them to the repository. First, you need to add all the files you created to your local Git repo. Run the following:
$ cd ~/devops/${YOUR_NAME}-codepipeline
$ git add --all
Now, let's commit the changes locally.
$ git commit -a -m "Initial Commit"$ git config user.email "you@example.com"
$ git config user.name "Your Name"You committed the changes locally, but have not updated the Git repository you created in Amazon Cloud. Enter the following command to push your changes to the cloud.
$ git push origin masterGo to the CodeCommit and select Repositories web page. Find your repository and navigate to its page. You should see the files you just created.
Test the application locally (Optional)
Back in Cloud Shell, make sure you are in your application's root folder. To run the program, type:
$ cd ~/devops/${YOUR_NAME}-codepipeline
$ go fmt
$ go run main.goTo see the program running, Open a new Terminal tab in Cloud Shell.
In the new tab run:
$ curl http://localhost:8080

{"message": "hello from production"}
To stop the program, switch back to the first tab and press Ctrl+C. You can close the extra tab for now.
Creating the Dockerfile for your application
The first step to using Docker is to create a file called Dockerfile.
$ vi DockerfileEnter the following and Save it.
FROM scratch
WORKDIR /app
COPY ./app .
ENTRYPOINT [ "./app" ]
Next, add a dockerignore file, so that our git repository won't end up in the container:
$ vi .dockerignoreAnd paste the following:
**/.gitEnter the following to make sure you are in the right folder and add your new Dockerfile to Git.
$ cd ~/devops/${YOUR_NAME}-codepipeline
$ git add --all
$ git commit -a -m "Added Docker Support"
Push your changes to the master repository using the following command.
$ git push origin masterGo back to CodeCommit in the AWS Management Console (it will be in another browser tab) and refresh the repository and verify your changes were uploaded.
Create a unit test
First, create a simple test to test the application. Create the file main_test.go:
$ cd ~/devops/${YOUR_NAME}-codepipeline/
$ vi main_test.go
And paste the following content using Vi Editor:
package main

import (
        "io/ioutil"
        "net/http"
        "net/http/httptest"
        "testing"
)

func TestMyHandler(t *testing.T) {
        handler := &Server{}
        server := httptest.NewServer(handler)
        defer server.Close()

        resp, err := http.Get(server.URL)
        if err != nil {
                t.Fatal(err)
        }
        if resp.StatusCode != 200 {
                t.Fatalf("Received non-200 response: %d\n", resp.StatusCode)
        }
        expected := `{"message": "hello from production"}`
        actual, err := ioutil.ReadAll(resp.Body)
        if err != nil {
                t.Fatal(err)
        }
        if expected != string(actual) {
                t.Errorf("Expected the message '%s'\n", expected)
        }
}
Verify the test is working by running the following:
$ go test ./ -v -shortFinally, push the application code to CodeCommit Repositories.
$ cd ~/devops/${YOUR_NAME}-codepipeline
$ git add --all
$ git commit -a -m "Added Unit Test"
$ git push origin master
Now we are ready to create a CodePipeline.
Create IAM Role
In an AWS CodePipeline, we are going to use AWS CodeBuild to deploy changes to our EKS, so we need to have an IAM Role with required permissions.
First, create an Assume Role policy document to delegate permissions to CodeBuild & CodePipeline:
$ cat << EOF > /tmp/Trust-Policy.json
{
    "Version": "2012-10-17",
    "Statement": [
        {
            "Effect": "Allow",
            "Principal": {
                "Service": "codebuild.amazonaws.com"
            },
            "Action": "sts:AssumeRole"
        },
        {
            "Effect": "Allow",
            "Principal": {
                "Service": "codepipeline.amazonaws.com"
            },
            "Action": "sts:AssumeRole"
        }
    ]
}
EOF
Run the following to create the role:
$ export ACCOUNT_ID=`aws sts get-caller-identity --query "Account" --output text`
$ aws iam create-role \
  --role-name Training-${YOUR_NAME}-codepipeline \
  --assume-role-policy-document file:///tmp/Trust-Policy.json \
  --output text --query 'Role.Arn' \
  --permissions-boundary arn:aws:iam::${ACCOUNT_ID}:policy/CustomPowerUserBound
Next, create an inline policy document to grant necessary permissions to do everything the CodeBuild & CodePipeline needs:
$ cat << EOF > /tmp/Eks-Policy.json
{
    "Statement": [
        {
            "Action": [
                "iam:PassRole"
            ],
            "Resource": "*",
            "Effect": "Allow",
            "Condition": {
                "StringEqualsIfExists": {
                    "iam:PassedToService": [
                        "cloudformation.amazonaws.com",
                        "elasticbeanstalk.amazonaws.com",
                        "ec2.amazonaws.com",
                        "ecs-tasks.amazonaws.com"
                    ]
                }
            }
        },
        {
            "Sid": "CloudWatchLogsPolicy",
            "Effect": "Allow",
            "Action": [
                "logs:CreateLogGroup",
                "logs:CreateLogStream",
                "logs:PutLogEvents"
            ],
            "Resource": "*"
        },
        {
            "Sid": "CodeCommitPolicy",
            "Action": [
                "codecommit:CancelUploadArchive",
                "codecommit:GetBranch",
                "codecommit:GetCommit",
                "codecommit:GetRepository",
                "codecommit:GetUploadArchiveStatus",
                "codecommit:UploadArchive",
                "codecommit:GitPull"
            ],
            "Resource": "*",
            "Effect": "Allow"
        },
        {
            "Sid": "EKSPolicy",
            "Effect": "Allow",
            "Action": [
                "eks:Describe*"
            ],
            "Resource": "*"
        },
        {
            "Action": [
                "codedeploy:CreateDeployment",
                "codedeploy:GetApplication",
                "codedeploy:GetApplicationRevision",
                "codedeploy:GetDeployment",
                "codedeploy:GetDeploymentConfig",
                "codedeploy:RegisterApplicationRevision"
            ],
            "Resource": "*",
            "Effect": "Allow"
        },
        {
            "Action": [
                "codestar-connections:UseConnection"
            ],
            "Resource": "*",
            "Effect": "Allow"
        },
        {
            "Action": [
                "elasticbeanstalk:*",
                "ec2:*",
                "elasticloadbalancing:*",
                "autoscaling:*",
                "cloudwatch:*",
                "s3:*",
                "sns:*",
                "cloudformation:*",
                "rds:*",
                "sqs:*",
                "ecs:*",
                "ecr:*"
            ],
            "Resource": "*",
            "Effect": "Allow"
        },
        {
            "Action": [
                "lambda:InvokeFunction",
                "lambda:ListFunctions"
            ],
            "Resource": "*",
            "Effect": "Allow"
        },
        {
            "Action": [
                "opsworks:CreateDeployment",
                "opsworks:DescribeApps",
                "opsworks:DescribeCommands",
                "opsworks:DescribeDeployments",
                "opsworks:DescribeInstances",
                "opsworks:DescribeStacks",
                "opsworks:UpdateApp",
                "opsworks:UpdateStack"
            ],
            "Resource": "*",
            "Effect": "Allow"
        },
        {
            "Action": [
                "cloudformation:CreateStack",
                "cloudformation:DeleteStack",
                "cloudformation:DescribeStacks",
                "cloudformation:UpdateStack",
                "cloudformation:CreateChangeSet",
                "cloudformation:DeleteChangeSet",
                "cloudformation:DescribeChangeSet",
                "cloudformation:ExecuteChangeSet",
                "cloudformation:SetStackPolicy",
                "cloudformation:ValidateTemplate"
            ],
            "Resource": "*",
            "Effect": "Allow"
        },
        {
            "Action": [
                "codebuild:BatchGetBuilds",
                "codebuild:StartBuild",
                "codebuild:BatchGetBuildBatches",
                "codebuild:StartBuildBatch"
            ],
            "Resource": "*",
            "Effect": "Allow"
        },
        {
            "Effect": "Allow",
            "Action": [
                "devicefarm:ListProjects",
                "devicefarm:ListDevicePools",
                "devicefarm:GetRun",
                "devicefarm:GetUpload",
                "devicefarm:CreateUpload",
                "devicefarm:ScheduleRun"
            ],
            "Resource": "*"
        },
        {
            "Effect": "Allow",
            "Action": [
                "servicecatalog:ListProvisioningArtifacts",
                "servicecatalog:CreateProvisioningArtifact",
                "servicecatalog:DescribeProvisioningArtifact",
                "servicecatalog:DeleteProvisioningArtifact",
                "servicecatalog:UpdateProduct"
            ],
            "Resource": "*"
        },
        {
            "Effect": "Allow",
            "Action": [
                "cloudformation:ValidateTemplate"
            ],
            "Resource": "*"
        },
        {
            "Effect": "Allow",
            "Action": [
                "ecr:DescribeImages"
            ],
            "Resource": "*"
        },
        {
            "Effect": "Allow",
            "Action": [
                "states:DescribeExecution",
                "states:DescribeStateMachine",
                "states:StartExecution"
            ],
            "Resource": "*"
        },
        {
            "Effect": "Allow",
            "Action": [
                "appconfig:StartDeployment",
                "appconfig:StopDeployment",
                "appconfig:GetDeployment"
            ],
            "Resource": "*"
        }
    ],
    "Version": "2012-10-17"
}
EOF
Finally, attach the policy to the role:
$ aws iam put-role-policy --role-name \
  Training-${YOUR_NAME}-codepipeline \
  --policy-name eks-codepipe \
  --policy-document file:///tmp/Eks-Policy.json
The EKS cluster should be up by now, so we can update the AWS Authentication ConfigMap within the cluster to allow the above role to access the cluster.
$ kubectl edit -n kube-system configmap/aws-authNext, find the mapRoles key and add the following, replacing ACCOUNT_ID and YOUR_NAME with appropriate values.
- rolearn: arn:aws:iam::<ACCOUNT_ID>:role/Training-<YOUR_NAME>-codepipeline
  username: codebuild
  groups:
- system:mastersAn example of how the mapRoles key might look after editing:
...
data:
  mapRoles: |
    - groups:
      - system:bootstrappers
      - system:nodes
      rolearn: arn:aws:iam::765410667671:role/...
      username: system:node:{{EC2PrivateDNSName}}
    - rolearn: arn:aws:iam::765410667671:role/Training-dmin-codepipeline
      username: codebuild
      groups:
      - system:masters
kind: ConfigMap
...
Setup CodePipeline
Go to Services → CodePipeline
And press Create Pipeline.

Pipeline Settings:
- Pipeline Name: eks-<YOUR_NAME>-devops
- Service Role: Existing Service Role
- Role Name: Training-<YOUR_NAME>-codepipeline
Rest all leave to defaults and click Next.

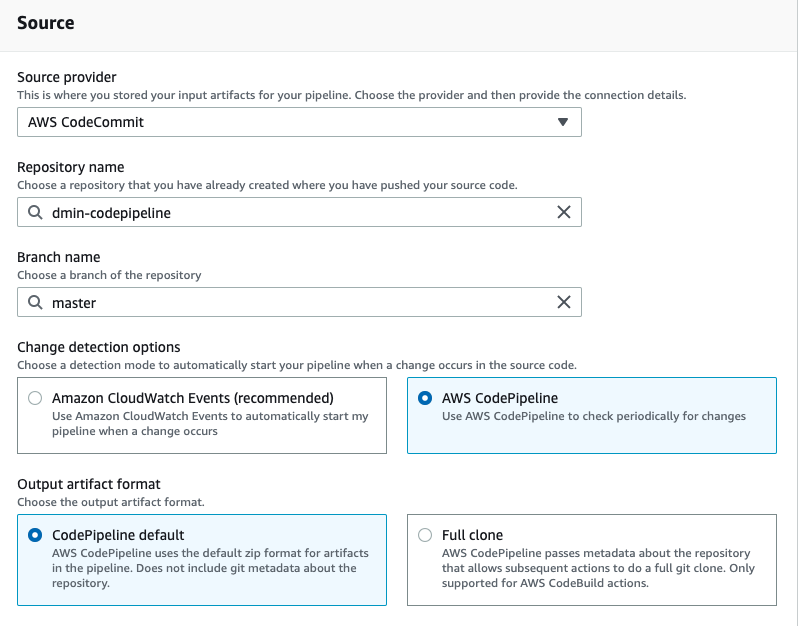
In the Add source stage select AWS CodeCommit as source and your repository name, as well as the master branch. Also select Change detection options as AWS CodePipeline, which is not optimal, but will not require an extra role creation.
Rest all leave to defaults and click Next.
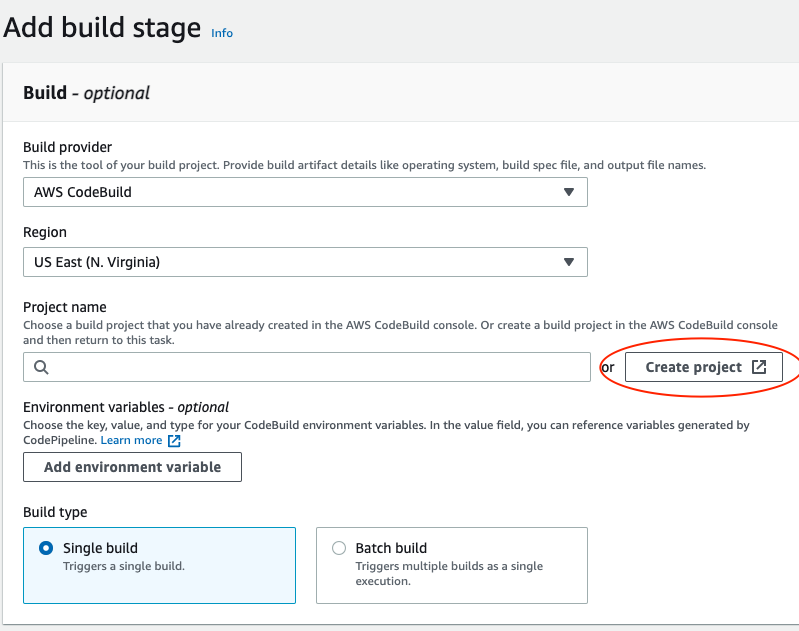
In the Add build stage select AWS CodeBuild as build provider and US East (N.Virginia) region. Then click the Create Project link.
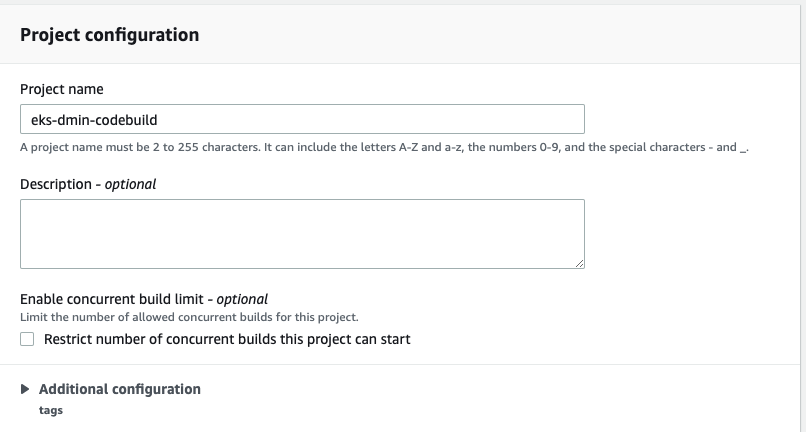
Create CodeBuild project
Project configuration:
- Name: eks-<YOUR_NAME>-codebuild
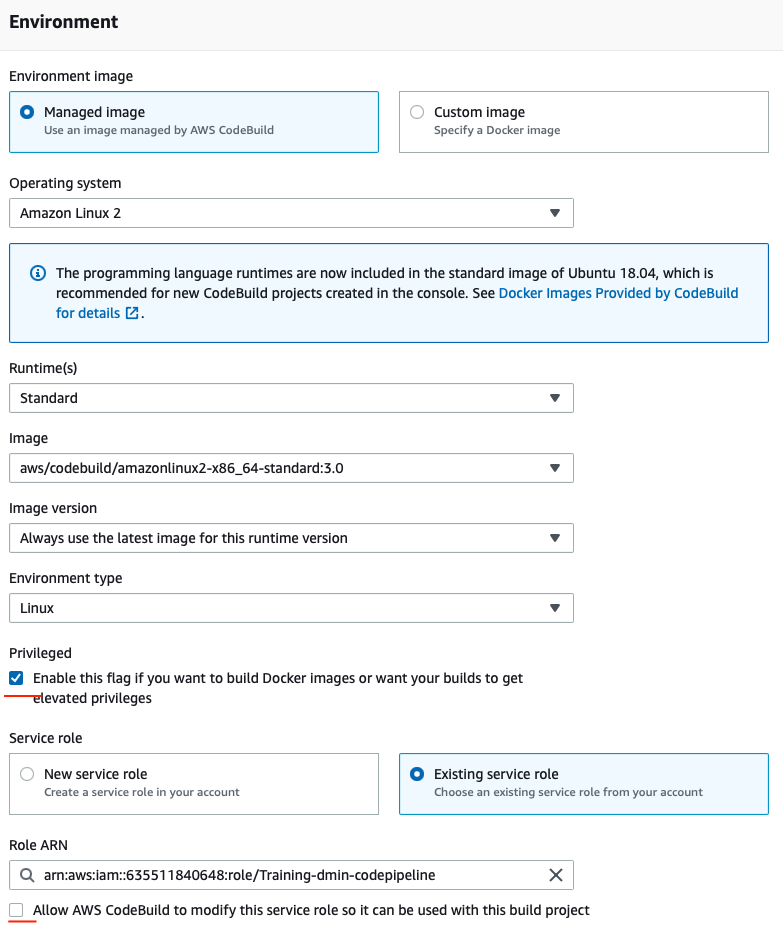
Environment:
- Select Managed image
- Operating system: Amazon Linux 2
- Runtime: Standard
- Image: standard:3.0
- Environment: Linux
- Check the Privileged flag
- Existing role with your name: Training-<YOUR_NAME>-codepipeline
- Uncheck Allow AWS CodeBuild to modify this service role
In the Buildspec select use a buildspec file (we will add it later).
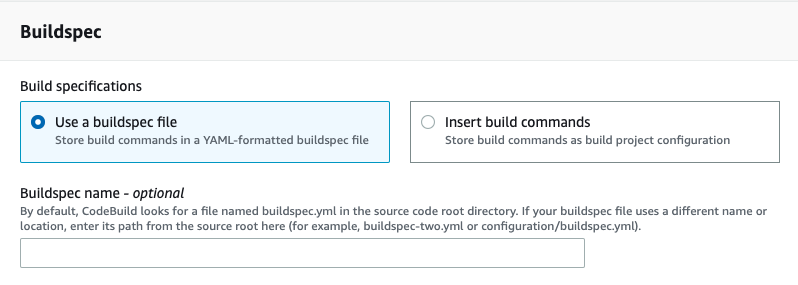
Rest all leave to defaults and click Continue to CodePipeline.
Continue CodePipeline setup
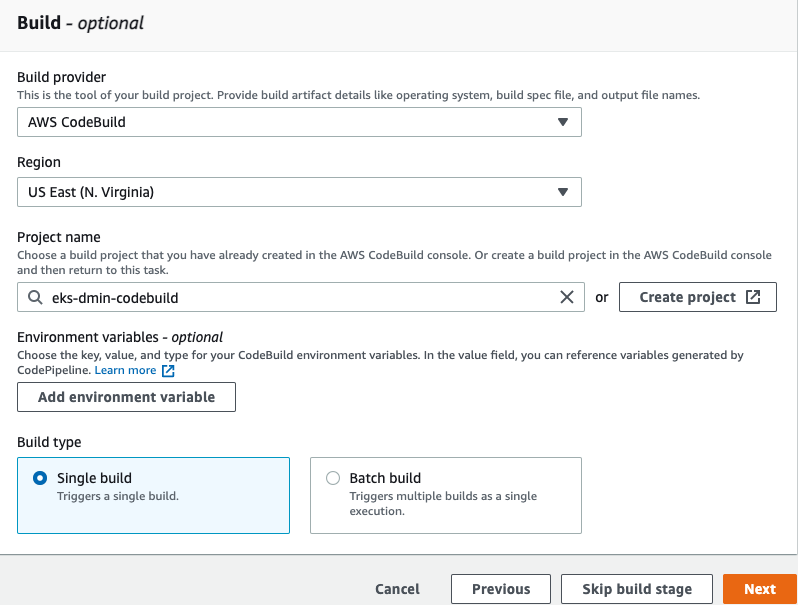
Back in the CodePipeline setup select your newly created CodeBuild project and click Next.
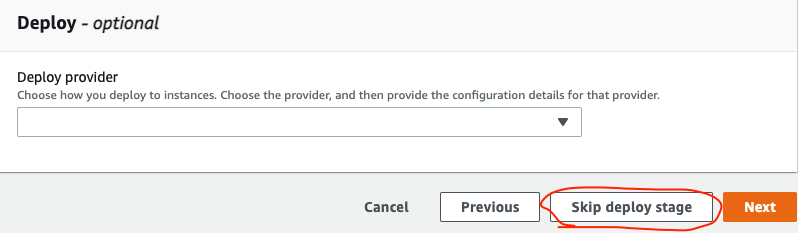
In the Add deploy stage don't select anything and click Skip deploy stage, as currently CodeDeploy does not work with both open source Kubernetes and Elastic Kubernetes Service. So we will use CodeBuild for everything.
In the last screen, review your Pipeline and if everything is fine - click Create Pipeline.
Wait a few seconds for the Pipeline to run. It will fail because we don't have the buildspec provided.
Create the Buildspec
Go back to the Cloud Shell and change to the project folder and create a buildspec.yml with basic configuration:
$ export YOUR_NAME=your-name-here
$ cd ~/devops/${YOUR_NAME}-codepipeline
$ vi buildspec.yml
Paste the following:
version: 0.2

env:
  variables:
    ACCOUNT_ID: AWS_ACCOUNT_ID
    REPO_PREFIX: "AWS_REPO_PREFIX"
    AWS_REGION: us-east-1
phases:
  install:
    runtime-versions:
      golang: latest
    commands:
      - echo Installing app dependencies...
      - go mod tidy
      - COMMIT_HASH=$(echo $CODEBUILD_RESOLVED_SOURCE_VERSION | head -c 7)
  pre_build:
    commands:
      - echo Entered the pre_build phase...
      - echo Running tests
      - go test ./ -v -short
      - echo Building the app
      - CGO_ENABLED=0 GOOS=linux GOARCH=amd64 go build -a -ldflags '-w -s -extldflags "-static"' -o app .
  build:
    commands:
      - echo Entered the build phase...
      - echo Logging in to Amazon ECR...
      - $(aws ecr get-login --no-include-email --region $AWS_REGION)
      - echo Building the Docker image...
      - docker build -t ${ACCOUNT_ID}.dkr.ecr.${AWS_REGION}.amazonaws.com/${REPO_PREFIX}-coolapp:$COMMIT_HASH .
  post_build:
    commands:
      - echo Pushing the Docker image...
      - docker push ${ACCOUNT_ID}.dkr.ecr.${AWS_REGION}.amazonaws.com/${REPO_PREFIX}-coolapp:$COMMIT_HASH
Substitute the account id and repo prefix variables:
$ export ACCOUNT_ID=`aws sts get-caller-identity --query "Account" --output text`

$ sed -i -e "s/AWS_ACCOUNT_ID/${ACCOUNT_ID}/g" \
  -e "s/AWS_REPO_PREFIX/${REPO_PREFIX}/g" buildspec.yml
Finally, push the application code to CodeCommit Repositories.
$ cd ~/devops/${YOUR_NAME}-codepipeline
$ git add --all
$ git commit -m "Added buildspec"
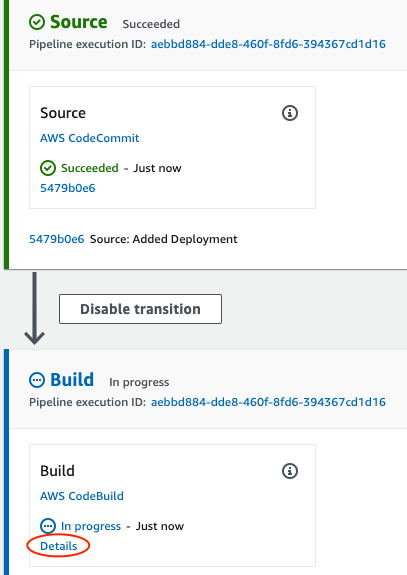
$ git push origin masterGo to the CodePipeline Interface and click on your project.
Click on the Details link to see execution details.
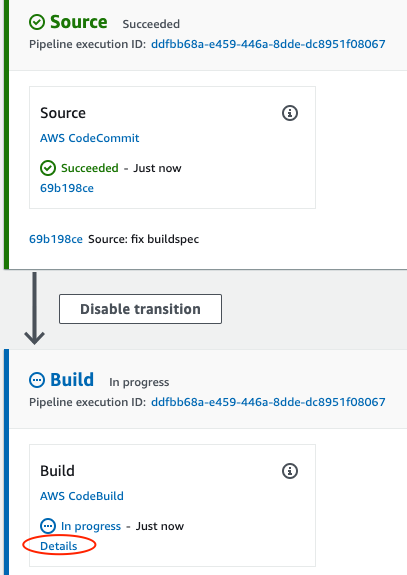
Now the project should be successful. When the pipeline completes, in AWS Console, go to the Elastic Container Registry service.
Click on your repository. You should see your image in the list.
We know that the application should be working based on passed unit tests, so we can deploy it to "production".
Create a Helm Chart
Create a new chart named coolapp in our demo directory:
$ cd ~/devops/${YOUR_NAME}-codepipeline
$ helm create coolapp
Edit Chart.yaml:
$ cat << EOF > coolapp/Chart.yaml
apiVersion: v2
name: coolapp
description: Example application deployment

type: application
version: 0.1.0
appVersion: 1.0
EOF
Edit values.yaml:
$ cat << EOF > coolapp/values.yaml
replicaCount: 1

service:
  type: ClusterIP
  port: 80
EOF
Remove the unused *.yaml and NOTES.txt.
$ rm ./coolapp/templates/*.yaml

$ rm ./coolapp/templates/NOTES.txt
Create new Deployment template:
$ cat <<EOF >./coolapp/templates/deployment.yaml
apiVersion: apps/v1
kind: Deployment
metadata:
  name: {{ include "coolapp.fullname" . }}
  namespace: {{ .Release.Namespace }}
  labels:
    {{- include "coolapp.labels" . | nindent 4 }}
spec:
  replicas: {{ .Values.replicaCount }}
  selector:
    matchLabels:
      {{- include "coolapp.selectorLabels" . | nindent 6 }}
  template:
    metadata:
      labels:
        {{- include "coolapp.selectorLabels" . | nindent 8 }}
    spec:
      containers:
        - name: {{ .Chart.Name }}
          image: "{{ .Values.accountId }}.dkr.ecr.us-east-1.amazonaws.com/{{ .Values.prefix }}-coolapp:{{ .Values.tag }}"
          ports:
            - name: http
              containerPort: 8080
              protocol: TCP
          livenessProbe:
            httpGet:
              path: /
              port: http
          readinessProbe:
            httpGet:
              path: /
              port: http
EOF
Create new Service template:
$ cat <<EOF >./coolapp/templates/service.yaml
apiVersion: v1
kind: Service
metadata:
  name: {{ include "coolapp.fullname" . }}
  namespace: {{ .Release.Namespace }}
  labels:
    {{- include "coolapp.labels" . | nindent 4 }}
spec:
  type: {{ .Values.service.type }}
  ports:
    - port: {{ .Values.service.port }}
      targetPort: http
      protocol: TCP
      name: http
  selector:
    {{- include "coolapp.selectorLabels" . | nindent 4 }}
EOF
Create new Notes template:
$ cat <<EOF >./coolapp/templates/NOTES.txt
Get the application URL by running these commands:
{{- if contains "NodePort" .Values.service.type }}
  export NODE_PORT=\$(kubectl get --namespace {{ .Release.Namespace }} -o jsonpath="{.spec.ports[0].nodePort}" services {{ include "coolapp.fullname" . }})
  export NODE_IP=\$(kubectl get nodes --namespace {{ .Release.Namespace }} -o jsonpath="{.items[0].status.addresses[0].address}")
  echo http://\$NODE_IP:\$NODE_PORT
{{- else if contains "LoadBalancer" .Values.service.type }}
     NOTE: It may take a few minutes for the LoadBalancer IP to be available.
           You can watch the status of by running 'kubectl get --namespace {{ .Release.Namespace }} svc -w {{ include "coolapp.fullname" . }}'
  export SERVICE_IP=\$(kubectl get svc --namespace {{ .Release.Namespace }} {{ include "coolapp.fullname" . }} --template "{{"{{ range (index .status.loadBalancer.ingress 0) }}{{.}}{{ end }}"}}")
  echo http://\$SERVICE_IP:{{ .Values.service.port }}
{{- else if contains "ClusterIP" .Values.service.type }}
  export POD_NAME=\$(kubectl get pods --namespace {{ .Release.Namespace }} -l "app.kubernetes.io/name={{ include "coolapp.name" . }},app.kubernetes.io/instance={{ .Release.Name }}" -o jsonpath="{.items[0].metadata.name}")
  echo "Visit http://127.0.0.1:8080 to use your application"
  kubectl --namespace {{ .Release.Namespace }} port-forward \$POD_NAME 8080:80
{{- end }}
EOF
Let's test that template engine is working:
$ cd ~/devops/${YOUR_NAME}-codepipeline
$ helm install --dry-run --debug test \
  --set accountId=${ACCOUNT_ID} \
  --set prefix=${REPO_PREFIX} \
  --set tag=latest ./coolapp
The templating should be working, so we're ready to deploy it automatically.
Modify buildspec
Change to the project directory and edit buildspec.yml:
$ cd ~/devops/${YOUR_NAME}-codepipeline

$ rm buildspec.yml
$ vi buildspec.yml
Paste the following (replace everything!):
version: 0.2

env:
  variables:
    ACCOUNT_ID: AWS_ACCOUNT_ID
    REPO_PREFIX: "AWS_REPO_PREFIX"
    AWS_REGION: us-east-1
    CLUSTER_PREFIX: AWS_YOUR_NAME
phases:
  install:
    runtime-versions:
      golang: latest
    commands:
      - echo Installing app dependencies...
      - go mod tidy
      - COMMIT_HASH=$(echo $CODEBUILD_RESOLVED_SOURCE_VERSION | head -c 7)
      - echo Installing K8s dependencies...
      - curl -o aws-iam-authenticator https://s3.us-west-2.amazonaws.com/amazon-eks/1.25.7/2023-03-17/bin/linux/amd64/aws-iam-authenticator
      - chmod +x ./aws-iam-authenticator
      - mv ./aws-iam-authenticator /usr/local/bin/aws-iam-authenticator
      - curl -Lo kubectl https://storage.googleapis.com/kubernetes-release/release/$(curl -s https://storage.googleapis.com/kubernetes-release/release/stable.txt)/bin/linux/amd64/kubectl
      - chmod +x ./kubectl
      - mv ./kubectl /usr/local/bin/kubectl
      - wget https://get.helm.sh/helm-v3.11.2-linux-amd64.tar.gz -O helm.tar.gz; tar -xzf helm.tar.gz
      - chmod +x ./linux-amd64/helm
      - mv ./linux-amd64/helm /usr/local/bin/helm
  pre_build:
    commands:
      - echo Entered the pre_build phase...
      - echo Running tests
      - go test ./ -v -short
      - echo Building the app
      - CGO_ENABLED=0 GOOS=linux GOARCH=amd64 go build -a -ldflags '-w -s -extldflags "-static"' -o app .
  build:
    commands:
      - echo Entered the build phase...
      - echo Logging in to Amazon ECR...
      - $(aws ecr get-login --no-include-email --region $AWS_REGION)
      - echo Building the Docker image...
      - docker build -t ${ACCOUNT_ID}.dkr.ecr.${AWS_REGION}.amazonaws.com/${REPO_PREFIX}-coolapp:$COMMIT_HASH .
      - echo Pushing the Docker image...
      - docker push ${ACCOUNT_ID}.dkr.ecr.${AWS_REGION}.amazonaws.com/${REPO_PREFIX}-coolapp:$COMMIT_HASH
  post_build:
    commands:
      - echo Logging in to Amazon EKS...
      - aws eks --region $AWS_REGION update-kubeconfig --name ${CLUSTER_PREFIX}-eks
      - helm upgrade --install --wait coolapp ./coolapp/ --set accountId=${ACCOUNT_ID} --set prefix=${REPO_PREFIX} --set tag=${COMMIT_HASH} --set service.type=LoadBalancer
Substitute the account id, repo prefix & your namevariables:
$ export ACCOUNT_ID=`aws sts get-caller-identity --query "Account" --output text`
$ sed -i -e "s/AWS_ACCOUNT_ID/${ACCOUNT_ID}/g" \
  -e "s/AWS_REPO_PREFIX/${REPO_PREFIX}/g" \
  -e "s/AWS_YOUR_NAME/${YOUR_NAME}/g" buildspec.yml
Finally, push the application code to CodeCommit Repositories.
$ cd ~/devops/${YOUR_NAME}-codepipeline
$ git add --all
$ git commit -m "Added Deployment"
$ git push origin master
Go to the CodePipeline Interface and click on your project.
Wait a minute for the build to start. Click on the Details link to see execution details.
When the pipeline ends you should see the instructions to access your application.

Delete the ECR repository:
$ aws ecr delete-repository \
  --repository-name ${REPO_PREFIX}-coolapp \
  --force
Delete the IAM User:
$ aws iam delete-role-policy \
  --role-name Training-${YOUR_NAME}-codepipeline \
  --policy-name eks-codepipe

$ aws iam delete-role --role-name Training-${YOUR_NAME}-codepipeline
Delete the CodeCommit Repository:
$ aws codecommit delete-repository --repository-name ${YOUR_NAME}-codepipelineDelete the cluster and all node groups
$ cd ~
$ eksctl delete cluster \
  --config-file=ekscfg.yaml
When the cluster and images are removed - delete the CodePipeline.
Go to the CodePipeline Interface.
Select your pipeline and click delete.

Finally, go to the CodeBuild Interface.
Select your build project and click delete.
Thank you! :)