Last Updated: 2022-06-06
Docker
Docker is a tool that allows developers, sys-admins etc. to easily deploy their applications in a sandbox (called containers) to run on the host operating system i.e. Linux. The key benefit of Docker is that it allows users to package an application with all of its dependencies into a standardized unit for software development. Unlike virtual machines, containers do not have high overhead and hence enable more efficient usage of the underlying system and resources.
Containers
The industry standard today is to use Virtual Machines (VMs) to run software applications. VMs run applications inside a guest Operating System, which runs on virtual hardware powered by the server's host OS.
VMs are great at providing full process isolation for applications: there are very few ways a problem in the host operating system can affect the software running in the guest operating system, and vice-versa. But this isolation comes at great cost — the computational overhead spent virtualizing hardware for a guest OS to use is substantial.
Containers take a different approach: by leveraging the low-level mechanics of the host operating system, containers provide most of the isolation of virtual machines at a fraction of the computing power.
Containers offer a logical packaging mechanism in which applications can be abstracted from the environment in which they actually run. This decoupling allows container-based applications to be deployed easily and consistently, regardless of whether the target environment is a private data center, the public cloud, or even a developer's personal PC. This gives developers the ability to create predictable environments that are isolated from the rest of the applications and can be run anywhere.
From an operations standpoint, apart from portability containers also give more granular control over resources giving your infrastructure improved efficiency which can result in better utilization of your compute resources.
Terminology
Before we go further, let's clarify some terminology that is used frequently in the Docker ecosystem.
- Images - The blueprints of our application which form the basis of containers.
- Containers - Created from Docker images and run the actual application.
- Docker Daemon - The background service running on the host that manages building, running and distributing Docker containers. The daemon is the process that runs in the operating system which clients talk to.
- Docker Client - The command line tool that allows the user to interact with the daemon. More generally, there can be other forms of clients too.
- Docker Hub - A registry of Docker images. You can think of the registry as a directory of all available Docker images. If required, one can host their own Docker registries and can use them for pulling images.
What you'll build
In this lab you have hands-on experience with building and deploying your own webapps on the Cloud. We'll be using Amazon Web Services to deploy a webapp on EC2 using Elastic Beanstalk.
What you'll need
Prior experience in developing web applications will be helpful but is not required. As we proceed further along the lab, we'll make use of a few cloud services.
- A recent version of your favorite Web Browser
- Basics of BASH
- AWS Account
- Docker Hub Account
Install Docker
The getting started guide on Docker has detailed instructions for setting up Docker on Mac, Linux and Windows.
Once you are done installing Docker, test your Docker installation by running the following:
$ docker run hello-world

Hello from Docker.
This message shows that your installation appears to be working correctly.Images
Now that we have everything setup, it's time to run some containers. In this section, we are going to run a Busybox container on our system and experiment with the docker run command.
To get started, let's run the following in our terminal:
$ docker pull busyboxThe pull command fetches the busybox image from the Docker registry and saves it to our system. You can use the docker images command to see a list of all images on your system.:
$ docker images
REPOSITORY          TAG                 IMAGE ID            CREATED             SIZE
busybox             latest              018c9d7b792b        3 weeks ago         1.22MB
Docker Run
Let's now run a Docker container based on this image. To do that we are going to use the almighty docker run command.
$ docker run busybox
$
But nothing happened?! Did we do something wrong? Well, no. Behind the scenes, a lot of stuff happened. When you call run, the Docker client finds the image (busybox in this case), loads up the container and then runs a command in that container. When we ran docker run busybox, we didn't provide a command, so the container booted up, ran an empty command and then exited. Let's try fixing it:
$ docker run busybox echo "hello from busybox"
hello from busybox
In this case, the Docker client ran the echo command in our busybox container and then exited it. If you've noticed, all of that happened pretty quickly. Imagine booting up a virtual machine, running a command and then killing it. Now you know why they say containers are fast! Ok, now it's time to see the docker ps command. The docker ps command shows you all containers that are currently running:
$ docker ps
CONTAINER ID        IMAGE               COMMAND             CREATED             STATUS              PORTS               NAMES
Since no containers are running, we see a blank line. Let's try a more useful variant - docker ps -a:
$ docker ps -a
CONTAINER ID        IMAGE               COMMAND                  CREATED             STATUS                      PORTS               NAMES
d5726be4301e        busybox             "echo 'hello from bu..."   4 seconds ago       Exited (0) 2 seconds ago                        competent_bouman
3f8337b589df        busybox             "sh"                     4 minutes ago       Exited (0) 4 minutes ago                        quirky_carson
cfc1323e5d9a        hello-world         "/hello"                 17 minutes ago      Exited (0) 17 minutes ago                       hungry_shamir
So what we see above is a list of all containers that we ran. Do notice that the STATUS column shows that these containers exited a few minutes ago.
You're probably wondering if there is a way to run more than just one command in a container. Let's try that now:
$ docker run -it busybox sh
/ # ls
bin   dev   etc   home  proc  root  sys   tmp   usr   var
/ # uptime
 06:52:28 up 49 min,  0 users,  load average: 0.73, 0.76, 0.80
Running the run command with the -it flags attaches us to an interactive tty in the container. Now we can run as many commands in the container as we want. Take some time to run your favorite commands.
The docker run command, and you would most likely use it the most often. It makes sense to spend some time getting comfortable with it. To find out more about run, use docker run --help to see a list of all flags it supports. As we proceed further, we'll see a few more variants of docker run.
Removing containers
We saw before that we can still see remnants of the container even after we've exited by running docker ps -a. If you execute docker run multiple times it will leave stray containers and eat up disk space. Hence, it is advised to clean up containers once you're done with them. To do that, you can run the docker rm command. Just copy the container IDs from docker ps -a and paste them alongside the command. Next command is just an example, containers ID will be different on your system.
$ docker rm cfc1323e5d9a 3f8337b589df
Cfc1323e5d9a
3f8337b589df
On deletion, you should see the IDs echoed back to you. If you have a bunch of containers to delete in one go, copy-pasting IDs can be tedious. In that case, you can simply run:
$ docker rm $(docker ps -a -q -f status=exited)This command deletes all containers that have a status of exited. In case you're wondering, the -q flag, only returns the numeric IDs and -f filters output based on conditions provided. One last thing that'll be useful is the --rm flag that can be passed to docker run which automatically deletes the container once it's exited from. For one off docker runs, --rm flag is very useful.
In latest versions of Docker, the docker container prune command can be used to achieve the same effect.
$ docker container prune
WARNING! This will remove all stopped containers.
Are you sure you want to continue? [y/N] y
Deleted Containers:
7dd2ac008db192d57bec99b403e87f724f25fb0a67e08b0cb7ff541e1f475838
d5726be4301e3f455b7bcb91a0b46471e7cc67793e068f30ef4608f9d403cd19
3f8337b589df72efa417abc083c65137dd29215a07b1e5031c0cd0c52779c8c5
cfc1323e5d9aa7efb3b2b92cb517feb52c06122c017c0b2c70f0f1fb71b1d4b7

Total reclaimed space: 15B
Lastly, you can also delete images that you no longer need by running docker rmi.
We've looked at images before, but in this section we'll dive deeper into what Docker images are and build our own image! Lastly, we'll also use that image to run our application locally and finally deploy on AWS! Let's get started.
Images basics
Docker images are the basis of containers. In the previous example, we pulled the Busybox image from the registry and asked the Docker client to run a container based on that image. To see the list of images that are available locally, use the docker images command. Output may vary depending on what images you might already have.
$ docker images
REPOSITORY          TAG                 IMAGE ID            CREATED             SIZE
busybox             latest              018c9d7b792b        3 weeks ago         1.22MB
bitnami/mongodb     latest              0854467d36b7        5 weeks ago         410MB
hello-world         latest              bf756fb1ae65        7 months ago        13.3kB
The above gives a list of images that I've pulled from the registry, along with ones that you've created yourself (we'll shortly see how). The TAG refers to a particular snapshot of the image and the IMAGE ID is the corresponding unique identifier for that image.
For simplicity, you can think of an image registry akin to a git repository - images can be committed with changes and have multiple versions. If you don't provide a specific version number, the client defaults to latest. For example, you can pull a specific version of ubuntu image:
$ docker pull ubuntu:20.04To get a new Docker image you can either get it from a registry (such as the Docker Hub) or create your own. There are tens of thousands of images available on Docker Hub. You can also search for images directly from the command line using docker search.
An important distinction to be aware of when it comes to images is the difference between base and child images.
- Base images are images that have no parent image, usually images with an OS like ubuntu, busybox or debian.
- Child images are images that build on base images and add additional functionality.
Then there are official and user images, which can be both base and child images.
- Official images are images that are officially maintained and supported by the folks at Docker. These are typically one word long.
- User images are images created and shared by other Docker users. They build on base images and add additional functionality. Typically, these are formatted as
user/image-name.
Dockerfile
A Dockerfile is a simple text file that contains a list of commands that the Docker client calls while creating an image. It's a simple way to automate the image creation process. The best part is that the commands you write in a Dockerfile are almost identical to their equivalent Linux commands. This means you don't really have to learn new syntax to create your own dockerfiles.
The application directory does contain a Dockerfile but since we're doing this for the first time, we'll create one from scratch. To start, create a new empty directory that we'll use to create the image and change to it.
$ mkdir docker-example
$ cd docker-example
Next, create a blank file in your favorite text-editor and save it in the folder created previously and name it server.js. Copy the following code in the file:
const http = require('http');

const server = http.createServer((req, res) => {
  const ip = (req.headers['x-forwarded-for'] || '').split(',').pop() || req.connection.remoteAddress || req.socket.remoteAddress || req.connection.socket.remoteAddress;
  res.writeHead(200, {"Content-Type": "text/plain"});
  res.end(`Hello, ${ip}!\n`);
});

server.listen(8080);

console.log("Server running at http://127.0.0.1:8080/");

process.on('SIGINT', function() {
  process.exit();
});
It is a simple application that echoes "Hello, <ip>".
Finally, create a new blank file and save it in the same folder as the NodeJS app by the name of Dockerfile.
We start with specifying our base image. Use the FROM keyword to do that -
FROM node:8-alpineThe next step usually is to write the commands of copying the files and installing the dependencies. First, we set a working directory and then copy all the files for our app.
# set a directory for the app
WORKDIR /usr/src/app

# copy app to the container
COPY server.js .
Now that we have the file(s), we can install the dependencies, but as the app is pretty simple we don't have to do it.
The next thing we need to specify is the port number that needs to be exposed. Since our NodeJS app is running on port 8080, that's what we'll indicate.
EXPOSE 8080The last step is to write the command for running the application, which is simply - node ./server.js. We use the CMD command to do that -
CMD ["node", "server.js"]The primary purpose of CMD is to tell the container which command it should run when it is started. With that, our Dockerfile is now ready. This is how it looks -
FROM node:8-alpine

# set a directory for the app
WORKDIR /usr/src/app

# copy app to the container
COPY server.js .

# define the port number the container should expose
EXPOSE 8080

# run the command
CMD ["node", "server.js"]
Now that we have our Dockerfile, we can build our image. The docker build command does the heavy-lifting of creating a Docker image from a Dockerfile.
The section below shows you the output of running the same. Before you run the command yourself (don't forget the period), make sure to replace placeholder your_username with yours. This username should be the same one you created when you registered on Docker hub. If you haven't done that yet, please go ahead and create an account. The docker build command is quite simple - it takes an optional tag name with -t and a location of the directory containing the Dockerfile (the period means current directory).
$ docker build -t your_username/example .
Sending build context to Docker daemon  3.072kB
Step 1/5 : FROM node:8-alpine
8-alpine: Pulling from library/node
e6b0cf9c0882: Pull complete
93f9cf0467ca: Pull complete
a564402f98da: Pull complete
b68680f1d28f: Pull complete
Digest: sha256:38f7bf07ffd72ac612ec8c829cb20ad416518dbb679768d7733c93175453f4d4
Status: Downloaded newer image for node:8-alpine
 ---> 2b8fcdc6230a
Step 2/5 : WORKDIR /usr/src/app
 ---> Running in 7cf3ce9fea22
Removing intermediate container 7cf3ce9fea22
 ---> caa4eacc9395
Step 3/5 : COPY server.js .
 ---> 3e1f6e358719
Step 4/5 : EXPOSE 8080
 ---> Running in 499dbd48a716
Removing intermediate container 499dbd48a716
 ---> 80b163503191
Step 5/5 : CMD ["node", "server.js"]
 ---> Running in f7cdf9a7dcf6
Removing intermediate container f7cdf9a7dcf6
 ---> a06f4765d655
Successfully built a06f4765d655
If you don't have the node:8-alpine image, the client will first pull the image and then create your image. If everything went well, your image should be ready! Run docker images and see if your image shows.
The last step in this section is to run the image and see if it actually works (replacing placeholder username with yours).
$ docker run --rm -p 8080:8080 your_username/example
Server running at http://127.0.0.1:8080/
The command we just ran used port 8080 (after the colon (:)) for the server inside the container and exposed this externally on port 8080 (before the colon). Head over to the URL with port 8080, where your app should be live.
We're going to use AWS Elastic Beanstalk to get our application up and running in a few clicks. We'll also see how easy it is to make our application scalable and manageable with Beanstalk!
Docker push
The first thing that we need to do before we deploy our app to AWS is to publish our image on a registry which can be accessed by AWS. There are many different Docker registries you can use (you can even host your own). For now, let's use Docker Hub to publish the image.
If this is the first time you are pushing an image, the client will ask you to login. Provide the same credentials that you used for logging into Docker Hub.
$ docker login
Login with your Docker ID to push and pull images from Docker Hub. If you don't have a Docker ID, head over to https://hub.docker.com to create one.
Username: your_username
Password:
WARNING! Your password will be stored unencrypted in /home/your_username/.docker/config.json.
Configure a credential helper to remove this warning. See
https://docs.docker.com/engine/reference/commandline/login/#credentials-store

Login Succeeded
To publish, just type the below command remembering to replace the name of the image tag above with yours. It is important to have the format of your_username/image_name so that the client knows where to publish.
$ docker push your_username/exampleOnce that is done, you can view your image on Docker Hub.
Now that your image is online, anyone who has docker installed can play with your app by typing just a single command - docker run -p 8080:8080 your_username/example
If you've spent countless hours setting up local dev environments / sharing application configuration in the past, you very well know how awesome this sounds.
AWS Beanstalk
AWS Elastic Beanstalk (EB) is a PaaS (Platform as a Service) offered by AWS. If you've used Heroku, Google App Engine etc. you'll feel right at home. As a developer, you just tell EB how to run your app and it takes care of the rest - including scaling, monitoring and even updates. In April 2014, EB added support for running single-container Docker deployments which is what we'll use to deploy our app. Although EB has a very intuitive CLI, it does require some setup, and to keep things simple we'll use the web UI to launch our application.
Here are the steps:
- Login to your AWS console.
- Click on Elastic Beanstalk. It will be in the compute section on the top left. Alternatively, you can access the Elastic Beanstalk console.
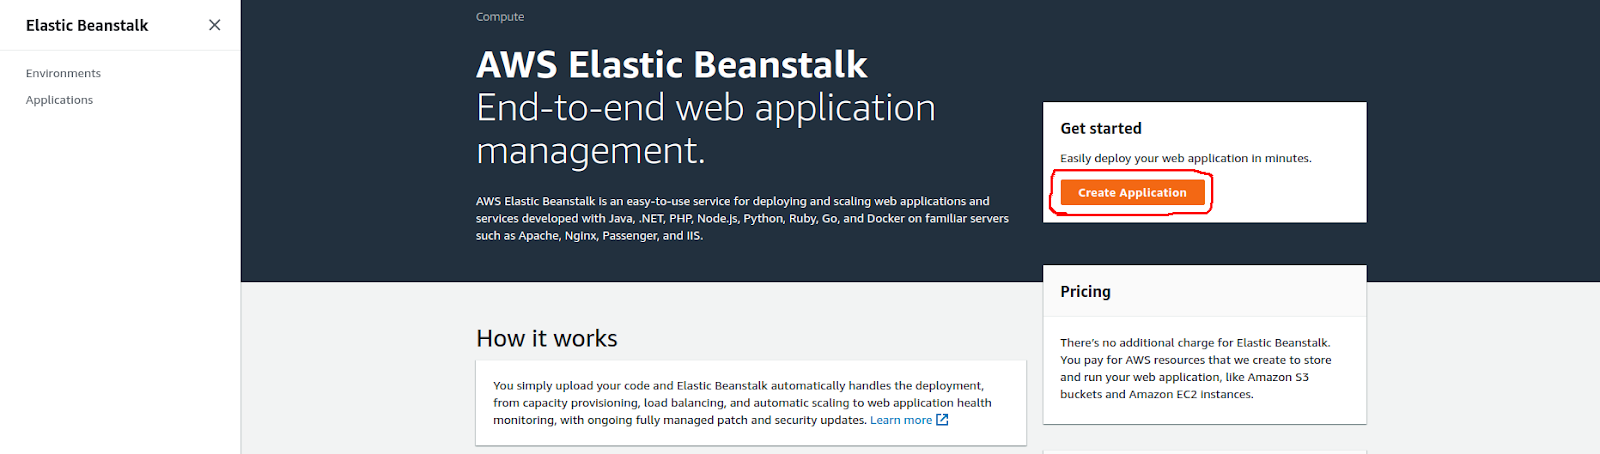
- Click on "Create New Application" in the top right
- Give your app a memorable (but unique) name
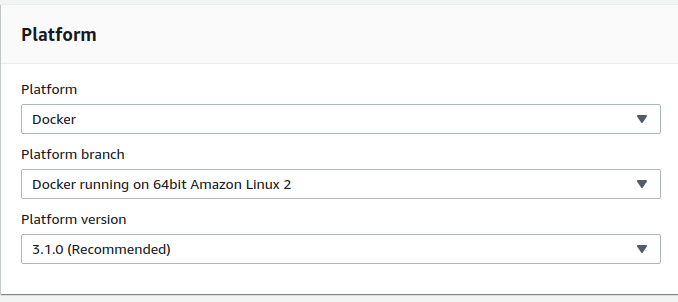
- Under base Platform section. Choose Docker from the predefined platform.
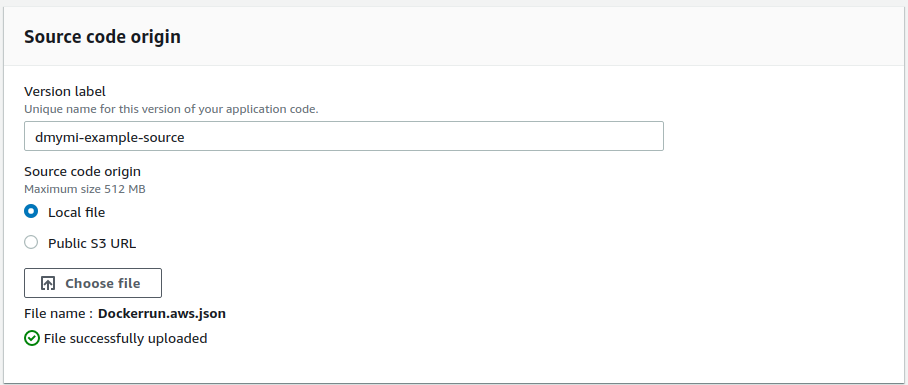
- Now we need to upload our application code. But since our application is packaged in a Docker container, we just need to tell Beanstalk about our container. Use your favorite text editor to create an empty file and name it
Dockerrun.aws.jsonand paste the following content (don't forget to change your_username and image name).
{
  "AWSEBDockerrunVersion": "1",
  "Image": {
    "Name": "your_username/example",
    "Update": "true"
  },
  "Ports": [
    {
      "ContainerPort": 8080
    }
  ],
  "Logging": "/var/log/nginx"
}- When you are done, click on the radio button for "Upload your Code", choose this file, and click on "Upload".
- Now click on "Create application". The final screen that you see will have a few spinners indicating that your environment is being set up. It typically takes around 5 minutes for the first-time setup.
Hopefully by now, our instance should be ready. Head over to the EB page and you should see a green tick indicating that your app is alive and kicking.
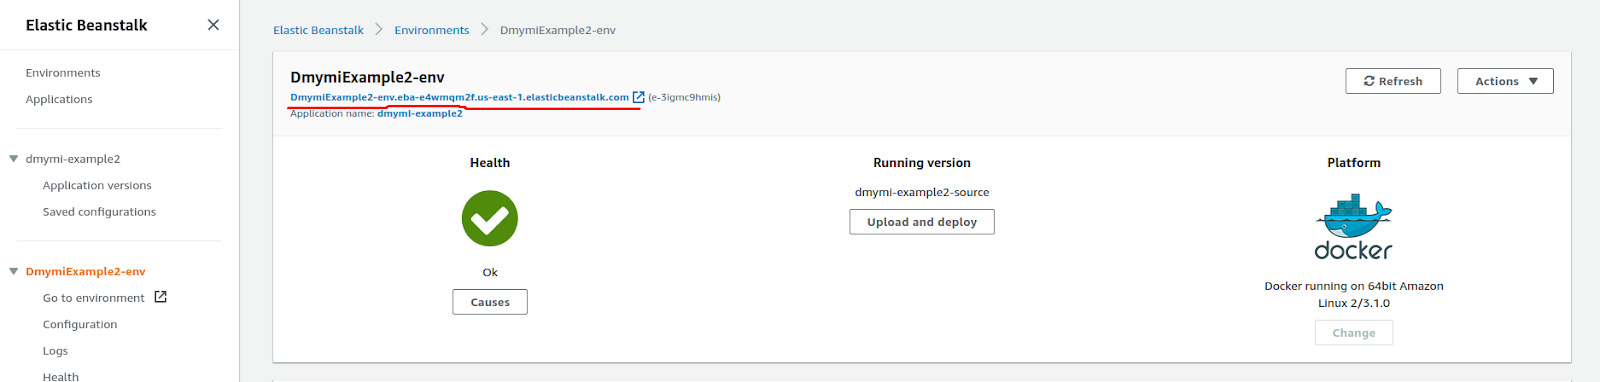
Go ahead and open the URL in your browser and you should see the application in all its glory.
Cleanup
Once you are done, remember to terminate the environment so that you don't end up getting charged for extra resources.

Congratulations! You have deployed your first Docker application! That might seem like a lot of steps, but with the command-line tool for EB you can almost mimic the functionality of Heroku in a few keystrokes! Hopefully, you agree that Docker takes away a lot of the pains of building and deploying applications in the cloud. I would encourage you to read the AWS documentation on single-container Docker environments to get an idea of what features exist.