
Last Updated: 2022-12-08
Identity & Access Management (IAM)
AWS Identity and Access Management (IAM) is a free service that enables you to manage access to AWS services and resources securely. Using IAM, you can create and manage AWS users and groups, and use permissions to allow and deny their access to AWS resources.
What you'll learn
- How to create and manage IAM Policies
- How to create and manage IAM Users, Group and Roles
What you'll need
- A recent version of your favorite Web Browser
You manage access in AWS by creating policies and attaching them to IAM entities (users, groups of users, or roles) or AWS resources. A policy is an object in AWS that, when associated with an identity or resource, defines their permissions. AWS evaluates these policies when a Principal entity (user or role) makes a request.
Identity-based policies are JSON permissions policy documents that you can attach to an identity (user, group of users, or role) to manage access. A JSON policy document includes these elements:
- Optional policy-wide information at the top of the document
- One or more individual statements. Each statement in a policy includes information about a single permission. If a policy includes multiple statements, AWS applies a logical
ORacross the statements when evaluating them.
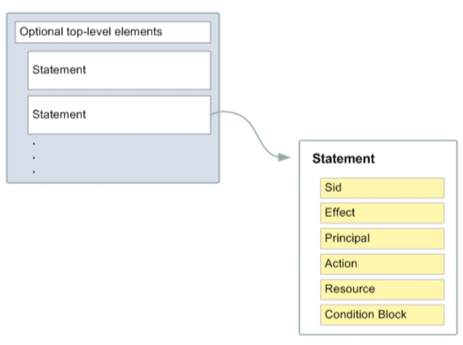
The information in a statement is contained within a series of elements.
Version: Specify the version of the policy language that you want to use.Statement– Container for the following elements:Sid: Include an optional statement ID to differentiate between your statements.Effect: UseAlloworDenyindicating whether the policy allows or denies access.Principal: The Principal element is used in resource policy statements to identify the Principal (account, user, role, or federated user) to which you would like to allow or deny access. In IAM identity policies the Principal is implied from the user or role that the policy is attached to.Action: Include a list of actions that the policy allows or denies.Resource: Specify a list of resources to which the actions apply.Condition(Optional): Specify the circumstances under which the policy grants permission.
If you want to define more than one permission for an entity (user, group, or role), you can use multiple statements in a single policy. You can also attach multiple policies to an IAM entity to manage access.
Create IAM Identity policy
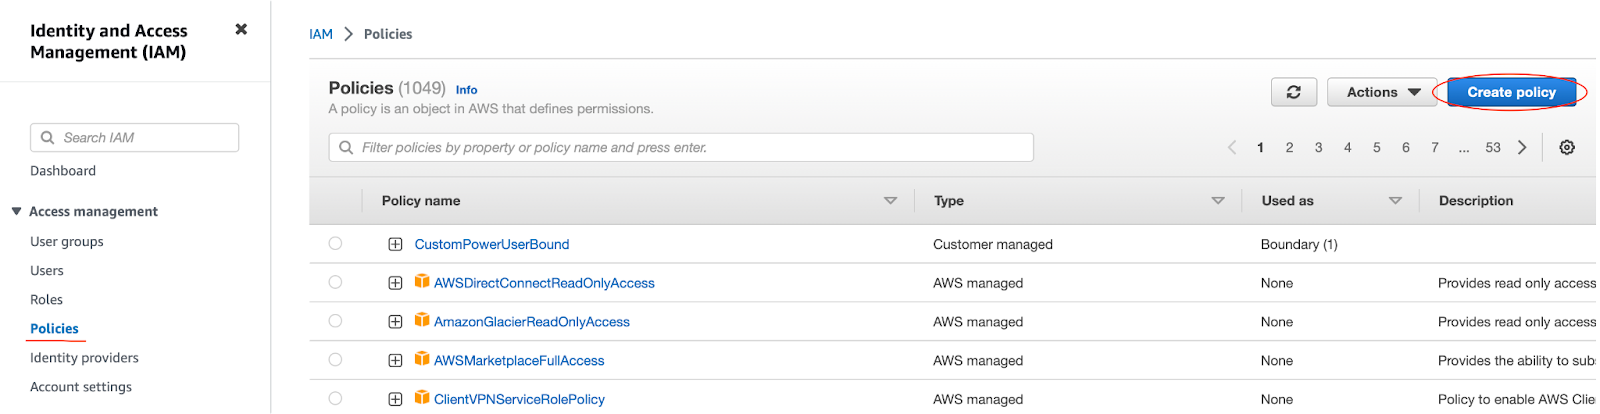
Access the AWS IAM console and select Policies from the sidebar. Click Create Policy.
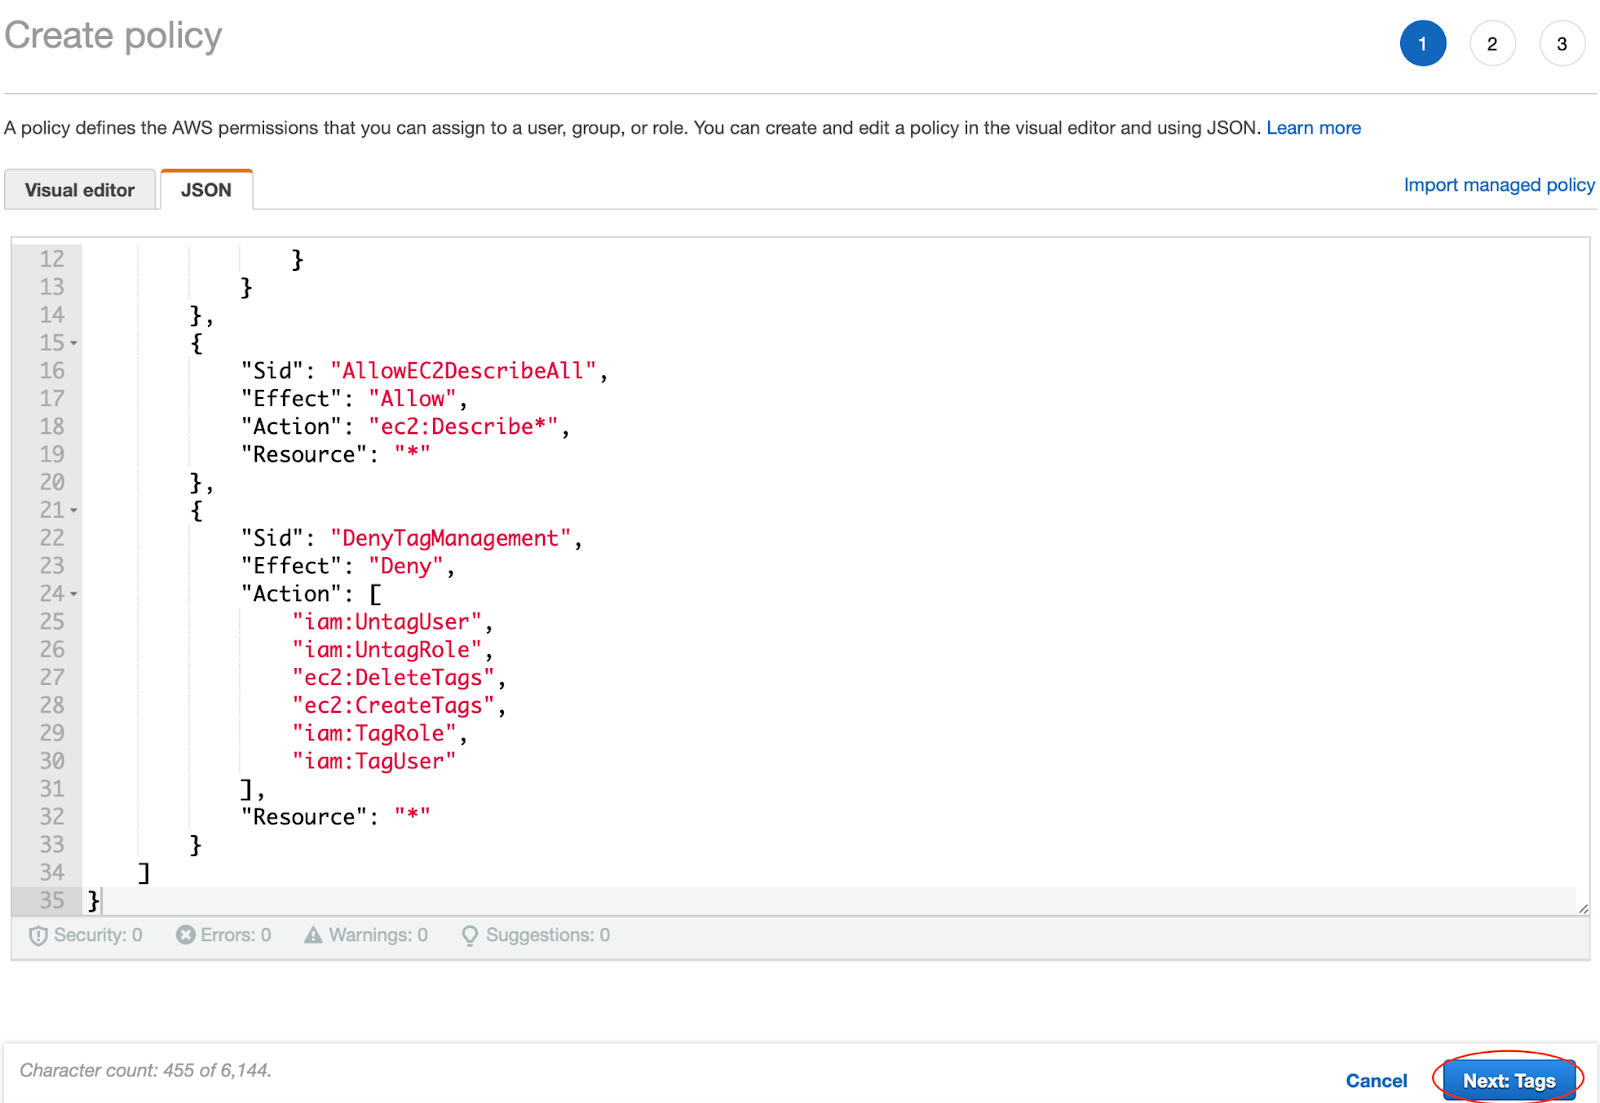
On the Create Policy screen, select the JSON tab and paste the policy contents from below into the JSON text editing panel in the AWS console.
{
    "Version": "2012-10-17",
    "Statement": [
        {
            "Sid": "AllowGroupEC2Management",
            "Effect": "Allow",
            "Action": "ec2:*",
            "Resource": "*",
            "Condition": {
                "StringEquals": {
                    "ec2:ResourceTag/group": "${aws:PrincipalTag/group}"
                }
            }
        },
        {
            "Sid": "AllowEC2DescribeAll",
            "Effect": "Allow",
            "Action": "ec2:Describe*",
            "Resource": "*"
        },
        {
            "Sid": "DenyTagManagement",
            "Effect": "Deny",
            "Action": [
                "iam:UntagUser",
                "iam:UntagRole",
                "ec2:DeleteTags",
                "ec2:CreateTags",
                "iam:TagRole",
                "iam:TagUser"
            ],
            "Resource": "*"
        }
    ]
}
The policy has 3 statements. When attached to an IAM entity these statements:
- Allow the Principal (e.g. User, Group or Role) to execute all Elastic Compute Cloud (EC2) actions against EC2 instances which have the same
grouptag as the Principal attempting to perform the action. - Allow the Principal (e.g. User, Group or Role) to describe all EC2 instances within the AWS account.
- Explicitly deny the Principal (e.g. User, Group or Role) access to manipulate IAM or EC2 tags within the AWS account.
After pasting the policy from above into the JSON editor in the AWS Console, click Next: Tags, then Next: Review.
Name the policy GroupEC2Access and optionally add a description. Click Create policy.
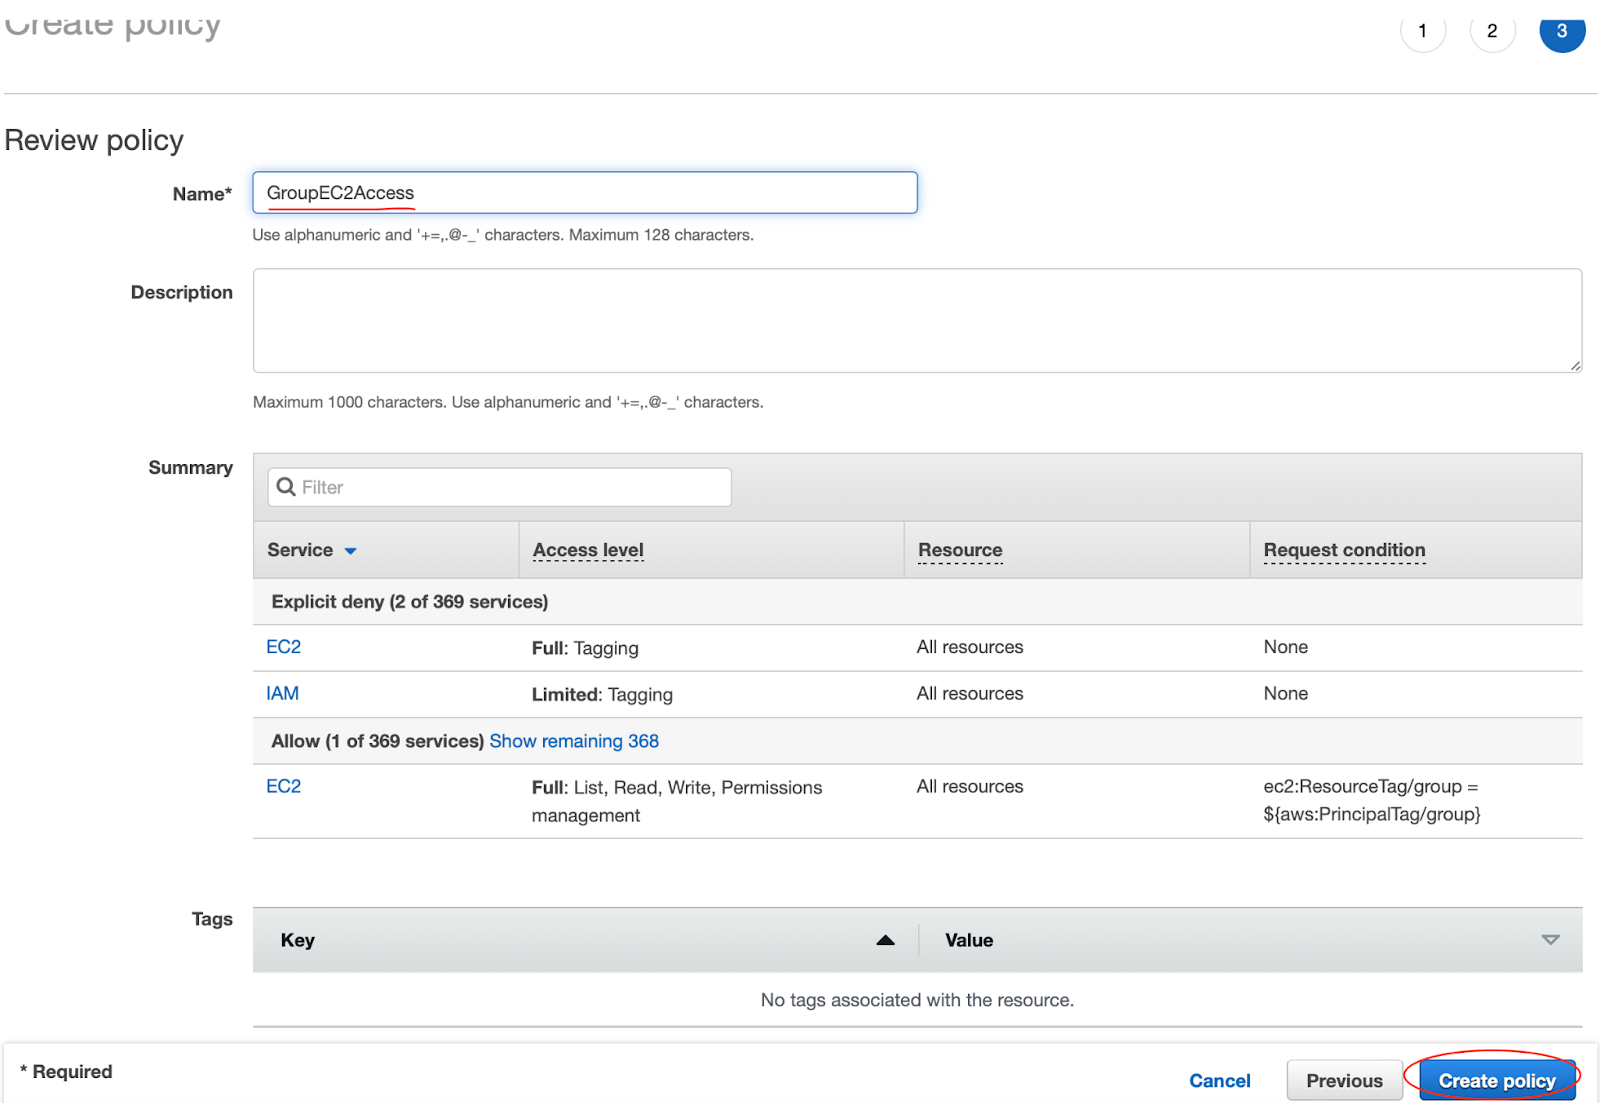
Policy creation is confirmed as you are returned to the IAM console policy dashboard.
Сreate additional IAM policy
Next, repeat the steps to create a second policy. Name the policy ExternalRoleAssumptionPolicy. On the Create Policy screen, use the policy provided below. This policy allows the assumption of an IAM Role if the condition is met that the role has a tag with the key external-assume-role and the value true.
{
  "Version": "2012-10-17",
  "Statement": {
    "Effect": "Allow",
    "Action": "sts:AssumeRole",
    "Resource": "*",
    "Condition": {"StringLike": {"iam:ResourceTag/external-assume-role": "true"}}
  }
}Create IAM User
Access the AWS IAM console and select Users from the sidebar. Click Add User.

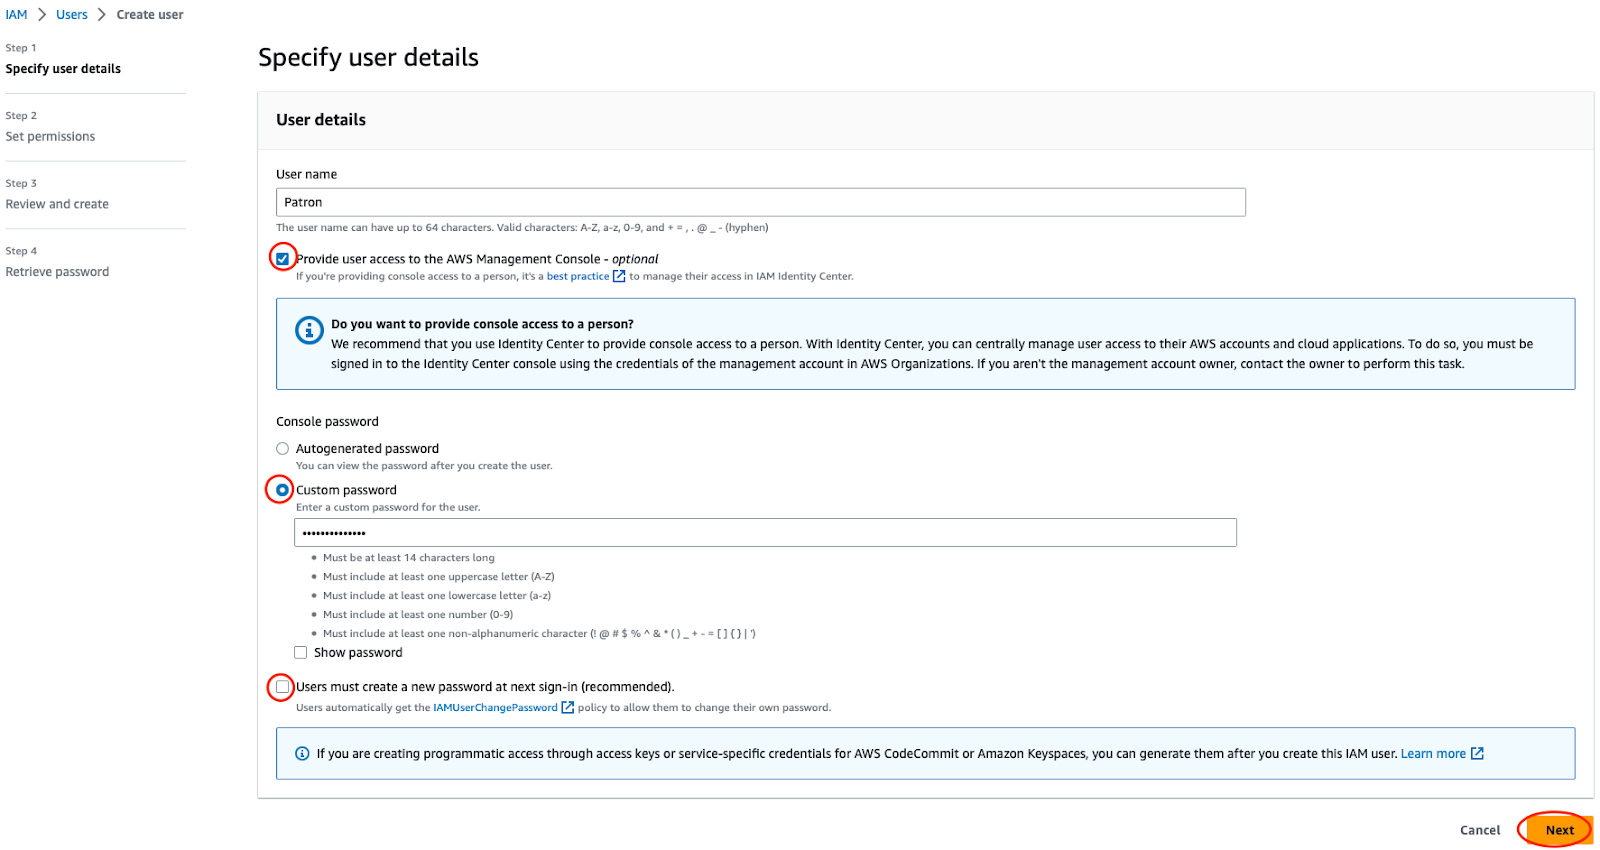
On the Add user screen, under "User Details" enter "Patron" in the User name field.
On the same screen, check the checkbox Provide user access to the AWS Management Console.
Under Console password select the Custom password radio button and enter a password in the text box.
Ensure the "User must create a new password at next sign-in" checkbox is unchecked.
Click Next.
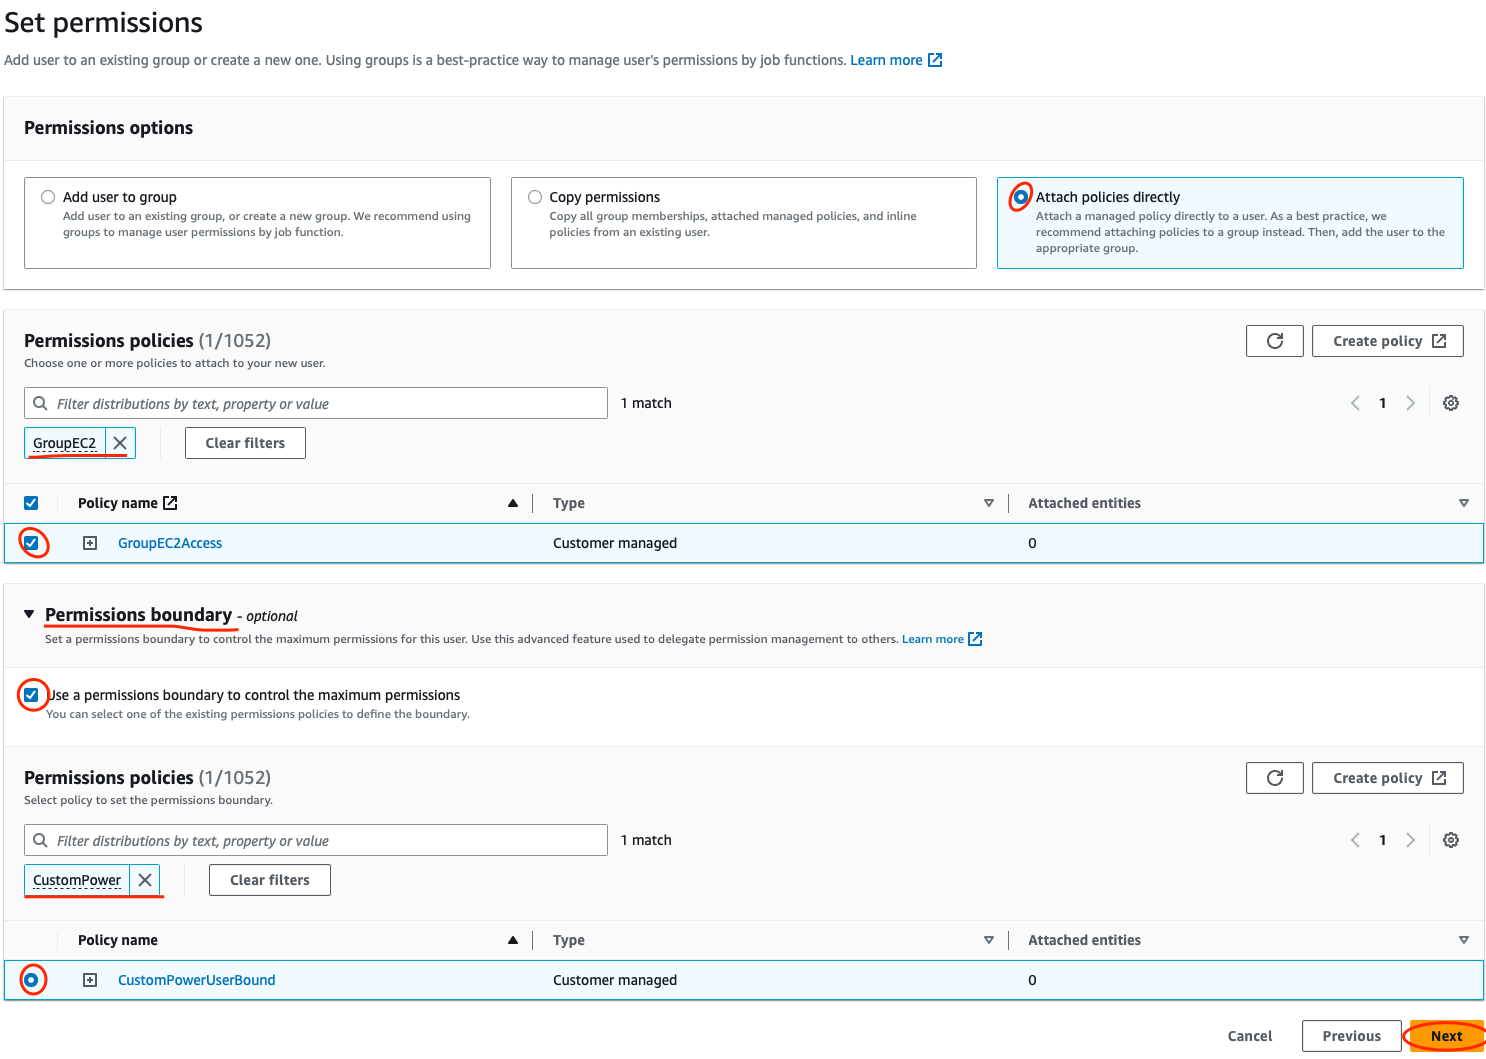
On the Set permissions screen, select the Attach policies directly option and use the filter search to locate the Identity policy created in the previous part. Select the checkbox next to the policy to select it.
Open the Permissions boundary dropdown and check Use a permissions boundary to control the maximum permissions checkbox. Use the filter search to locate a policy named CustomPowerUserBound. Select the radio button next to the policy to select it. Click Next.
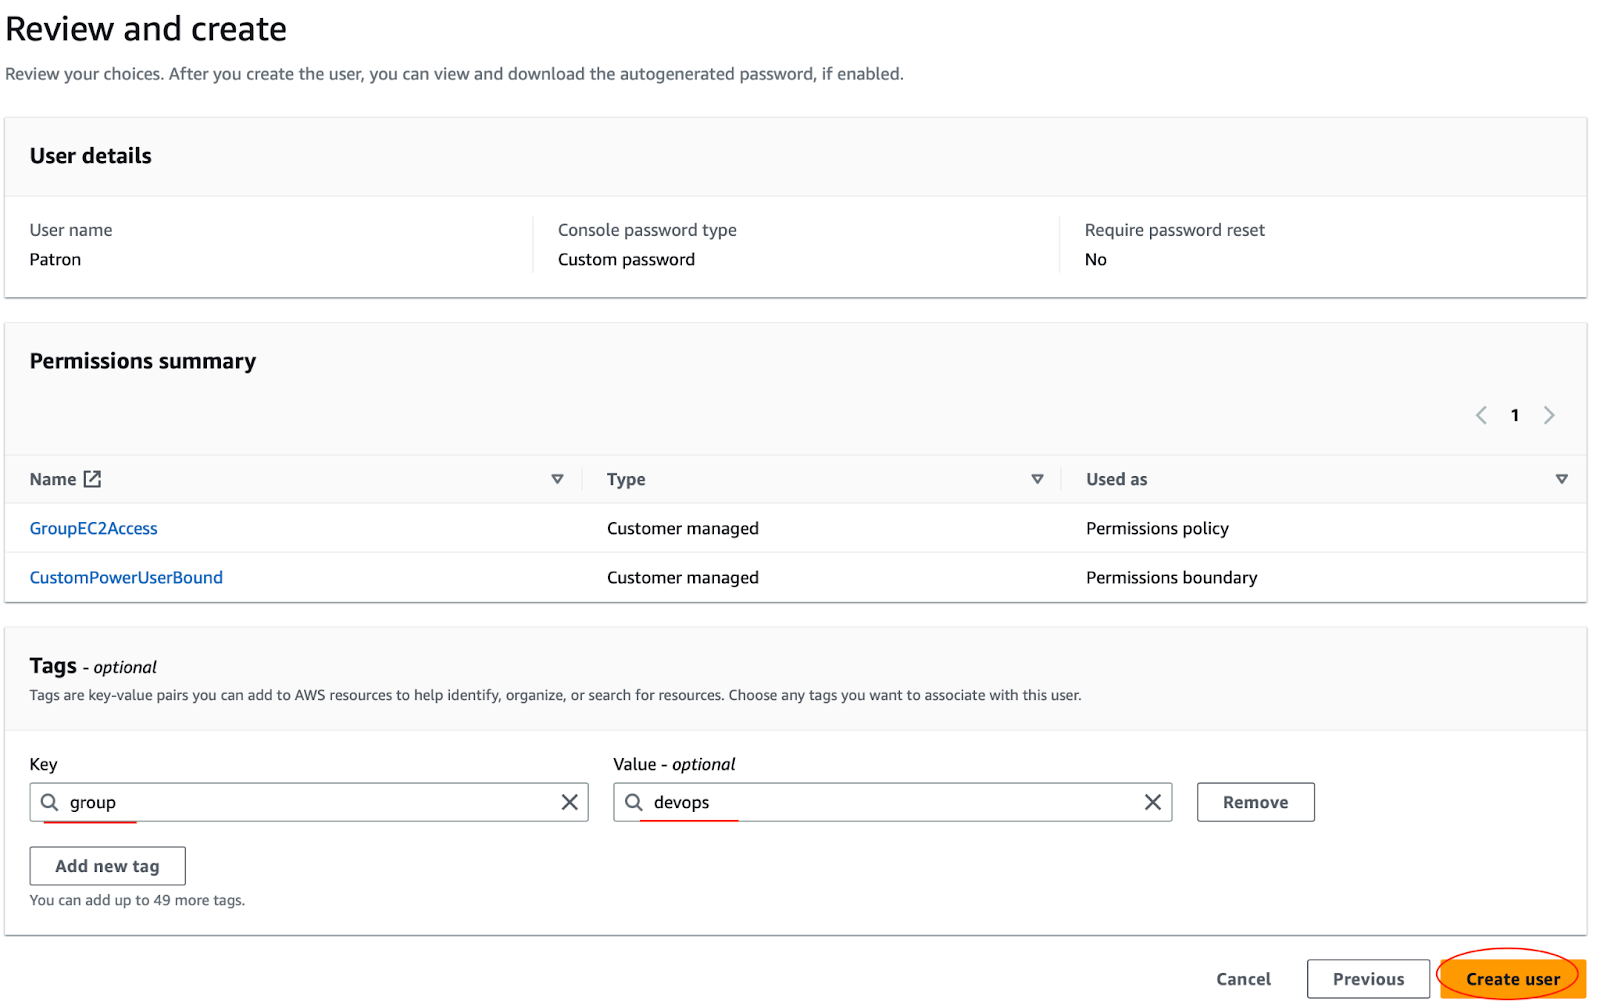
On the Review and create screen, click Add new tag and create a tag with the key group and the value devops. Click Create user.
On the final Retrieve password screen, verify that the user was successfully created. Click Return to users list.
Create additional IAM Users
Repeat the steps to create the user "Mykola".
- Enter "Mykola" in the User name field.
- Provide Mykola with the same permissions and permission boundary as Patron.
- When adding a tag to the user Mykola, the tag should have the key
groupand the valuejava.
Repeat the steps to create the user "Andrzej".
- Enter "Andrzej" in the User name field.
- DO NOT provide any permissions, but you still MUST provide a permission boundary.
- DO NOT add any tags to the user Andrzej.
Repeat the steps to create the user "Maria".
- Enter "Maria" in the User name field.
- DO NOT provide any permissions, but you still MUST provide a permission boundary.
- DO NOT add any tags to the user Maria.
Validate IAM Users
If you've done everything correctly, you should have the following setup:
- Patron has the permission policy
GroupEC2Accessattached to his identity. Patron has a tag with the keygroupand the valuedevopsattached to his identity. - Mykola has the permission policy
GroupEC2Accessattached to his identity. Mykola has a tag with the keygroupand the valuejavaattached to his identity. - Andrzej has no permission policy attached to his identity. Andrzej has no tags attached to his identity.
- Maria has no permission policy attached to her identity. Maria has no tags attached to her identity.
- All four users have a
CustomPowerUserBoundpermission boundary applied.
An IAM group is a collection of users. Groups are often based on job function and can be used to simplify provisioning common user access requirements. They allow you to manage permissions by applying policies to groups of users, rather than applying policies to each individual user.
Create IAM Groups
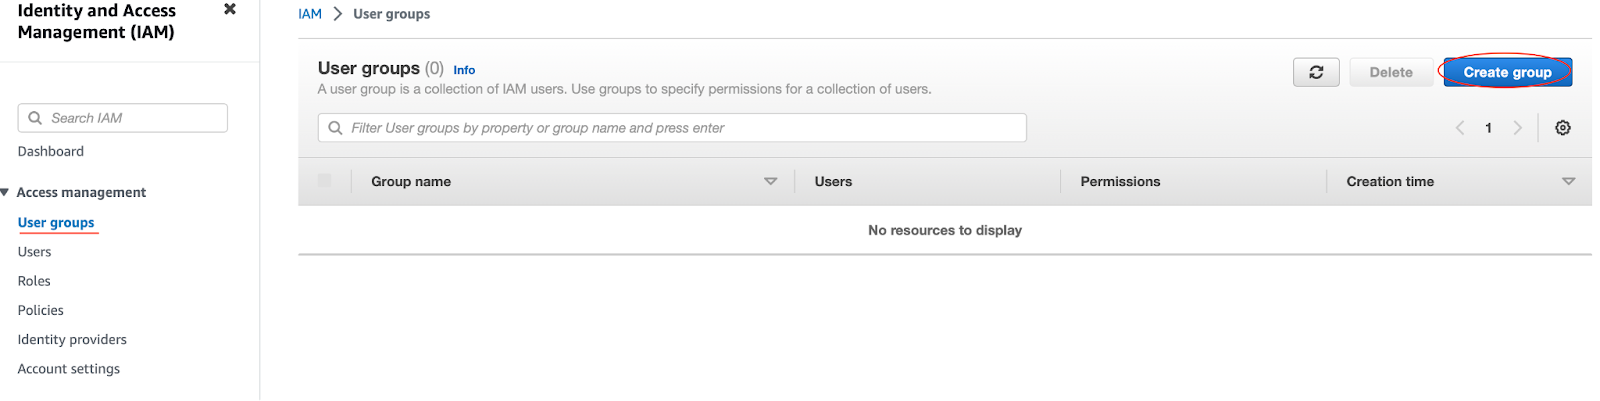
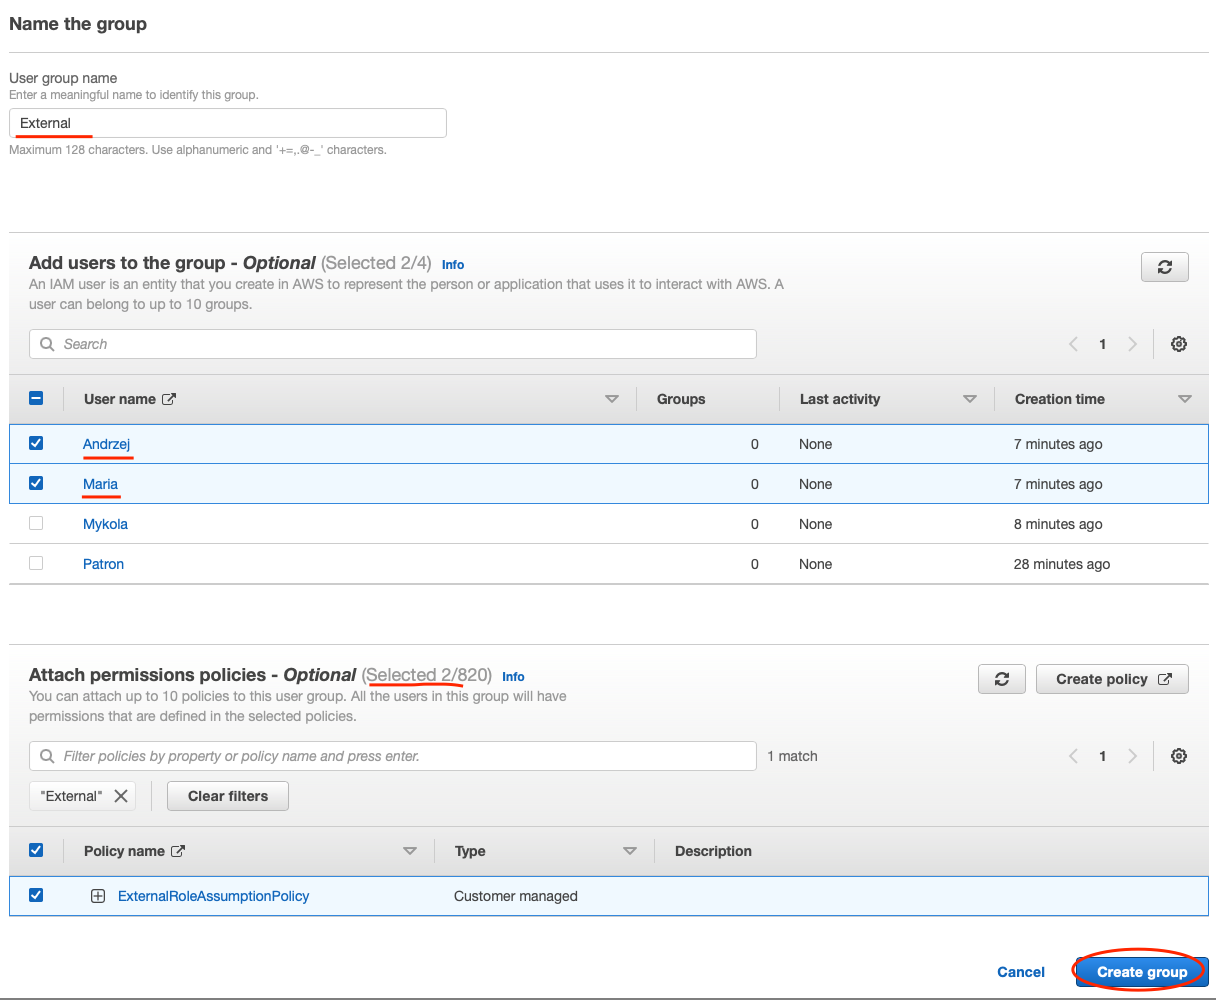
Access the AWS IAM console and select User Groups from the sidebar. Click Create Group.
Type in "External" as the User group game.
In the Add users to the group section select Andrzej and Maria.
In the Attach permissions policies section, enter the search string "S3" in the search bar and check the checkbox next to the AWS managed policy named AmazonS3ReadOnlyAccess. Policies are what give IAM entities permissions. AWS provides managed policies for many common access needs. We will use the AmazonS3ReadOnlyAccess policy which will provide read only access to the Amazon Simple Storage Service (S3) to all members of the External group.
In the same Attach permissions policies section execute a second search. Enter the search string "external" and add the customer-managed policy named ExternalRoleAssumptionPolicy. Click Create Group.
Validate IAM Group
If you've done everything correctly, you should have the following setup:
- You have created an IAM group and attached the AWS managed policy
AmazonS3ReadOnlyAccesswhich provides read only access to Amazon Simple Storage Service (S3) to members of this group. - You added the customer managed policy named
ExternalRoleAssumptionPolicywhich allows members of this group to assume roles which have been tagged with the keyexternal-assume-roleand the valuetrue. - You added the IAM users Andrzej and Maria into the External group.
IAM Roles can be assumed by AWS services, IAM users, or applications. They are assigned temporary rather than permanent credentials whenever assumed. Using roles for privileged permissions sets can help improve your security posture since credential exposure is minimized.
Create IAM Role for EC2 Instance
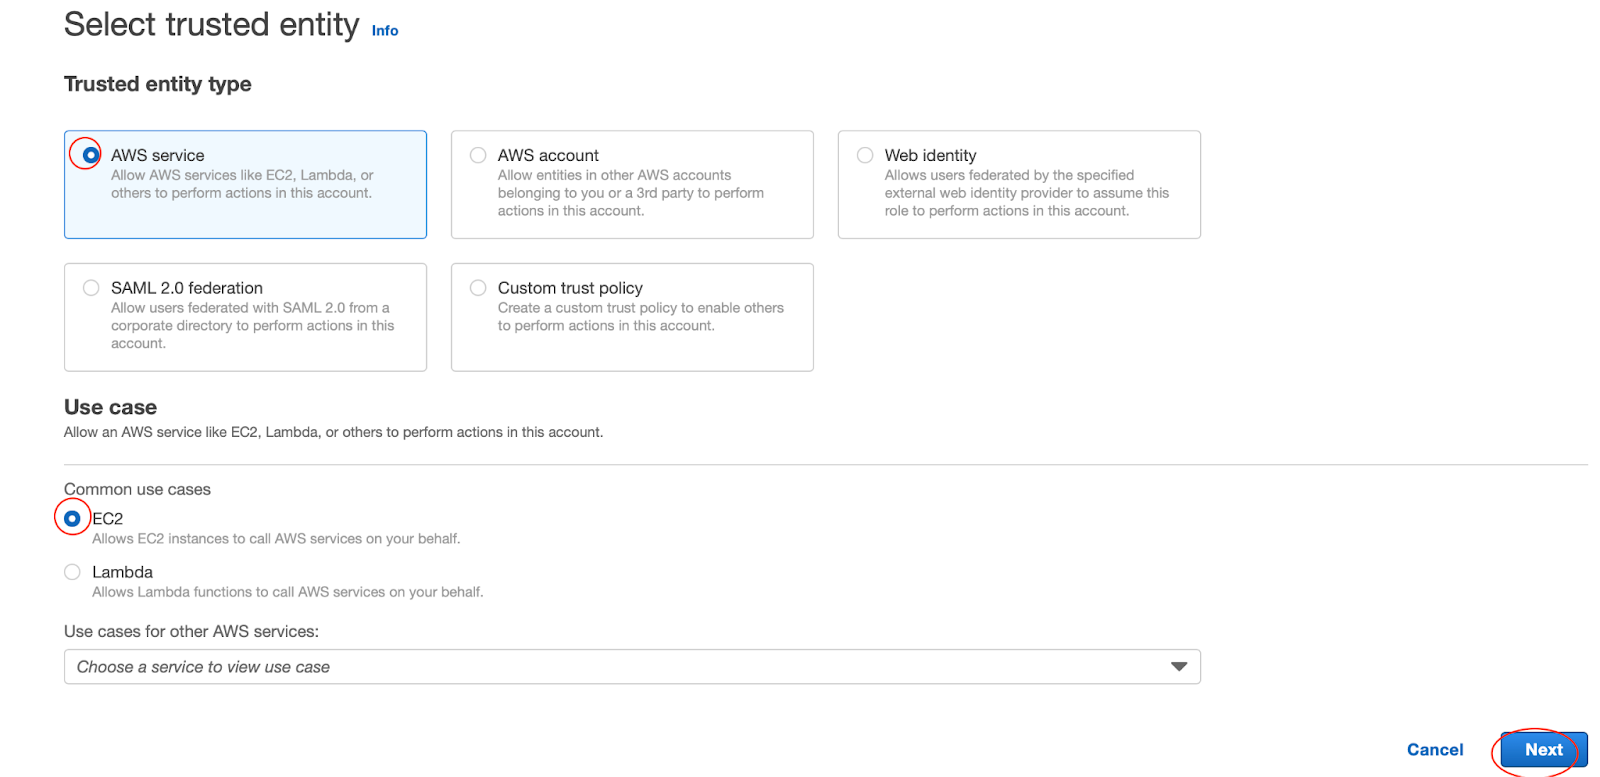
Access the AWS IAM console and select Roles from the sidebar. Click Create role.

On the Select trusted entity screen, you decide who or what will be able to assume this role. For this lab, we will create a role that allows an EC2 instance to read files in S3. Therefore, we will stay on the AWS service tab and select EC2. Click Next.
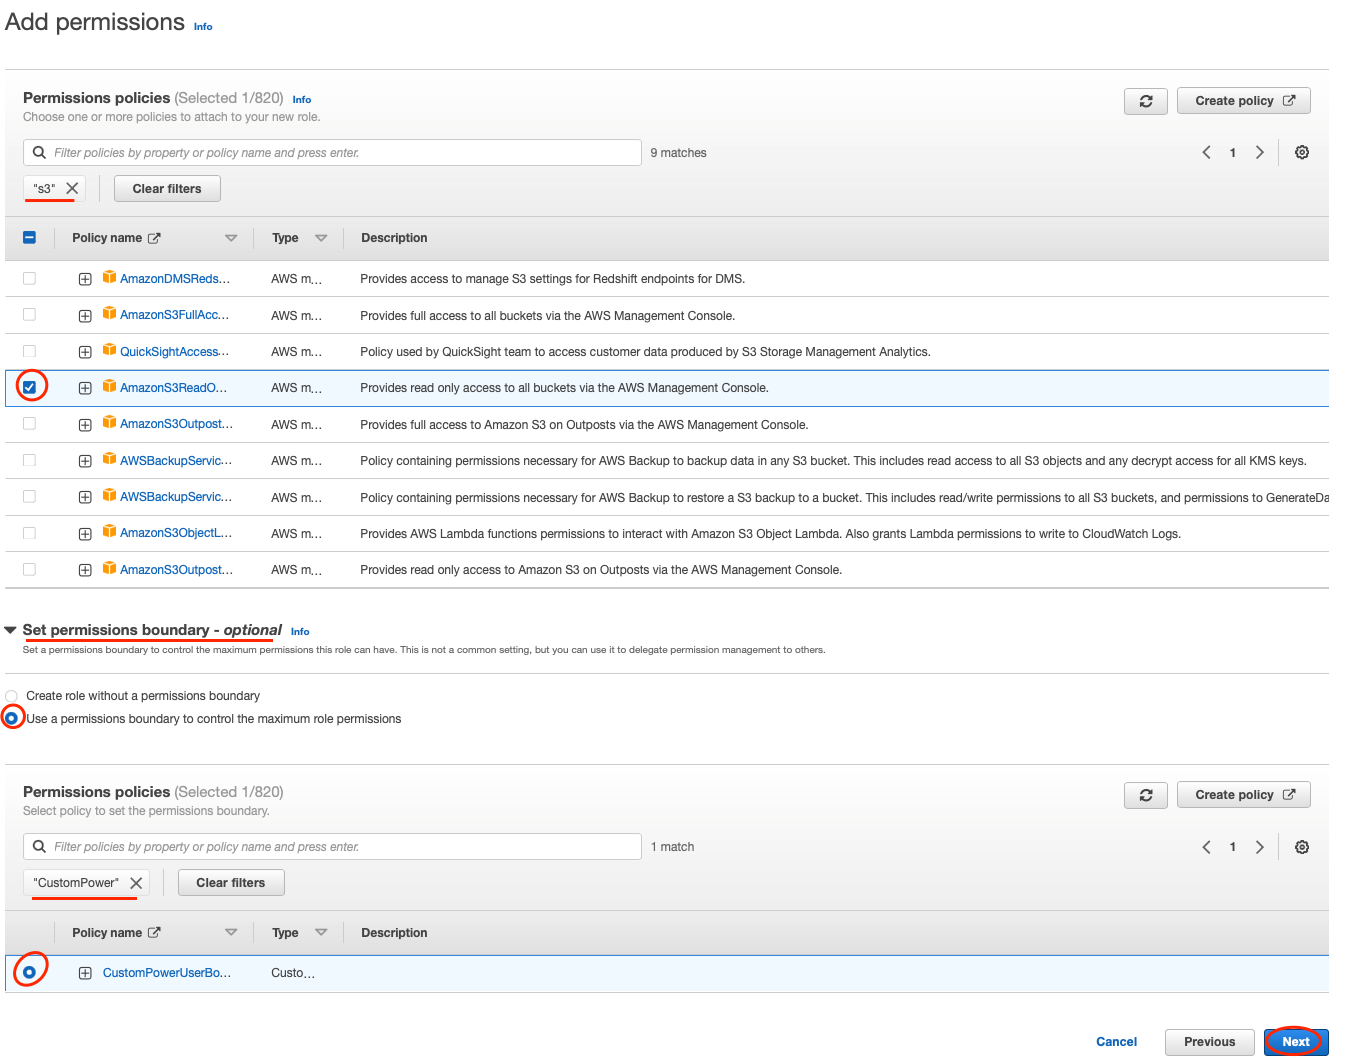
On Add permissions attach a managed policy with S3 Read Only access to the role by typing s3 into the search bar, then select the AmazonS3ReadOnlyAccess policy.
Open the Permissions boundary dropdown and check Use a permissions boundary to control the maximum permissions checkbox. Use the filter search to locate a policy named CustomPowerUserBound. Select the radio button next to the policy to select it. Click Next.
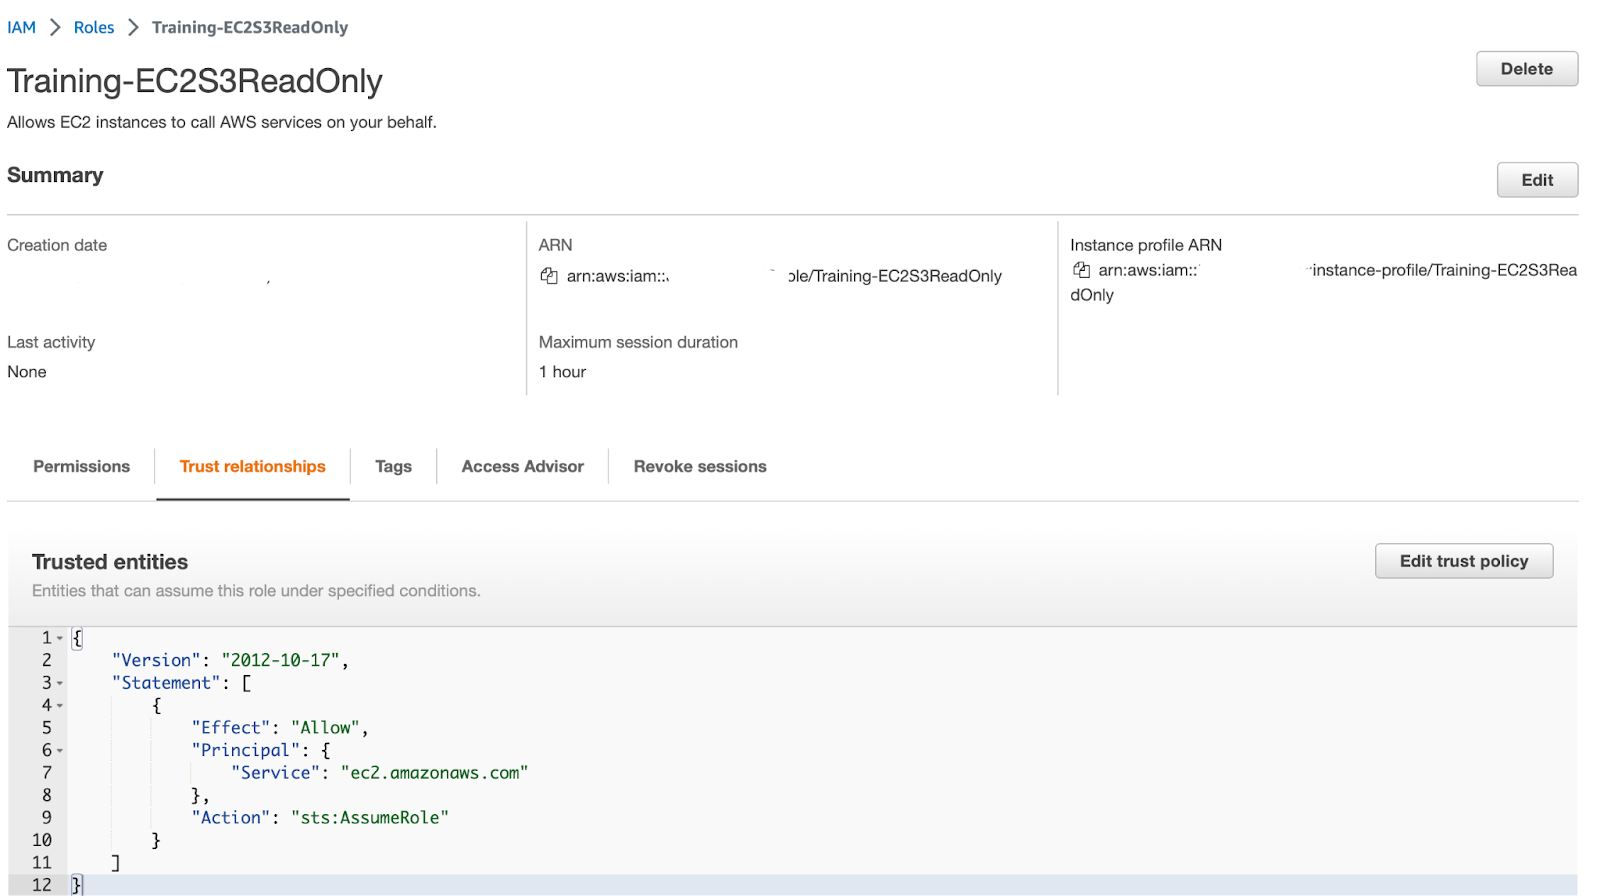
Name your role "Training-EC2S3ReadOnly" and optionally edit the role description to be a helpful summary of what this role is, then click Create Role.
You are returned to the IAM Roles console. Enter the name of the role you just created into the search bar and click on the role name.
You are now on the Summary screen of the role you just created. Here you can view and edit attributes of the role, such as how long the role's temporary credentials last. The default value as you can see below is 1 hour but can be up to 12 hours. Click on the Trust relationships tab and you will see that ec2.amazonaws.com is listed as a trusted entity that can assume this role.
Create IAM Role for external user
Select Roles from the IAM console sidebar. Then click Create Role.
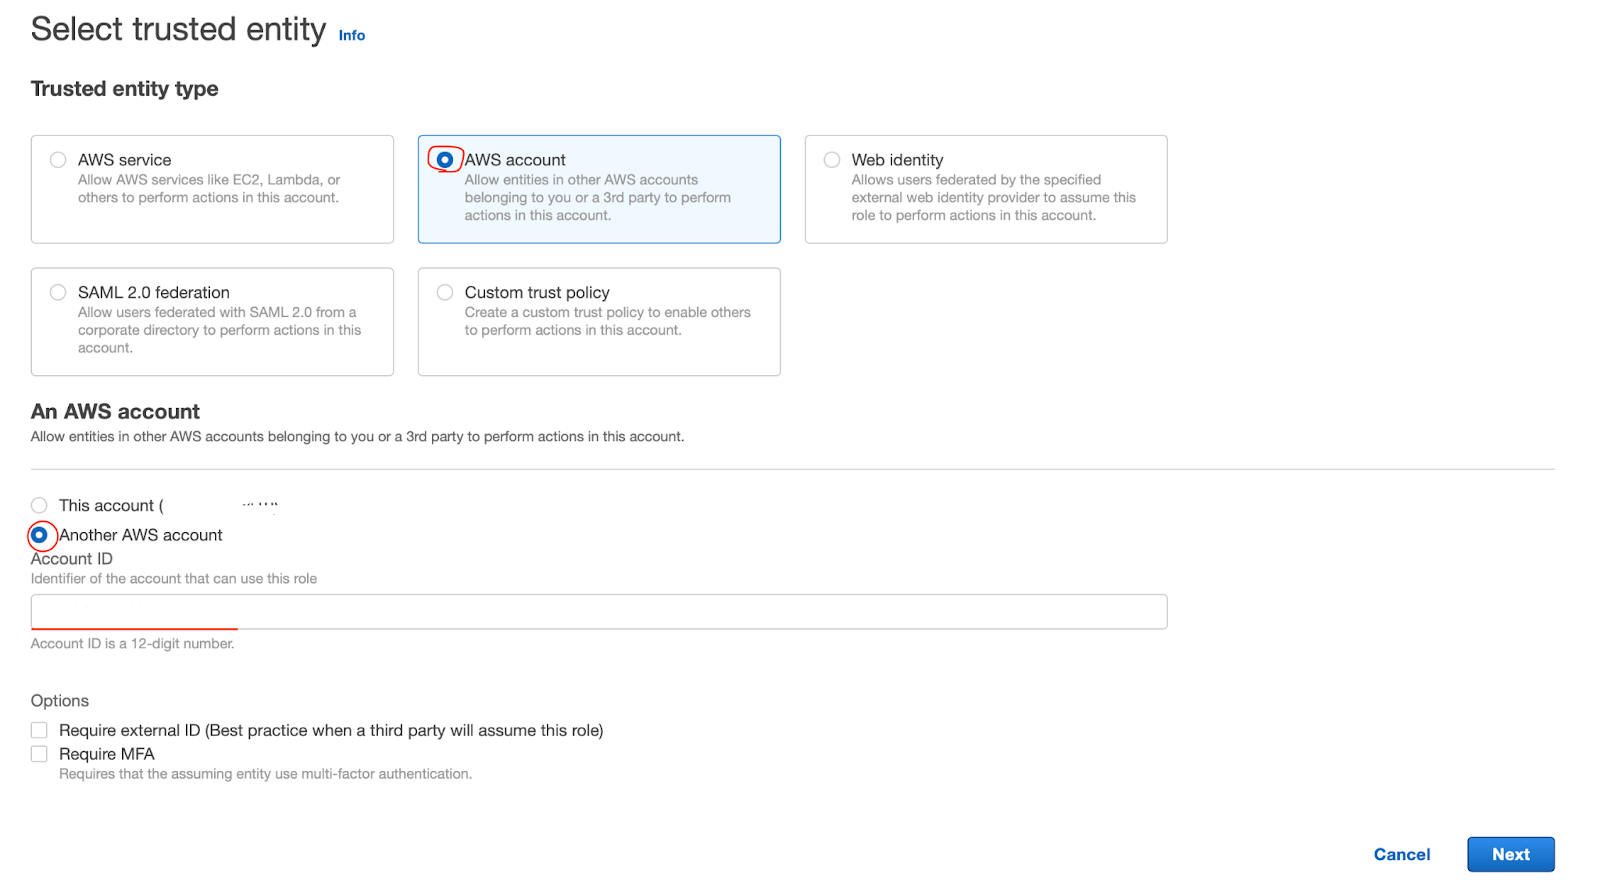
On the Select trusted entity screen, select AWS Account.
In the An AWS account section select Another AWS Account and in the Account ID text box, enter the Account ID of the AWS account that you are currently logged into. For the purposes of this lab, leave both options (require external ID, require MFA) unchecked. Click Next.
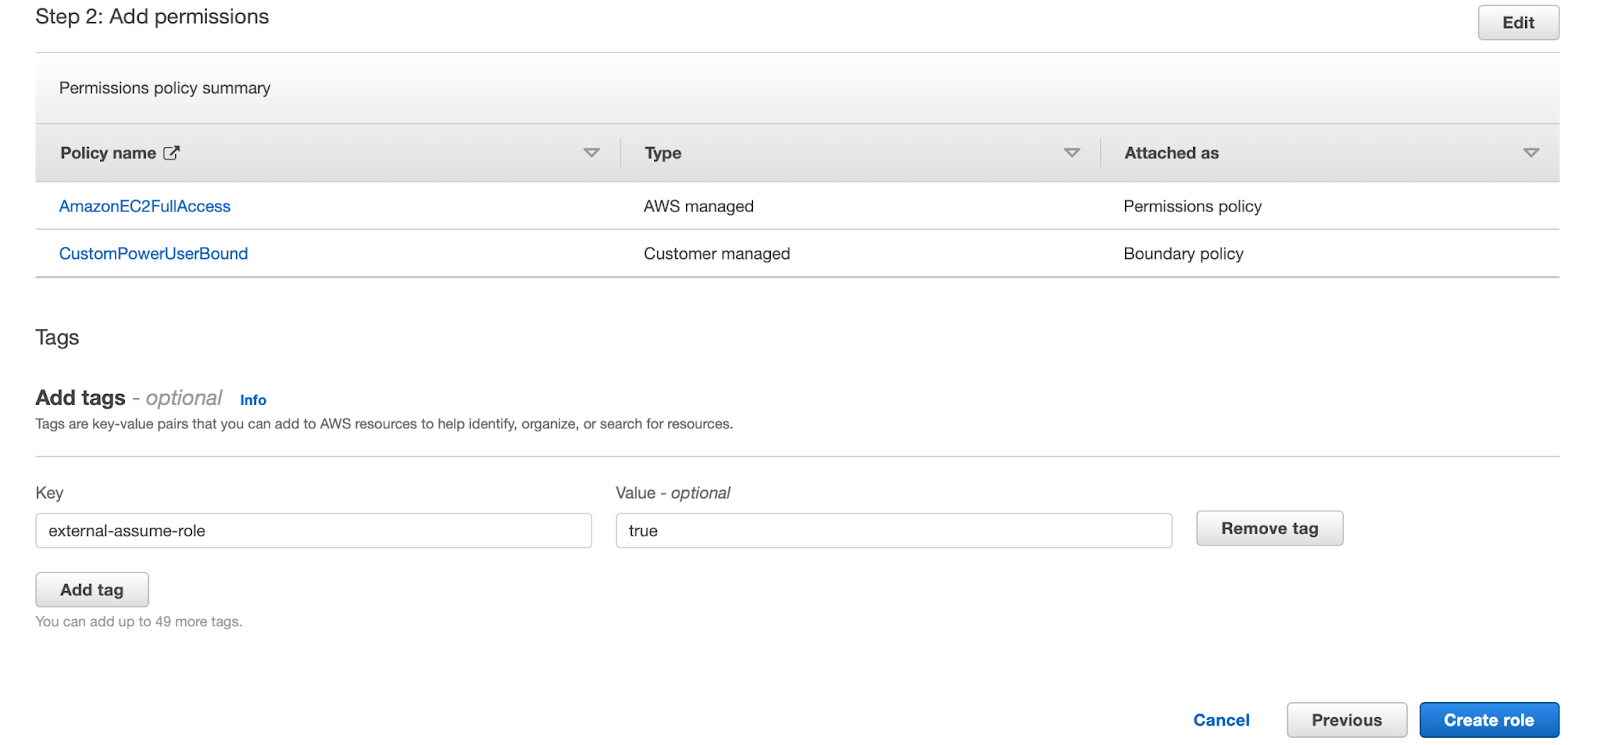
On the Add permissions screen, use the text box to perform a filtered search for the AmazonEC2FullAccess policy. Check the checkbox to select this policy and attach it to the role being created.
Open the Permissions boundary dropdown and check Use a permissions boundary to control the maximum permissions checkbox. Use the filter search to locate a policy named CustomPowerUserBound. Select the radio button next to the policy to select it. Click Next.
Name your role "Training-EC2PowerUser". On the Add Tags section, add a tag with the key external-assume-role and the value true. Click Create role.
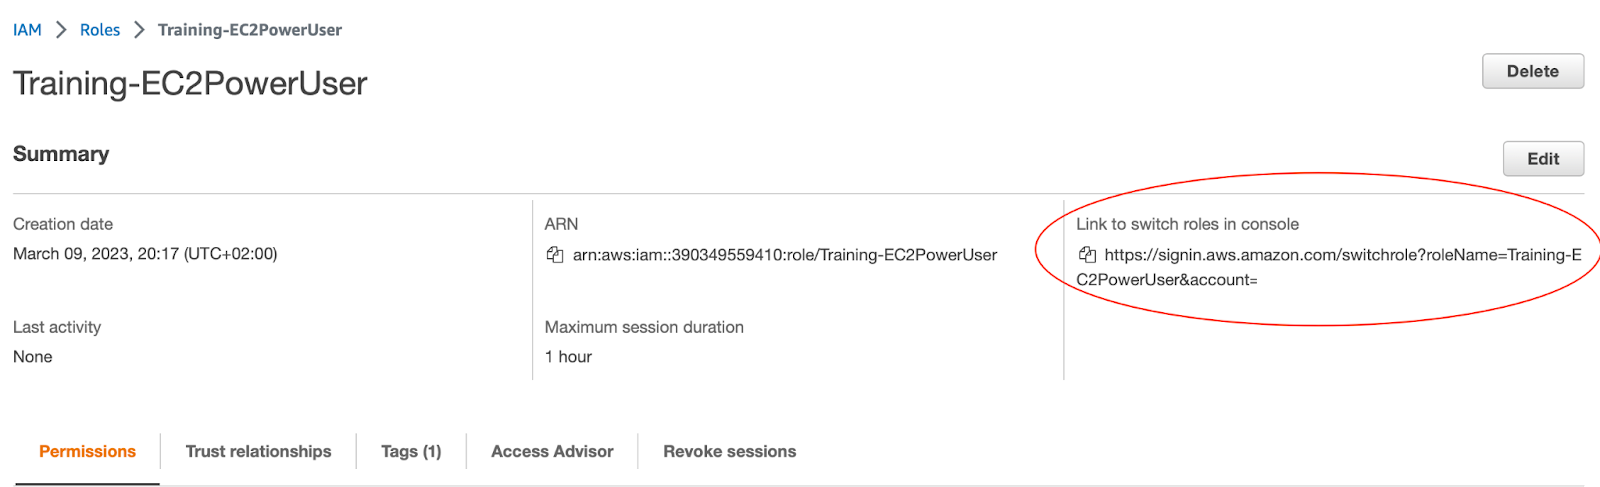
The role is created successfully. Access the Training-EC2PowerUser role details page by searching for role by name from the Roles dashboard.
Confirm that AmazonEC2FullAccess is listed under attached policies and copy the switch roles console link from your IAM dashboard. Copy into a text editor for safekeeping. You will need this URL to test access.
We can summarize the existing configurations we have completed in this lab as follows:
- A customer managed IAM identity policy named
GroupEC2Access. - A customer managed IAM identity policy named
ExternalRoleAssumptionPolicy. - A user named Patron, who has a tag with the key
groupand the valuedevops. Patron has theGroupEC2Accesspolicy attached to his identity. - A user named Mykola, who has a tag with the key
groupand the valuejava. Mykola has theGroupEC2Accesspolicy attached to his identity. - A user named Andrzej.
- A user named Maria.
- An IAM Group named External which has the AWS Managed policy named
AmazonS3ReadOnlyAccessattached to the group. Andrzej and Maria are members of the group. - A role named Training-EC2S3ReadOnly (which has a trust policy making the role assumable by an EC2 instance) that has the Amazon managed policy named
AmazonS3ReadOnlyAccessattached to the role. - A role named Training-EC2PowerUser (which has a trust policy making the role assumable by IAM entities within this AWS account) that has the Amazon managed policy named
AmazonEC2FullAccessattached to the role. The role has a tag with the keyexternal-assume-roleand the valuetrue. - All mentioned Principal entities have
CustomPowerUserBoundpermissions boundary applied.
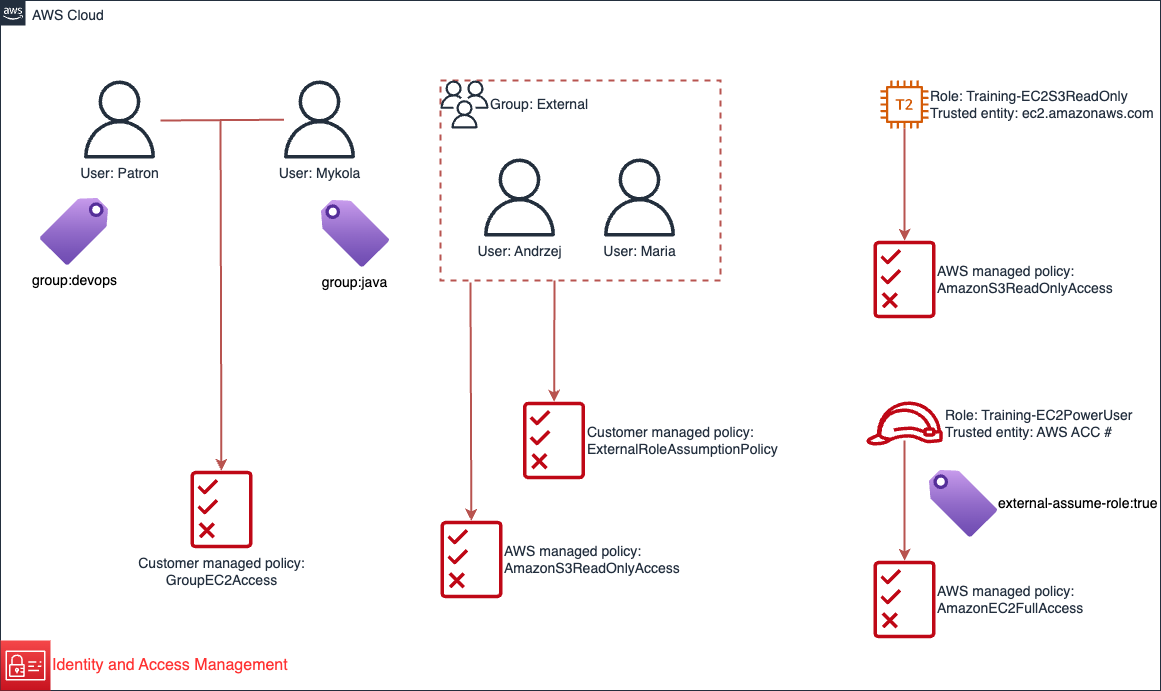
We have used both AWS and customer managed policies. We have attached policies to IAM users, IAM Roles and Groups of IAM users. We have tagged IAM Users Patron and Mykola. We have tagged the Training-EC2PowerUser IAM Role. It Is not possible to tag a Group of users.
Let's test the access provided.
Environment setup
Ensure that you are still logged into your AWS account using an identity which has been granted administrative access in the AWS account. Access the EC2 Console.
Click the Launch instance dropdown, then Launch instance. The EC2 Launch wizard appears.
In Name and tags click Add additional tags and add two tags. The first tag should have the key group and the value devops. The second tag should have the key Name and the value devops.

Select an Amazon Linux 2 AMI.
Select a t2.micro EC2 instance type.
In the Key pair section select Proceed without a key pair.
In networking select default VPC and select your security group with port 22 open to your IP address (or create one).
Leave rest as default values and click Launch instance.
Repeat the steps to provision a second EC2 instance in your AWS account to provision an EC2 instance for the java group. When completing steps for a second time:
- Change the tag values. When creating the JAVA EC2 instance, the first tag should have the key group and the value java. The second tag should have the key Name and the value java. Treat these values as case-sensitive.
- Do not create a second Security Group. Instead, select the existing security group or use the one you created previously.
Return to the AWS IAM console Dashboard.
Make note of the IAM user sign-in link in the AWS Account section in the top right corner. You will use this to sign in using the IAM User identities we have created in this lab to validate their access. Copy the IAM user sign-in link into a text editor for safekeeping. It should be of the format: https://youraccountID-or-alias.signin.aws.amazon.com/console
Log out of the AWS console.
Test Patron's access
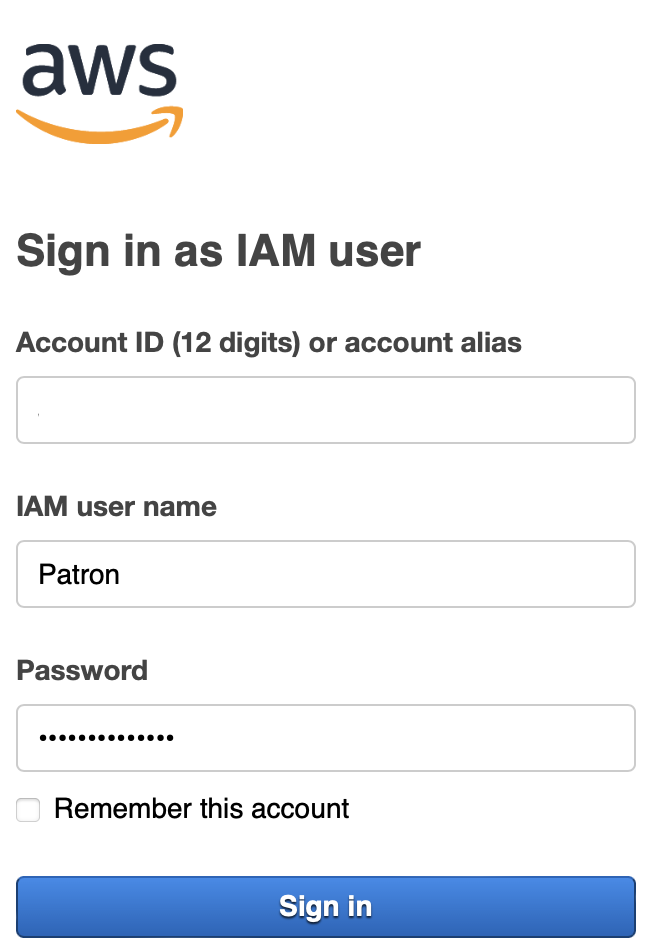
Log in as Patron using the IAM user sign-in link you collected from the IAM Console. Specify the IAM user Patron as the User and use the password you specified earlier when creating the user Patron.
Continue testing Patron's access. Access the EC2 console:
Select the checkbox for the EC2 instance named java. Attempt to Terminate the EC2 instance named java by selecting Terminate instance under the Instance state dropdown menu. The operation will fail because the group tag value attached to the EC2 instance does not match the group tag value attached to the Principal (Patron). The condition in the statement titled AllowGroupEC2Management in the GroupEC2Access policy is not met and the request fails.
Attempt the same operation for the EC2 instance named devops after deselecting the EC2 instance named java and selecting the instance named devops. The operation will succeed because the condition in the policy statement is met and the action is allowed.
Log out of the AWS Console.
Test Mykola's access
Log in as Mykola using the IAM user sign-in link you collected from the IAM Console. Specify the IAM user Mykola as the User and use the password you specified earlier when creating the user Mykola.
Access the EC2 console
Attempt to STOP the EC2 instance named java. The operation will succeed.
Do not terminate the EC2 instance named java.
Log out of the AWS Console.
You have validated access for Patron and Mykola to group EC2 resources based on tag key and tag values.
Test Andrzej's access
Log in as Andrzej using the IAM user sign-in link you collected from the IAM Console. Specify the IAM user Andrzej as the User and use the password you specified earlier when creating the user Andrzej.
Access the S3 console.
The operation will succeed. Attempt to create a new S3 bucket. The operation will fail. Andrzej has been provided read only access to S3 via his membership of the External IAM group.
While still logged in as the IAM user Andrzej, use the link captured earlier to switch roles to the Training-EC2PowerUser role. Paste the link or type in a browser. It should be of the format: https://signin.aws.amazon.com/switchrole?roleName=EC2PowerUser&account=youraccountID-or-alias
Alternatively, use the Switch Role option under the user dropdown menu in the primary AWS console. Make a note of the account ID from the user dropdown menu.
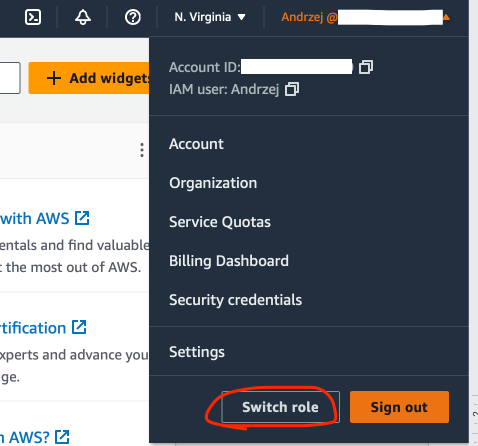
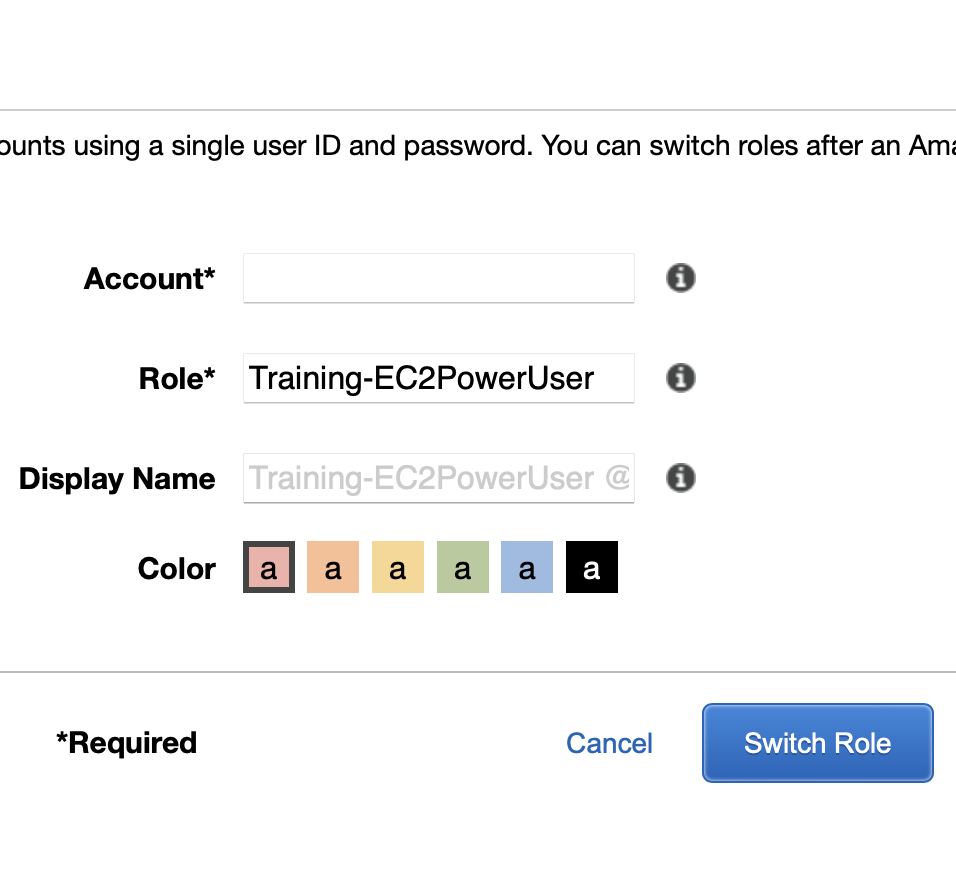
Provide your AWS account ID or account alias, the role name and a display value and color. Click Switch Role.
Having assumed the Training-EC2PowerUser role, proceed to the EC2 console and terminate the remaining EC2 instance named java. The operation will succeed.
Access the S3 console. The operation will fail. You do not have access to the S3 console. This is because the permissions of your IAM user (e.g. Andrzej) and any roles that you switch to (e.g. Training-EC2PowerUser) are not cumulative. Andrzej has S3 read access as a result of his membership to the External IAM Group. The Training-EC2PowerUser role has access to EC2 but no access to S3.
Log out of the AWS Console.
Test the EC2 Instance profile access
Log into the AWS account you used for this lab using the original identity with administrative access.
Access the EC2 Console.
Click the Launch instance dropdown, then Launch instance. The EC2 Launch wizard appears.
In Name and tags give the instance any recognizable name.
Select an Amazon Linux 2 AMI.
Select a t2.micro EC2 instance type.
In the Key pair section select your personal key pair (or create one).
In networking select default VPC and select your security group with port 22 open to your IP address (or create one).
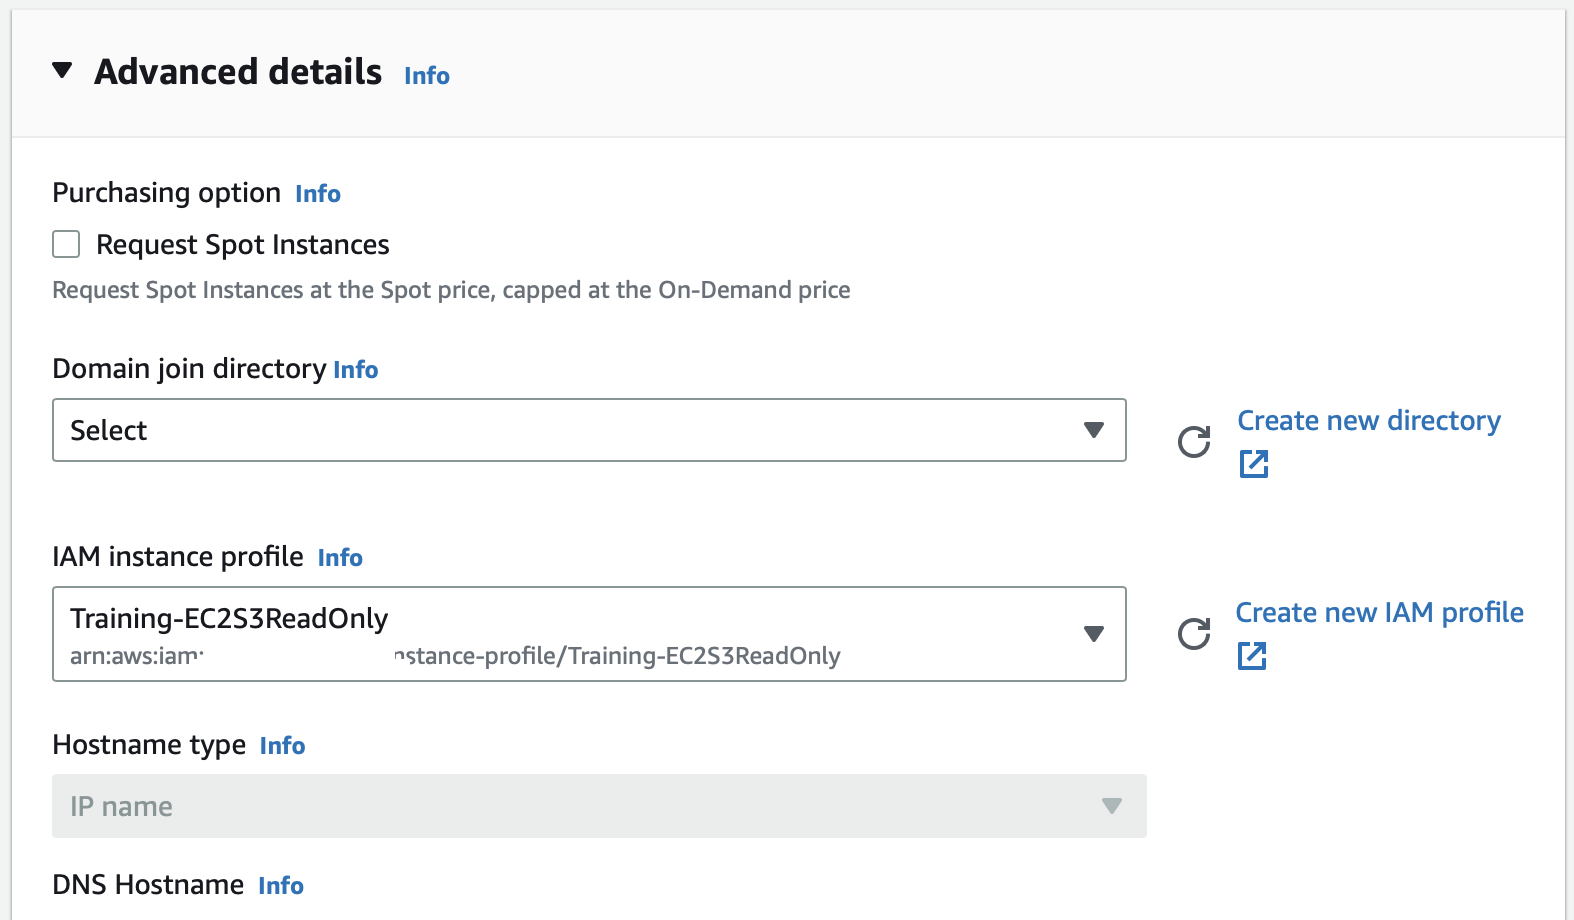
Scroll down to Advanced details and in the IAM instance profile select Training-EC2S3ReadOnly.
Leave rest as default values and click Launch instance.
Wait a few minutes till the instance is up and running.
Access the EC2 Console again.
Find your instance by name and SSH to it using an appropriate method for your OS.
Inside the instance try to run the following command:
$ aws ec2 describe-instances --region us-east-1The operation will fail. This is because the Training-EC2S3ReadOnly role used for the instance profile does not have EC2 permissions.
But we have configured the role with S3 read access. Inside the instance try to run the following command:
$ aws s3 lsThe command will display a list of S3 buckets.
Congratulations! Now you can provide different permissions to both Users and AWS Services (e.g., EC2) to perform operations inside your AWS account.
We will now clean up the remaining resources provisioned for this lab. Log into the AWS account you used for this lab using the original identity with administrative access.
Access the AWS IAM console.
Select Policies from the sidebar. Use the search bar to search for the policy named GroupEC2Access that you created. Select the radio button next to the policy and then select Delete from the Policy actions dropdown menu. Accept the confirmation to delete the IAM policy. Repeat this process to also delete the policy named ExternalRoleAssumptionPolicy that you created.
Select Users from the sidebar. For each user that you created (Patron, Mykola, Andrzej, Maria), select the checkmark next to their user name and then click Delete User. Accept the confirmations to delete the IAM users.
Select User Groups from the sidebar. Check the checkbox next to the group named External that you created and then select Delete Group from the Group Actions dropdown menu. Accept the confirmation to delete the IAM group.
Select Roles from the sidebar. Use the search bar to search for the roles named Training-EC2S3ReadOnly and Training-EC2PowerUser that you created. Check the checkbox next to each role and then click Delete Role. Accept the confirmation to delete the IAM Roles.
Access the EC2 console.
Validate that the instances named devops and java have been terminated successfully.
Optionally, Select Security Groups from the EC2 console sidebar. Click the Security group ID of the security group named that you created to see the Details screen. Select the Delete security group from the Actions dropdown menu. Accept the confirmation to delete the security group.
What's next?
More AWS functionality ;)