
Last Updated: 2020-09-23
What is 3 Tier Architecture?
A three-tier architecture is a software architecture pattern where the application is broken down into three logical tiers:
- Presentation layer,
- Business logic layer,
- Data storage layer.
This architecture is used in a client-server application such as a web application that has:
- frontend,
- backend,
- database.
Each of these layers or tiers does a specific task and can be managed independently of each other. This a shift from the monolithic way of building an application where the frontend, the backend and the database are both sitting in one place.
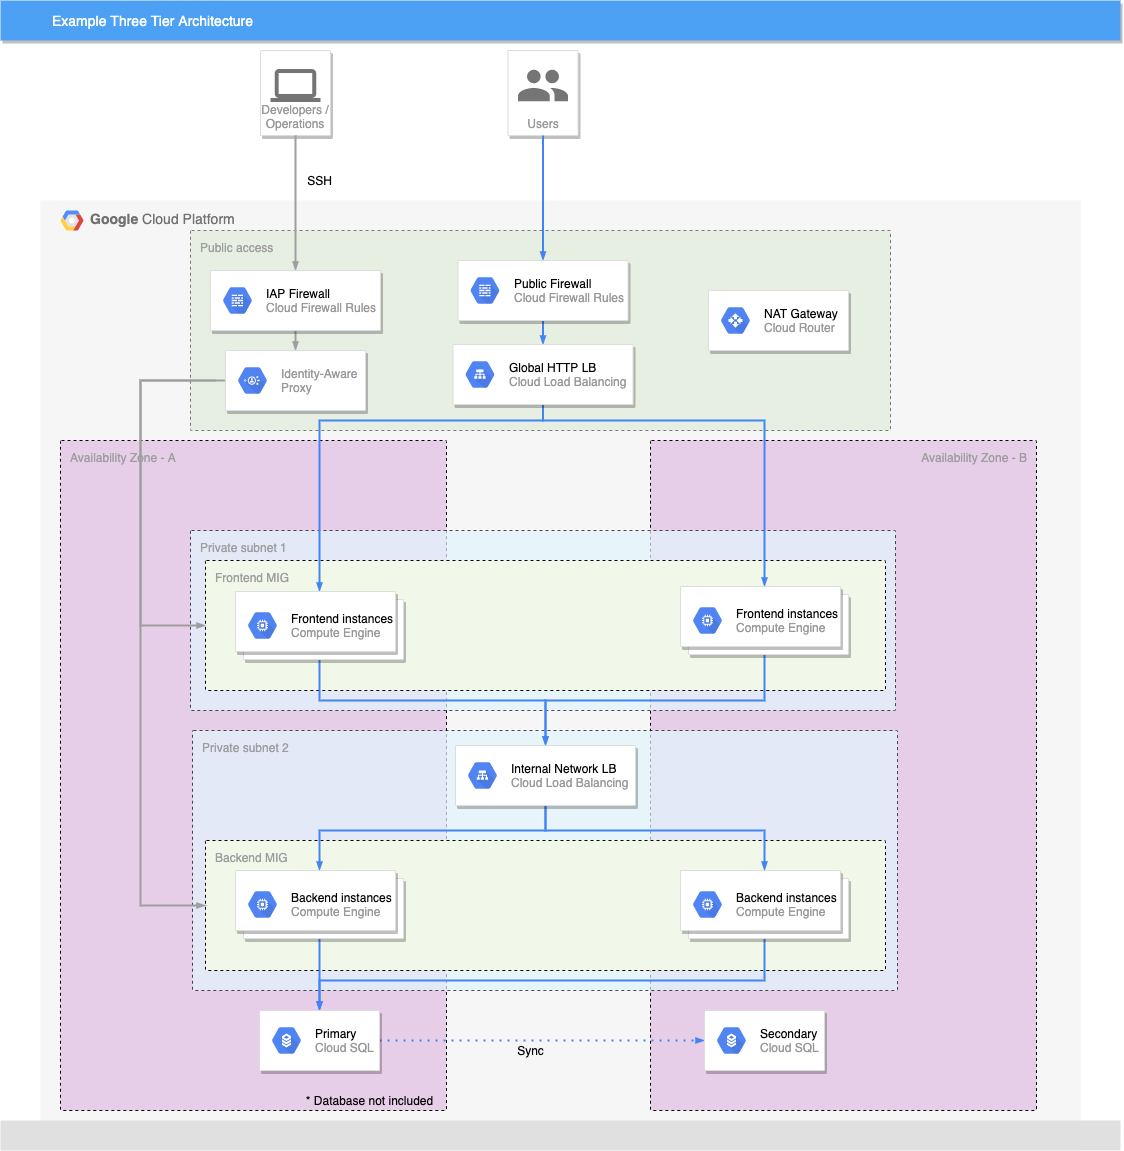
In this lab, you will use the following GCP services to design and build a three-tier cloud infrastructure:
- Google Compute Engine (GCE),
- Managed Instance Groups (MIG), Virtual Private Cloud(VPC),
- Cloud Load Balancer (CLB),
- Firewall Rules
- Cloud NAT.
Your infrastructure will be designed to be highly available and fault tolerant.
Architecture Design Goals
Modularity
The essence of having a three-tier architecture is to modularize your application so that each part can be managed independently of each other. With modularity, teams can focus on different tiers of the application and make changes as quickly as possible. Also, modularization helps you recover quickly from an unexpected disaster by focusing solely on the faulty part.
Scalability
Each tier of the architecture can scale horizontally to support the traffic and request demand coming to it. This can easily be done by adding more GCE instances to each tier and load balancing across them. For instance, assuming you have two GCE instances serving your backend application and each of the GCE instances is working at 80% CPU utilization, you can easily scale the backend tier by adding more GCE instances to it so that the load can be distributed. You can also automatically reduce the number of the GCE instances when the load is less.
High Availability
With the traditional data centre, your application is sitting in one geographical location. If there is an earthquake, flooding or even power outage in that location where your application is hosted, your application will not be available. With GCP, you can design your infrastructure to be highly available by hosting your application in different locations known as the availability zones.
Fault Tolerant
You want your infrastructure to comfortably adapt to any unexpected change both to traffic and fault. This is usually done by adding a redundant system that will account for such a spike in traffic when it does occur. So instead of having two GCE instances working at 50% each, such that when one instance goes down, the other instance will be working at 100% capacity until a new instance is brought up by your Managed Instance Group, you have an extra instance making it three instances working at approximately 35% each. This is usually a tradeoff made against the cost of setting up a redundant system.
Security
You want to design an infrastructure that is secured and protected from the prying eyes of hackers. As much as possible, you want to avoid exposing your interactions within the application over the internet. This simply means that the application parts will communicate with each other using a private IP. The presentation (frontend) tier of the infrastructure will be in a private subnet (the subnet with no public IP assigned to its instances) within the VPC. Users can only reach the frontend through the cloud load balancer. The backend and the database tier will also be in the private subnet because you do not want to expose them over the internet. You will use Identity-Aware Proxy for remote SSH and a NAT gateway for your private subnets to access the internet. The GCP firewall rules help us limit access to your infrastructure.
What you'll build
In this codelab, you're going to build a 3 Tier Web application.
Your app will:
- Be highly available.
- Fault tolerant.
- Secure.
What you'll learn
- How to create and manage Managed Instance Groups
- How to create and manage Load Balancers
- How to have a secure SSH connection using Bastion host
This codelab is focused on building a 3 Tier infrastructure. Non-relevant concepts and code blocks are glossed over and are provided for you to simply copy and paste.
What you'll need
- A recent version of your favourite Web Browser
- Basics of BASH
- GCP account
- Cloud Shell
Create an Account
In this step, you register for the Google Cloud Platform free trial and create a project. The free trial provides you:
- $300 Credit for Free
- Access to Google Cloud Platform Products
- You Won't be Billed (though you need to enter your credit card)
- Build with the Power, Speed, Security, Reliability, and Scalability of Google
To register for the free trial open the free trial Registration page.
If you do not have a Gmail account, follow the steps to create one. Otherwise, login and complete the registration form.
Read and agree to the terms of service. Click Accept and start a free trial.
Create a Project
Next, create your first project using the Google Cloud Platform Console. The project is used to complete the rest of the lab.
To create a project in the Google Cloud Platform Console, click Select a project > Create a project.
In the New Project dialog: for Project name, type whatever you like. Make a note of the Project ID in the text below the project name box; you need it later. Then click Create.
Upgrade Account (Optional)
In the upper-right corner of the console, a button will appear asking you to upgrade your account. Click Create a Project when you see it. If the Upgrade button does not appear, you may skip this step. If the button appears later, click it when it does.
When you upgrade your account, you immediately have access to standard service quotas, which are higher than those available on the free trial.
Finalize
On the GCP Console, use the left-hand side menu to navigate to Compute Engine and ensure that there are no errors.
At the end of this lab, you may delete this project and close your billing account if desired.
Open CloudShell
You will do most of the work from the Google Cloud Shell, a command line environment running in the Cloud. This virtual machine is loaded with all the development tools you'll need (docker, gcloud, kubectl and others) and offers a persistent 5GB home directory and runs in Google Cloud, greatly enhancing network performance and authentication. Open the Google Cloud Shell by clicking on the icon on the top right of the screen:

You should see the shell prompt at the bottom of the window:
Once connected to Cloud Shell, you should see that you are already authenticated and that the project is already set to your project ID.
Run the following command in Cloud Shell to confirm that you are authenticated
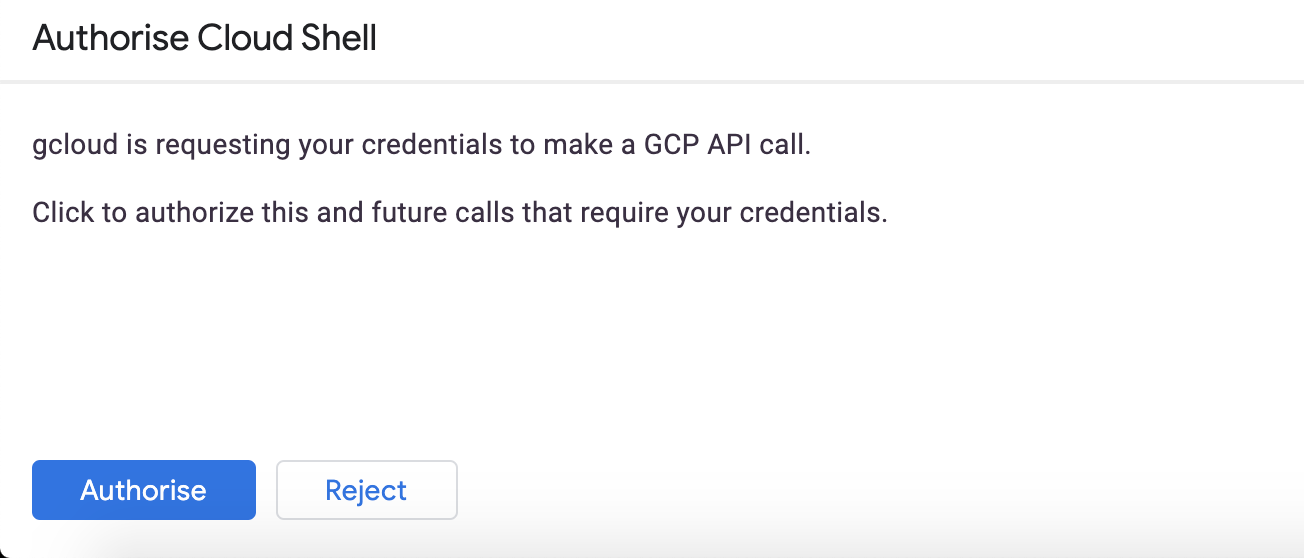
gcloud auth listIf it's the first time you are running Cloud Shell - authorize it.
You might need to run the command again after authorization. Command output:
 Credentialed Accounts
ACTIVE  ACCOUNT
*       <my_account>@<my_domain.com>

To set the active account, run:
$ gcloud config set account `ACCOUNT`Check if your project is set correctly.
gcloud config list projectCommand output
[core]
project = <PROJECT_ID>
If it is not, you can set it with this command:
gcloud config set project <PROJECT_ID>Virtual Private Cloud (VPC)
Virtual Private Cloud (VPC) is a virtual network where you create and manage your GCP resource in a more secure and scalable manner. For this lab we will use a regional VPC with custom subnets. To create a new VPC run:
$ gcloud compute networks create three-tier \
  --project=${GOOGLE_CLOUD_PROJECT} \
  --subnet-mode=custom \
  --mtu=1460 \
  --bgp-routing-mode=regional

...
NAME        SUBNET_MODE  BGP_ROUTING_MODE  IPV4_RANGE  GATEWAY_IPV4
three-tier  CUSTOM       REGIONAL
...
Subnets
The subnet is a way for you to group our resources within the VPC with their IP range. A subnet can be public or private. GCE instances within a public subnet have public IPs and can directly access the internet while those in the private subnet do not have public IPs and can only access the internet through a NAT.
For your setup, you will create the following subnets with the corresponding IP ranges.
- private-subnet-1 | CIDR (10.0.1.0/24) | Region (europe-west1)
- private-subnet-2 | CIDR (10.0.2.0/24) | Region (europe-west1)
The second private subnet will have Private Google Access enabled, so that VMs in this subnet can access Google services without assigning external IP addresses (e.g., Cloud SQL).
$ gcloud compute networks subnets create private-subnet-1 \
--network=three-tier \
--range=10.0.1.0/24 \
--region=europe-west1
$ gcloud compute networks subnets create private-subnet-2 \
--network=three-tier \
--range=10.0.2.0/24 \
--region=europe-west1 \
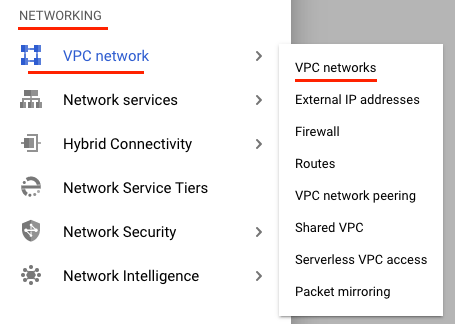
--enable-private-ip-google-accessIn Cloud Console navigate to Networking → VPC network → VPC networks.
You should see your new network with 2 subnets at the bottom:

Cloud NAT
Cloud NAT lets your GCE instances communicate with the internet using a shared, public IP address.
Cloud NAT uses NAT gateway to manage those connections. A NAT gateway is region- and VPC network-specific. If you have VM instances in multiple regions, you'll need to create a NAT gateway for each region.
Before we create the actual NAT Gateway we need to create a Cloud Router, that can dynamically exchange routes between a VPC network and any non-Google network. By default, Cloud Router advertises subnets in its region for regional dynamic routing. To create a Cloud Router, we need to provide an Autonomous System Number (64512 - 65534, 4200000000 - 4294967294), that is not used anywhere in our infrastructure.
$ gcloud compute routers create nat-router \
  --network three-tier \
  --asn 65000 \
  --region europe-west1
The simplest configuration that we will use automatically allocates the necessary external IP addresses to provide NAT services to a region. VM instances without external IP addresses in any subnet of the region are provided internet access through NAT.
$ gcloud compute routers nats create nat-gw \
--router=nat-router \
--auto-allocate-nat-external-ips \
--nat-all-subnet-ip-ranges \
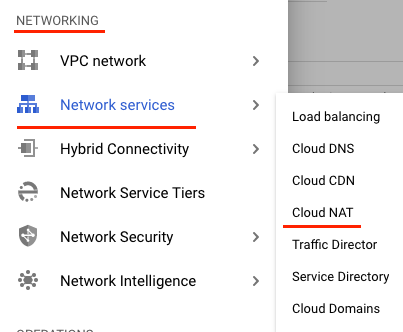
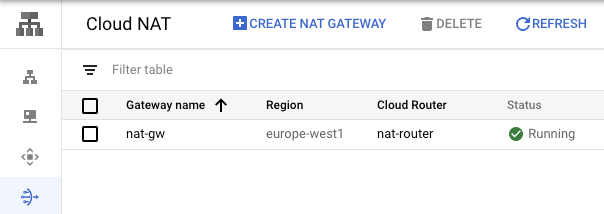
--region europe-west1In Cloud Console navigate to Networking → Network services → Cloud NAT.
You should see your NAT Gateway up and running using your Cloud Router.
Firewall Rules
VPC firewall rules let you allow or deny connections to or from your GCE instances based on a configuration that you specify. Enabled VPC firewall rules are always enforced, protecting your instances regardless of their configuration and operating system, even if they have not started up.
Every VPC network functions as a distributed firewall. While firewall rules are defined at the network level, connections are allowed or denied on a per-instance basis. You can think of the VPC firewall rules as existing not only between your instances and other networks, but also between individual instances within the same network.
In addition to firewall rules that you create, Google Cloud has other rules that can affect incoming (ingress) or outgoing (egress) connections:
- Google Cloud doesn't allow certain IP protocols, such as egress traffic on TCP port 25 within a VPC network.
- Google Cloud always allows communication between a VM instance and its corresponding metadata server at
169.254.169.254. - Every network has two implied firewall rules that permit outgoing connections and block incoming connections. Firewall rules that you create can override these implied rules.
Default VPC networks include pre-populated firewall rules, including an ingress rule that allows ingress from sources in the 10.128.0.0/9 range (CIDR for default network). For custom subnets and custom mode VPC networks, you'll need to create your own ingress allow firewall rules.
First, let's set up basic Firewall rules.
Create a firewall rule to allow access (TCP, UDP, ICMP ports) internally within our private subnets in VPC:
$ gcloud compute firewall-rules create allow-internal-private \
  --allow tcp:1-65535,udp:1-65535,icmp \
  --source-ranges 10.0.1.0/24,10.0.2.0/24 \
  --network three-tier \
  --priority 65534
Create a firewall rule to allow ingress ICMP traffic from any source to any instance in the network. It enables tools such as ping.
$ gcloud compute firewall-rules create default-allow-icmp-three-tier \
  --allow icmp \
  --network three-tier \
  --priority 65534
We will be creating load balancers & health checks later on, so we need a firewall rule that will allow Load Balancer health checks to reach our private instances in the private subnet. Also, to limit which instances are going to be accessible for health checks we're going to add a network tag:
$ gcloud compute firewall-rules create allow-lb-health-three-tier \
  --direction=INGRESS \
  --action=allow \
  --rules=tcp:80 \
  --target-tags=allow-healthcheck \
  --source-ranges=130.211.0.0/22,35.191.0.0/16,209.85.152.0/22,209.85.204.0/22 \
  --network three-tier
Our users will access our frontend instances from any part of the world through load balancer, so we need to allow HTTP from anywhere in the world. Once again, limiting the instancess affected using a tag:
$ gcloud compute firewall-rules create allow-http-three-tier \
  --direction=INGRESS \
  --action=allow \
  --rules=tcp:80 \
  --target-tags=allow-http \
  --network three-tier
Finally, we can use Identity-Aware Proxy (IAP) TCP forwarding to enable administrative access to VM instances that do not have public IP addresses or do not permit direct access over the internet, such as the ones in our private subnet. Same as before, we're going to use a network tag to limit which instances are accessible that way.
$ gcloud compute firewall-rules create allow-ssh-ingress-from-iap \
  --direction=INGRESS \
  --action=allow \
  --rules=tcp:22 \
  --source-ranges=35.235.240.0/20 \
  --target-tags=allow-ssh \
  --network three-tier
To set up a load balancer with a Compute Engine backend, your VMs need to be in instance groups. Managed Instance Groups can adjust the number of the GCE instances serving the application based on need, so it can scale to accommodate traffic or shrink when there is no traffic to save cost.
You will create four virtual machine instances: two to serve as backends and two to serve as frontends.
Backend instance group
To create an instance group, you need to create an Instance Template for the VMs in the group. We will use a startup script to populate our dummy backend application.
Create the template:
$ gcloud compute instance-templates create backend-template \
  --region=europe-west1 \
  --network=three-tier \
  --subnet=private-subnet-2 \
  --tags=allow-ssh,allow-healthcheck \
  --image-family=debian-10 \
  --image-project=debian-cloud \
  --boot-disk-size=10GB \
  --machine-type=f1-micro \
  --no-address \
  --metadata=startup-script='#! /bin/bash
  sudo apt-get update
  sudo apt-get install -y git apache2
  cd /var/www/html
  sudo rm index.html -f
  sudo git init
  sudo git pull https://github.com/DmyMi/2048.git
  ZONE=$(curl "http://metadata.google.internal/computeMetadata/v1/instance/zone" -H "Metadata-Flavor: Google")
  sed -i "s|zone-here|$ZONE|" /var/www/html/index.html
  sudo systemctl restart apache2'
Next, we will create a regional instance group spread across two availability zones:
$ gcloud compute instance-groups managed create backend-mig \
  --template=backend-template \
  --size=2 \
  --zones=europe-west1-b,europe-west1-c \
  --region=europe-west1
Finally, we need to setup auto scaling policy to scale up to a maximum of 5 instances with 70% CPU threshold:
$ gcloud compute instance-groups managed set-autoscaling backend-mig \
--max-num-replicas=5 \
--scale-based-on-cpu \
--target-cpu-utilization=0.7 \
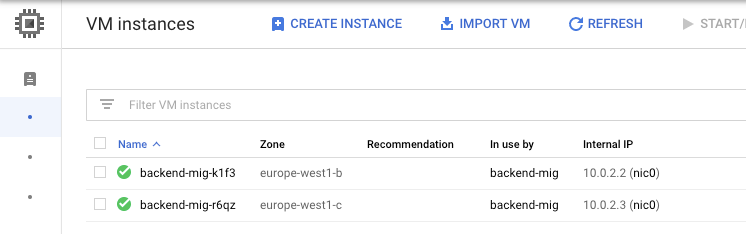
--region=europe-west1In Cloud Console navigate to Compute → Compute Engine → VM Instances.
You should see 2 instances online:
Backend Load Balancer
There are several types of load balancers in Google Cloud Platform including :
- a L3 Network Load Balancer
- a L7 HTTP(s) Load Balancer
Let's create an internal regional network load balancer for our backend instance group.
For that we need a backend service. A backend service allows you to have a single access point to all the instances in a group and is necessary for load balancing.
First, create a health check. As we're creating a Network load balancer - we will use a TCP health check.
$ gcloud compute health-checks create tcp backend-check \
  --port 80
Then create a backend service:
$ gcloud compute backend-services create backend-bs \
    --global-health-checks \
    --protocol=TCP \
    --load-balancing-scheme=INTERNAL \
    --network=three-tier \
    --health-checks=backend-check \
    --region=europe-west1
Next, add our instance group to the backend service:
$ gcloud compute backend-services add-backend backend-bs \
    --instance-group=backend-mig \
    --instance-group-region=europe-west1 \
    --balancing-mode=CONNECTION \
    --region=europe-west1
Now, lets create an internal regional network load balancer targeting our instance group:
$ gcloud compute forwarding-rules create backend-lb \
  --ports 80 \
  --backend-service backend-bs \
  --load-balancing-scheme=INTERNAL \
  --network=three-tier \
  --subnet=private-subnet-2 \
  --ip-protocol=TCP \
  --region=europe-west1
Check if the load balancer is created and write down its IP address, we will need it later.
$ gcloud compute forwarding-rules list

NAME        REGION        IP_ADDRESS  IP_PROTOCOL  TARGET
backend-lb  europe-west1  10.0.2.x    TCP          europe-west1/backendServices/backend-bs
Frontend instance group
Now we need to do the same for the frontend part of the application. As a dummy front end we will use a NGINX that will just forward requests to the backend.
First, create a startup script:
$ touch startup.sh
$ cloudshell edit startup.sh
Paste the following code:
#! /bin/bash

# Install NGINX
sudo yum -y update; sudo yum clean all
sudo yum -y install http://nginx.org/packages/centos/7/noarch/RPMS/nginx-release-centos-7-0.el7.ngx.noarch.rpm; sudo yum -y makecache
sudo yum -y install nginx-1.14.0

# Remove default files we don't need
sudo rm -f /etc/nginx/conf.d/default.conf

sudo cat <<__EOF__>/etc/nginx/nginx.conf
pid /run/nginx.pid;
worker_processes auto;
worker_rlimit_nofile 1024;

events {
        multi_accept on;
        worker_connections 1024;
}

http {
    upstream myapp {
        server INTERNAL_LOADBALANCER_IP;
    }

    server {
        listen 80 default_server;
        server_name "";
        location / {
            proxy_pass http://myapp;
            proxy_set_header Host \$host;
            proxy_http_version 1.1;
            proxy_read_timeout 120s;
        }
    }
}
__EOF__
sudo systemctl restart nginx
Back in Cloud Shell, create the template:
$ gcloud compute instance-templates create frontend-template \
  --region=europe-west1 \
  --network=three-tier \
  --subnet=private-subnet-1 \
  --tags=allow-ssh,allow-healthcheck,allow-http \
  --image-family=centos-7 \
  --image-project=centos-cloud \
  --boot-disk-size=20GB \
  --machine-type=f1-micro \
  --no-address \
--metadata-from-file startup-script=startup.shNext, we will create a regional instance group spread across two availability zones:
$ gcloud compute instance-groups managed create frontend-mig \
  --template=frontend-template \
  --size=2 \
  --zones=europe-west1-b,europe-west1-c \
  --region=europe-west1
Finally, we need to setup auto scaling policy to scale up to a maximum of 5 instances depending on HTTP load balancing hits:
$ gcloud compute instance-groups managed set-autoscaling frontend-mig \
  --max-num-replicas=5 \
  --scale-based-on-load-balancing \
  --target-load-balancing-utilization=0.7 \
  --region=europe-west1
Run the following to check if instances are created:
$ gcloud compute instances list

NAME               ZONE            MACHINE_TYPE  PREEMPTIBLE  INTERNAL_IP  EXTERNAL_IP  STATUS
backend-mig-79pz   europe-west1-b  f1-micro                   10.0.2.x                  RUNNING
frontend-mig-gjmn  europe-west1-b  f1-micro                   10.0.1.x                  RUNNING
backend-mig-zfbk   europe-west1-c  f1-micro                   10.0.2.x                  RUNNING
frontend-mig-h65c  europe-west1-c  f1-micro                   10.0.1.x                  RUNNING
You should see 4 instances online: 2 backends and 2 frontends.
Frontend Load Balancer
Let's create a regional HTTP load balancer for our frontend instance group. It will allow us to connect to our application from the outside world.
First, create a health check. As we're creating a HTTP load balancer - we will use a http health check.
$ gcloud compute health-checks create http frontend-check \
  --port 80
Set a named port on our instance group:
$ gcloud compute instance-groups managed set-named-ports frontend-mig \
  --named-ports http:80 \
  --region=europe-west1
Then create a global backend service for frontend instances:
$ gcloud compute backend-services create frontend-bs \
  --global \
  --global-health-checks \
  --protocol=HTTP \
  --port-name=http \
  --health-checks=frontend-check
Next, add our instance group to the backend service:
$ gcloud compute backend-services add-backend frontend-bs \
  --instance-group=frontend-mig \
  --instance-group-region=europe-west1 \
  --balancing-mode=RATE \
  --max-rate-per-instance=100 \
  --capacity-scaler=0.8 \
  --global
Next, create an URL map to route the incoming requests to the appropriate backend services. In this case, the request path mappings defined via the --path-rules flag split traffic according to the URL path in each request to your site. Traffic that does not match an entry in the --path-rules list is sent to the entry in the --default-service flag.
$ gcloud compute url-maps create frontend-map \
  --default-service frontend-bs
$ gcloud compute url-maps add-path-matcher frontend-map \
  --default-service frontend-bs \
  --path-matcher-name pathmap \
  --path-rules="/*=frontend-bs"
Now, let's create a HTTP Proxy and HTTP load balancer targeting our instance group:
$ gcloud compute target-http-proxies create frontend-proxy \
  --url-map=frontend-map
$ gcloud compute forwarding-rules create frontend-lb \
  --ports 80 \
  --global \
  --target-http-proxy=frontend-proxy
Check if the load balancer is created and copy its public IP.
$ gcloud compute forwarding-rules list
NAME REGION IP_ADDRESS IP_PROTOCOL TARGET
frontend-lb xx.xx.xx.xx TCP frontend-proxy
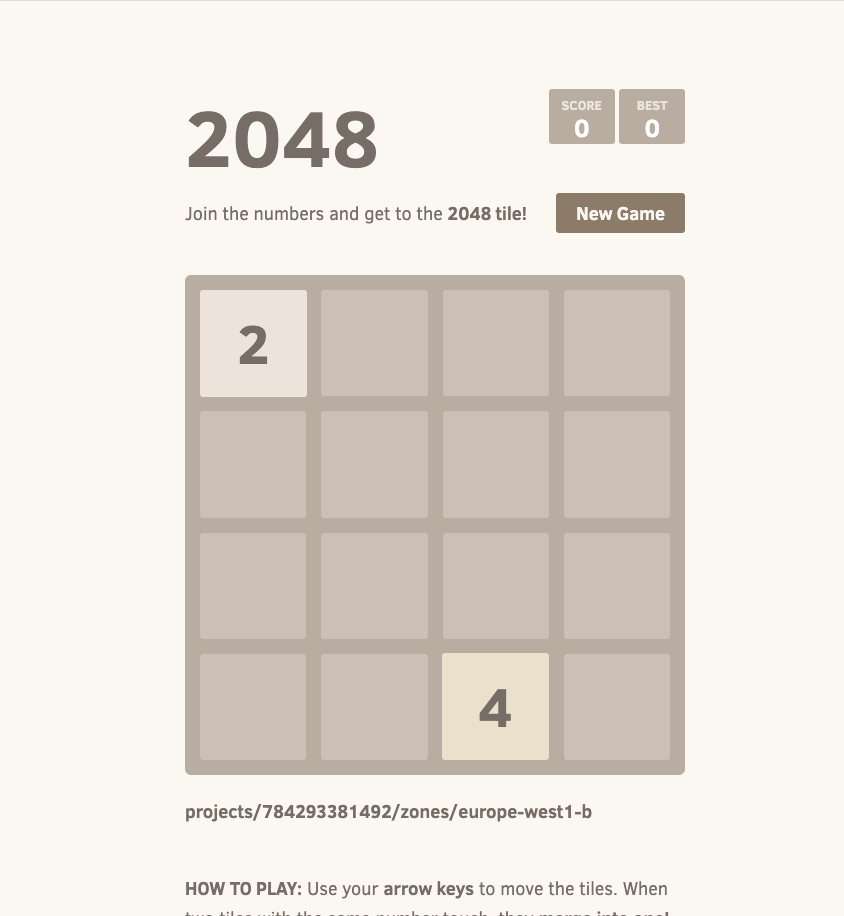
backend-lb europe-west1 10.0.2.8 TCP europe-west1/backendServices/backend-bsOpen it in the browser to see our application:
We can use IAP to tunnel TCP connections to our private instances. So we can access them even without public IP.
Let's get a list of our instances again:
$ gcloud compute instances list

NAME               ZONE            MACHINE_TYPE  PREEMPTIBLE  INTERNAL_IP  EXTERNAL_IP  STATUS
backend-mig-79pz   europe-west1-b  f1-micro                   10.0.2.x                  RUNNING
frontend-mig-gjmn  europe-west1-b  f1-micro                   10.0.1.x                  RUNNING
backend-mig-zfbk   europe-west1-c  f1-micro                   10.0.2.x                  RUNNING
frontend-mig-h65c  europe-west1-c  f1-micro                   10.0.1.x                  RUNNING
Choose one of the instances and enter the following (modify according to your output of previous command):
$ gcloud compute ssh frontend-mig-... --zone=europe-west1-c --tunnel-through-iap

[user@frontend-mig-... ~]$Let's try checking if we have access to the Internet through NAT:
[user@frontend-mig-... ~]$ sudo yum update -yYou should see that packages were updated successfully!
Disconnect from the instance:
[user@frontend-mig-... ~]$ exitYou can simply copy paste the following:
gcloud compute forwarding-rules delete frontend-lb --global --quiet
gcloud compute target-http-proxies delete frontend-proxy --quiet
gcloud compute url-maps delete frontend-map --quiet
gcloud compute backend-services delete frontend-bs --global --quiet
gcloud compute health-checks delete frontend-check --quiet
gcloud compute instance-groups managed delete frontend-mig \
  --region=europe-west1 --quiet
gcloud compute instance-templates delete frontend-template --quiet
gcloud compute forwarding-rules delete backend-lb \
  --region=europe-west1 --quiet
gcloud compute backend-services delete backend-bs \
  --region=europe-west1 --quiet
gcloud compute health-checks delete backend-check --quiet
gcloud compute instance-groups managed delete backend-mig \
  --region=europe-west1 --quiet
gcloud compute instance-templates delete backend-template --quiet
gcloud compute routers nats delete nat-gw \
  --router=nat-router \
  --region=europe-west1 --quiet
gcloud compute routers delete nat-router \
  --region europe-west1 --quiet
gcloud compute firewall-rules delete allow-internal-private --quiet
gcloud compute firewall-rules delete default-allow-icmp-three-tier --quiet
gcloud compute firewall-rules delete allow-lb-health-three-tier --quiet
gcloud compute firewall-rules delete allow-http-three-tier --quiet
gcloud compute firewall-rules delete allow-ssh-ingress-from-iap --quiet
gcloud compute networks subnets delete private-subnet-1 \
  --region=europe-west1 --quiet
gcloud compute networks subnets delete private-subnet-2 \
  --region=europe-west1 --quiet
gcloud compute networks delete three-tier --quiet
rm ~/startup.sh
What's next?
More GCP functionality ;)