Last Updated: 2020-09-23
Overview
Spinnaker is an open source, multi-cloud continuous delivery platform for releasing software changes with high velocity and confidence.
With GKE and Spinnaker, you can create a robust continuous delivery flow that helps to ensure your software is shipped as quickly as it is developed and validated. Although rapid iteration is your end goal, you must first ensure that each app revision passes through a series of automated validations before becoming a candidate for production rollout.
To install spinnaker, a Google provided setup script can be used. They can help you set up and manage Spinnaker in a production-ready configuration, optimized for GCP. The scripts set up resources (GKE, Cloud Memorystore, Cloud Storage buckets and service accounts), integrate Spinnaker with related services such as Cloud Build, and provide a Cloud Shell-based management environment for your Spinnaker installations, with helpers and common tools such as spin and hal.
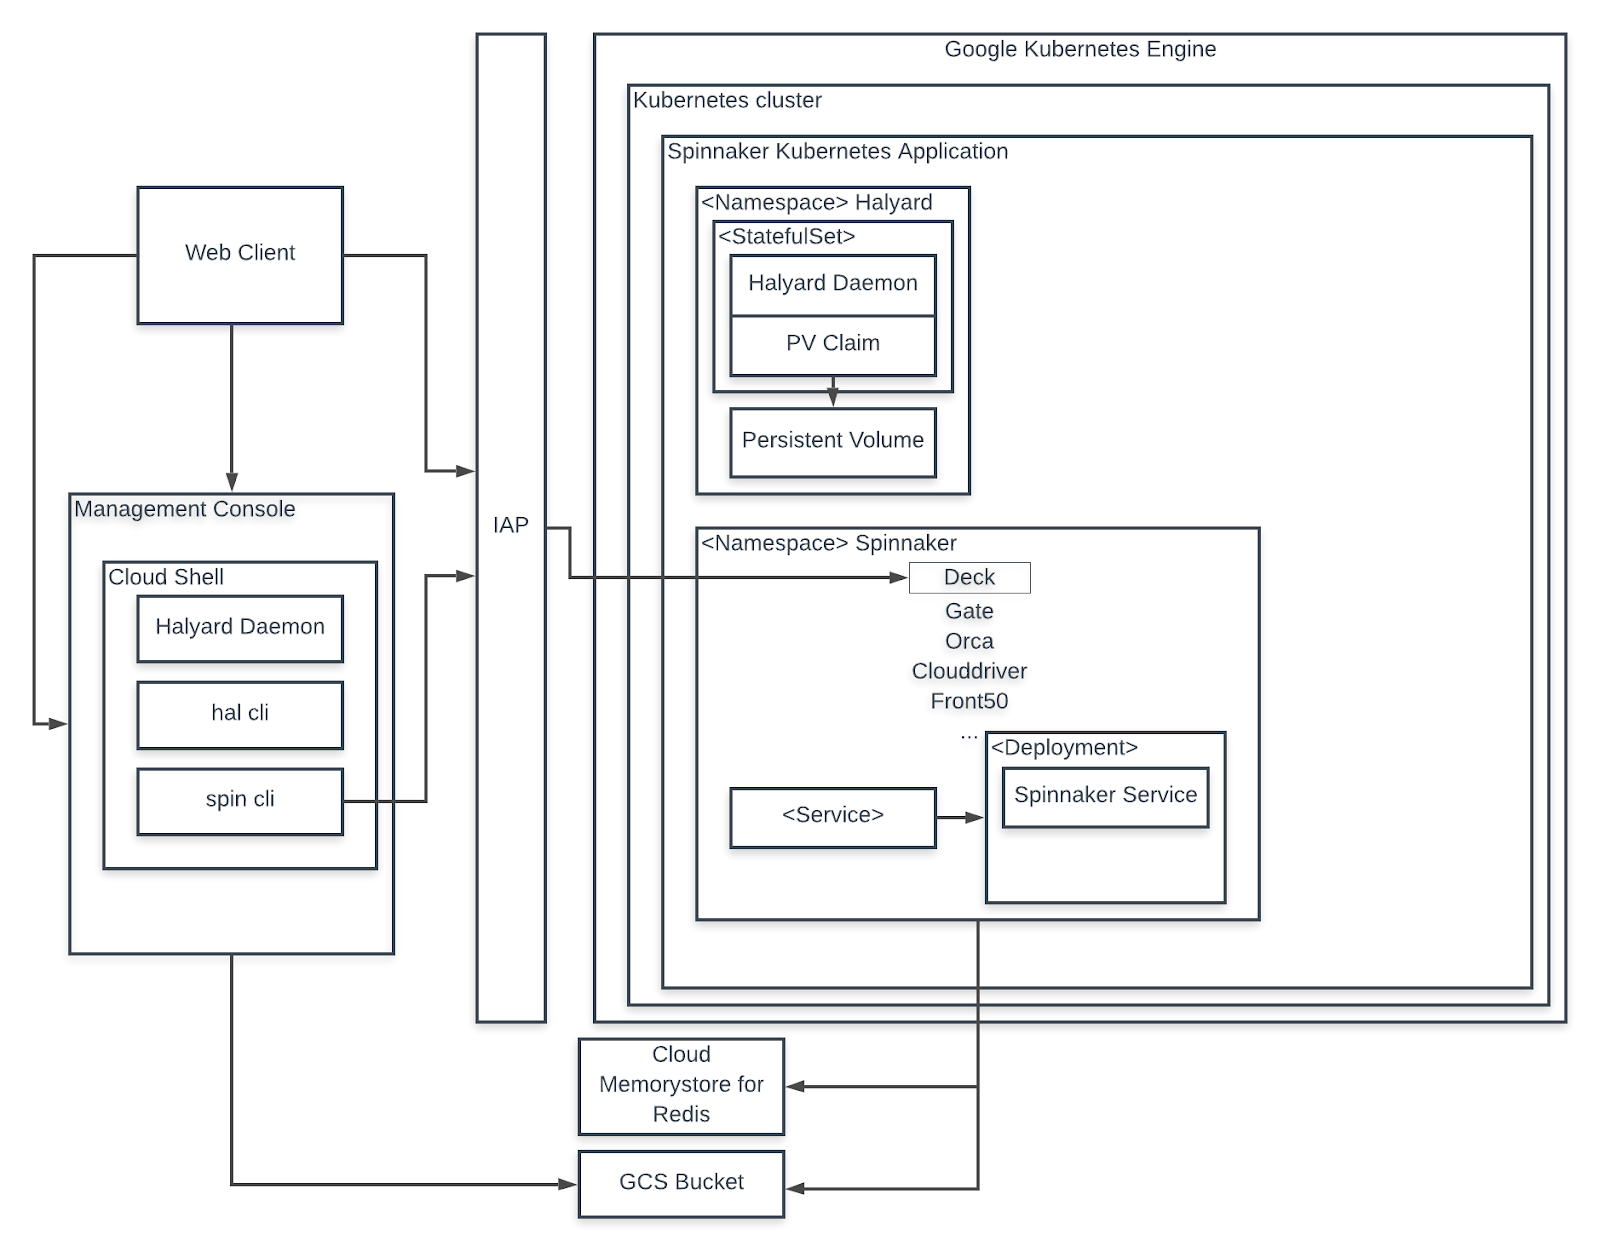
Spinnaker and its components are installed on GKE using the following architecture:
What you'll build
In this codelab, you will do the following:
- Write a simple Golang web application and store the code in a private Git repository
- Package your Golang app in a Docker container
- Upload your Docker container to a container registry
- Deploy your application to a compute cluster using Kubernetes
- Create a CI/CD Pipeline
- Use Spinnaker to create CD Pipeline for canary deployment
What you'll learn
- How to create and manage Cloud Source Repositories
- How to test and deploy an application using Cloud Build
- How to configure canary deployment using Spinnaker
What you'll need
- A recent version of your favourite Web Browser
- Basics of BASH
- GCP Trial account
Create an Account
In this step, you register for the Google Cloud Platform free trial and create a project. The free trial provides you:
- $300 Credit for Free
- Access to Google Cloud Platform Products
- You Won't be Billed (though you need to enter your credit card)
- Build with the Power, Speed, Security, Reliability, and Scalability of Google
To register for the free trial open the free trial Registration page.
If you do not have a Gmail account, follow the steps to create one. Otherwise, login and complete the registration form.
Read and agree to the terms of service. Click Accept and start a free trial.
Create a Project
Next, create your first project using the Google Cloud Platform Console. The project is used to complete the rest of the lab.
To create a project in the Google Cloud Platform Console, click Select a project > Create a project.
In the New Project dialog: for Project name, type whatever you like. Make a note of the Project ID in the text below the project name box; you need it later. Then click Create.
Upgrade Account (Optional)
In the upper-right corner of the console, a button will appear asking you to upgrade your account. Click Create a Project when you see it. If the Upgrade button does not appear, you may skip this step. If the button appears later, click it when it does.
When you upgrade your account, you immediately have access to standard service quotas, which are higher than those available on the free trial.
Finalize
On the GCP Console, use the left-hand side menu to navigate to Compute Engine and ensure that there are no errors.
At the end of this lab, you may delete this project and close your billing account if desired.
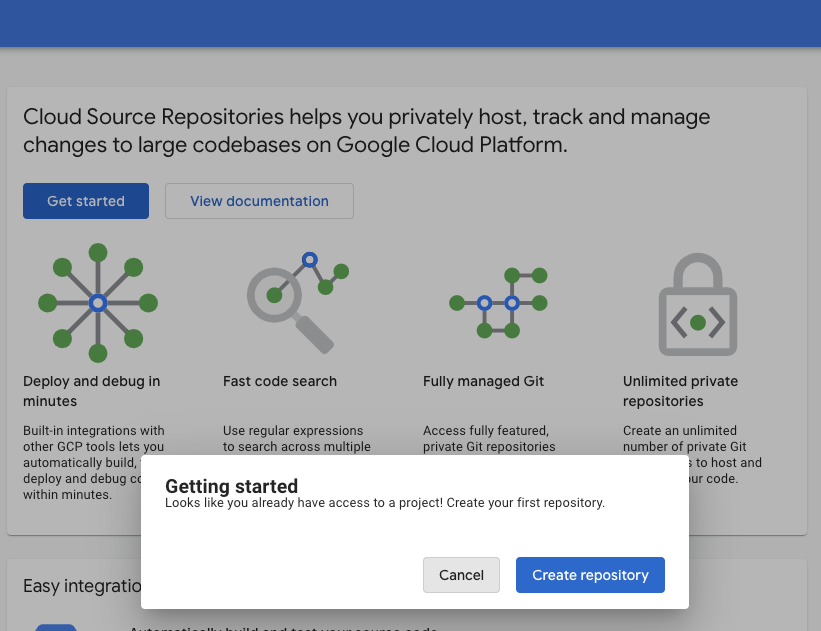
From the Products and services menu, in the Tools section, choose Source Repositories.
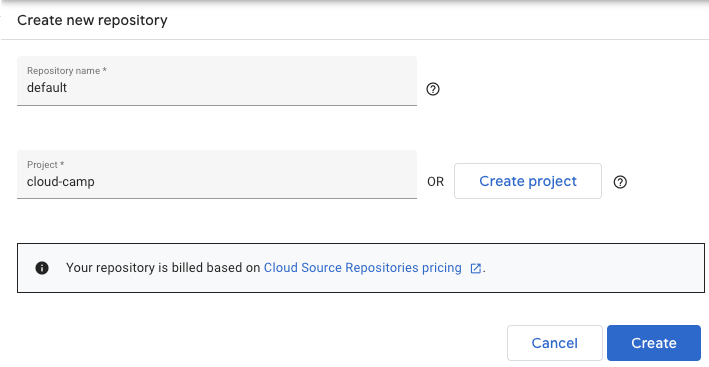
Click Get Started → Create Repository and provide a Repository Name of default.
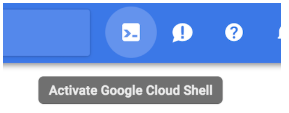
Open Google Cloud Shell by clicking its icon in the toolbar.
Once Cloud Shell starts, enter the following to create a folder called devops. Then change to the folder you just created.
$ mkdir devops
$ cd devops
Now clone the empty repository you just created.
$ gcloud source repos clone default --project=${GOOGLE_CLOUD_PROJECT}The previous command created an empty folder called default. Change to that folder.
$ cd defaultCreate the application
You need some source code to manage. So, you will create a simple Go web application.
In Cloud Shell, type the following to create a Go module:
$ go mod init defaultCreate a Golang starting point.
$ touch main.go
$ cloudshell edit main.go
In the Cloud Editor paste the following:
package main

import (
        "fmt"
        "log"
        "net/http"
        "os"
)

type Server struct{}

func (s *Server) ServeHTTP(w http.ResponseWriter, r *http.Request) {
        environment := "production"
        if en := os.Getenv("DEVOPS_ENV"); en != "" {
            environment = en
        }
        w.WriteHeader(http.StatusOK)
        w.Header().Set("Content-Type", "application/json")
        w.Write([]byte(fmt.Sprintf(`{"message": "hello from %s"}`, environment)))
}

func main() {
        s := &Server{}
        http.Handle("/", s)
        log.Fatal(http.ListenAndServe(":8080", nil))
}
You have some files now, let's save them to the repository. First, you need to add all the files you created to your local Git repo. In Cloud Shell execute:
$ cd ~/devops/default
$ git add --all
Now, let's commit the changes locally.
$ git commit -a -m "Initial Commit"$ git config user.email "you@example.com"
$ git config user.name "Your Name"You committed the changes locally, but have not updated the Git repository you created in Google Cloud. Enter the following command to push your changes to the cloud.
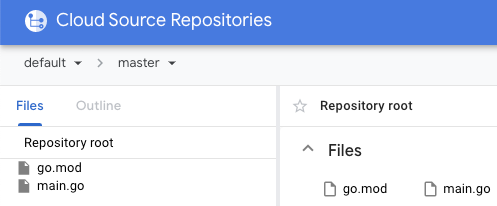
$ git push origin masterClick the Source code link in the Source Repositories web page to refresh your source code. You should see the files you just created.
Test the application locally
Back in Cloud Shell, make sure you are in your application's root folder.
$ cd ~/devops/defaultTo run the program, type:
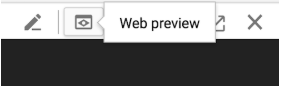
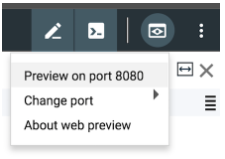
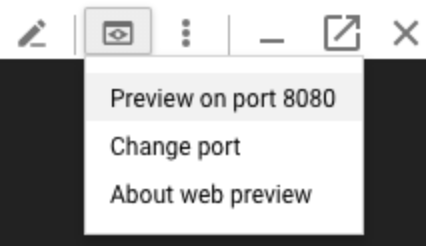
$ go run main.goTo see the program running, click the Web Preview button in the toolbar of Google Cloud Shell. Then, select Preview on port 8080.
The program should be displayed in a new browser tab.
To stop the program, switch back to the browser tab with the Google Cloud Shell and press Ctrl+C in the cloud shell.
To start with Docker, you will define a container and then test it in Google Cloud Shell.
You will also see how to store containers in container registries so they are accessible from the machines that need to run them.
Creating the Dockerfile for your application
The first step to using Docker is to create a file called Dockerfile.
$ touch Dockerfile
$ cloudshell edit Dockerfile
The file Dockerfile is used to define how the container is built.
At the top of the file, enter the following.
FROM scratchThis is the base image. You could choose many operating systems as the base. In this case, you are using an empty scratch image, as our application won't need any extra libraries.
On the next line, add the following code.
WORKDIR /app
COPY . /app
These lines copy the source code from the current folder into the /app folder on the container. Then, that folder is set as the working directory (like entering cd /app on a machine).
Finally, add the following.
ENTRYPOINT [ "./app" ]These lines start the program. It is the equivalent of entering ./app in the shell.
Verify that the completed file looks as follows and Save it.
FROM scratch
WORKDIR /app
COPY ./app .
ENTRYPOINT [ "./app" ]
Next, add a dockerignore file, so that our git repository won't end up in the container:
$ touch .dockerignore
$ cloudshell edit .dockerignore
And paste the following:
**/.gitIn Cloud Shell, enter the following to make sure you are in the right folder and add your new Dockerfile to Git.
$ cd ~/devops/default
$ git add --all
$ git commit -a -m "Added Docker Support"
Push your changes to the master repository using the following command.
$ git push origin masterGo back to Source Repositories in the GCP Management Console (it will be in another browser tab) and refresh the repository and verify your changes were uploaded.
Back in Google Cloud Shell, first make sure you are in the right folder.
$ cd ~/devops/defaultEnter the following commands to build the application and your container.
$ CGO_ENABLED=0 GOOS=linux GOARCH=amd64 go build -a -ldflags '-w -s -extldflags "-static"' -o app .
$ sudo docker build -t devops-demo:latest .Wait for the container to finish building. It will take up to a minute or so.
Run the container in Google Cloud Shell with the following command.
$ sudo docker run -d -p 8080:8080 --name my-container devops-demo:latestHopefully, the container is running now. Type the following command which lists all running containers. You should see your container running.
$ sudo docker psThe container should be running on port 8080. To see if it works, click the Web Preview button and select Preview on port 8080.
The program should open in another browser tab. Verify that it works.
To stop the container, we need to know its Container ID or Container Name.
You can either type:
$ docker stop my-container
$ docker rm my-container
Or look at the output from the docker ps command you entered a minute ago. Copy the value under Container ID. Then enter the following command to stop the container.
$ docker stop <CONTAINER_ID_HERE>
$ docker rm <CONTAINER_ID_HERE>
Refresh the browser tab running the program and it should fail because the container was stopped and deleted.
You are now going to push your Docker image into the GCP Container Registry.
Go back to Google Cloud Shell. Make sure you are in the right folder.
$ cd ~/devops/defaultEnter the following commands to use Google Container Builder.
$ export COMMIT_ID="$(git rev-parse --short=7 HEAD)"
$ export PROJECT_ID=$(gcloud config get-value project)
$ CGO_ENABLED=0 GOOS=linux GOARCH=amd64 go build -a -ldflags '-w -s -extldflags "-static"' -o app .
$ gcloud builds submit --tag gcr.io/${PROJECT_ID}/devops-demo:${COMMIT_ID} .
If you are asked to enable the service and retry, enter Yes. Wait for the build to complete successfully.
In the Management Console, from the Products and Services menu, go to the Cloud Build service. Click the History link and you should see your build listed.
Then, from the Products and Services menu, go to the Container Registry service. You should see your image in the list.
Go back to Google Cloud Source Code Repositories and verify your Dockerfile was added to source control.
Testing your application and building images manually on every commit is boring.
Let's automate that using Cloud Build Pipelines
Create a unit test
First, create a simple test to test the application. Create the file main_test.go:
$ cd ~/devops/default/
$ touch main_test.go
$ cloudshell edit main_test.go
And paste the following content using Cloud Editor:
package main

import (
        "io/ioutil"
        "net/http"
        "net/http/httptest"
        "testing"
)

func TestMyHandler(t *testing.T) {
        handler := &Server{}
        server := httptest.NewServer(handler)
        defer server.Close()

        resp, err := http.Get(server.URL)
        if err != nil {
                t.Fatal(err)
        }
        if resp.StatusCode != 200 {
                t.Fatalf("Received non-200 response: %d\n", resp.StatusCode)
        }
        expected := `{"message": "hello from production"}`
        actual, err := ioutil.ReadAll(resp.Body)
        if err != nil {
                t.Fatal(err)
        }
        if expected != string(actual) {
                t.Errorf("Expected the message '%s'\n", expected)
        }
}
Verify the test is working by running the following in Cloud Shell:
$ go test ./ -v -shortConfigure the pipeline
Then, configure Cloud Build to automatically run this small unit test, build the container image, and then push it to Container Registry.
Create a cloudbuild.yaml:
$ cd ~/devops/default
$ touch cloudbuild.yaml
$ cloudshell edit cloudbuild.yaml
And paste the following code using Cloud Editor:
steps:
# This step runs the unit tests on the app
- name: 'golang:1.15'
  id: Test
  entrypoint: /bin/bash
  args:
  - -c
  - go test ./
  - -v
  - -short

# This step compiles the app
- name: 'golang:1.15'
  id: Build App
  env:
  - 'CGO_ENABLED=0'
  - 'GOOS=linux'
  - 'GOARCH=amd64'
  entrypoint: /bin/bash
  args:
  - -c
  - >-
    go build -a -ldflags '-w -s -extldflags "-static"' -o app .

# This step builds the container image.
- name: 'gcr.io/cloud-builders/docker'
  id: Build Image
  args:
  - 'build'
  - '-t'
  - 'gcr.io/$PROJECT_ID/devops-demo:$SHORT_SHA'
  - '.'

# This step publishes an artifact (container image) to the Container Registry.
# There is actualy a built in mechanism to publish artifacts, that will be shown later.
- name: 'gcr.io/cloud-builders/docker'
  id: Push Image
  args:
  - 'push'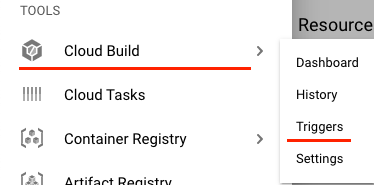
- 'gcr.io/$PROJECT_ID/devops-demo:$SHORT_SHA'In the Management Console, from the Products and Services menu, go to the Cloud Build service. Click the Triggers link and press the Create Trigger button.
In the "Create trigger" screen, enter the following parameters:
- Name: devops-ci
- Repository: default
- Branch (regex): ^master$
- Build configuration: cloudbuild.yaml
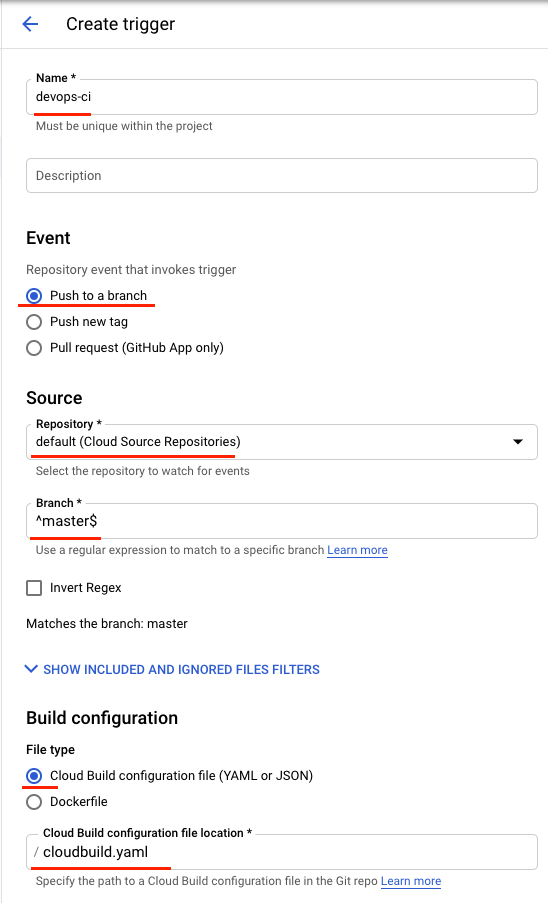
And press Create
In Cloud Shell, push the application code to Cloud Source Repositories to trigger the CI pipeline in Cloud Build.
$ cd ~/devops/default
$ git add --all
$ git commit -a -m "Added CI Support"
$ git push origin master
In the Management Console, from the Products and Services menu, go to the Cloud Build History.
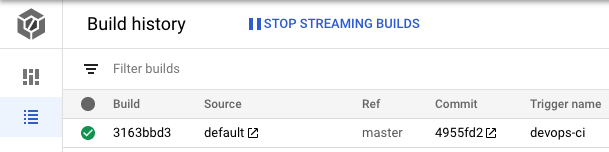
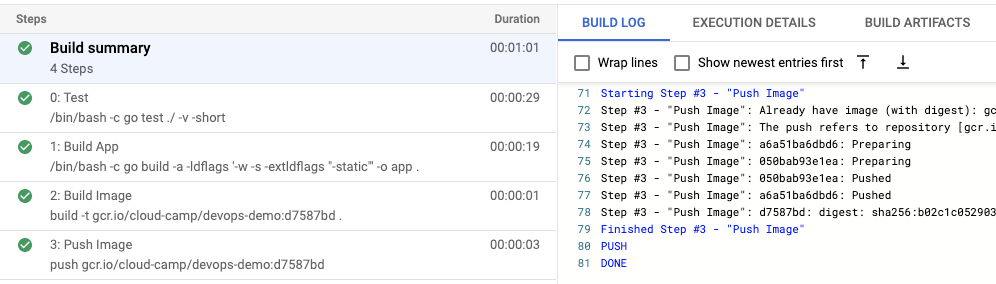
Select your newly created build to check it's progress.
Check your Container Registry for a new image after build is finished.
Before you can use Kubernetes to deploy your application, you need a cluster of machines to deploy them to. The cluster abstracts the details of the underlying machines you deploy to the cluster.
Machines can later be added, removed, or rebooted and containers are automatically distributed or re-distributed across whatever machines are available in the cluster. Machines within a cluster can be set to autoscale up or down to meet demand. Machines can be located in different zones for high availability.
Create a GKE Cluster
Go back to Google Cloud Shell.
First, make sure you're in the right folder.
$ cd ~/devops/defaultType the following to find a suitable instance type in europe-west1-b zone (as we will need 2 CPUs and 4+ GB memory later):
$ gcloud compute machine-types list --filter="zone:( europe-west1-b )" | awk '$4 ~ /^4.00/ || FNR == 1 { print }'It should be e2-medium.
Now, enter the following command to create a cluster of machines.
$ export PROJECT_ID=$(gcloud config get-value project)
$ gcloud container clusters create devops-cluster --zone "europe-west1-b" \
--num-nodes 4 --machine-type=e2-medium \
--project=${PROJECT_ID} --enable-ip-alias \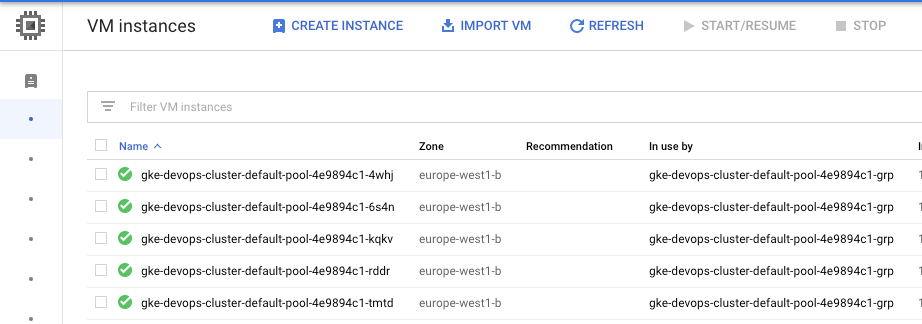
--scopes=gke-default,cloud-platformWhen the cluster is ready, go to the Kubernetes Engine page in the management console and you should see it.

A node is really just a virtual machine. From the Products and Services menu, choose Compute Engine and you should see your machines.
Create a Kubernetes manifest
Create a new file kubernetes-config.yaml.
$ cd ~/devops/default
$ touch kubernetes-config.yaml
$ cloudshell edit kubernetes-config.yaml
Paste the following code into the file you just created.
---
apiVersion: apps/v1
kind: Deployment
metadata:
  name: devops-deployment
  labels:
    app: devops
    tier: frontend
spec:
  replicas: 3
  selector:
    matchLabels:
      app: devops
      tier: frontend
  template:
    metadata:
      labels:
        app: devops
        tier: frontend
    spec:
      containers:
      - name: devops-demo
        image: gcr.io/GOOGLE_CLOUD_PROJECT/devops-demo:TAG
        ports:
        - containerPort: 8080
---
Substitute the project id variable and tag:
$ export TAG="$(git rev-parse --short=7 HEAD)"
$ sed -i -e "s/GOOGLE_CLOUD_PROJECT/${GOOGLE_CLOUD_PROJECT}/g" \
  -e "s/TAG/${TAG}/g" \
kubernetes-config.yamlSave the file. Now let's run the deployment.
Deploy the application to cluster
First, you need to connect to the cluster you created earlier.
In Cloud Shell, enter the following command to get your cluster config.
$ gcloud container clusters get-credentials devops-cluster --zone europe-west1-b --project ${PROJECT_ID}Enter the following command to run your Kubernetes deployment.
$ kubectl create -f kubernetes-config.yamlEnter the following command to see if you have any instances of your application running.
$ kubectl get podsRun the command a few times until all the pods are running.
Go back to Google Cloud Shell. Enter the following to see the deployments.
$ kubectl get deploymentsNote the name of the deployment. This was specified in the configuration file.
Enter the following to see the details of your deployment.
$ kubectl describe deployments devops-deploymentYou have application instances, but can't yet access them with a browser because they are not exposed outside of Kubernetes.
Expose the application to the outside world
Expose the application and create a load balancer with the following command.
$ kubectl expose deployment devops-deployment --port=80 --target-port=8080 --type=LoadBalancerYou need the IP address of the load balancer. Type the following command to get it.
$ kubectl get servicesOnce you have an external IP address, open a browser tab and make a request to it (on port 80). It should work. If you get an error, wait a little while and try again.
Scaling the application
Let's scale up to 10 instances.
$ kubectl scale deployment devops-deployment --replicas=10After the command completes, type kubectl get pods to see if it worked. You might have to run the command a few times before all 10 are running.
Let's scale back to 3 instances.
$ kubectl scale deployment devops-deployment --replicas=3After the command completes, type kubectl get pods to see if it worked. You might have to run the command a few times.
Let's create a Horizontal Pod Autoscaler (HPA). Type the following command.
$ kubectl autoscale deployment devops-deployment --min=5 --max=10 --cpu-percent=60Wait a little while and type kubectl get pods again. The autoscaler will create two more pods. As before, you might have to wait a little while and run the command a couple times.
Delete resources
It's just as easy to delete everything, as it is to create everything. Enter the following to delete the deployment. This will delete the HPA and Service but not the cluster. We will reuse the cluster shortly.
$ kubectl delete hpa devops-deployment
$ kubectl delete services devops-deployment
Wait a minute and then type kubectl get hpa and kubectl get services to see if everything got deleted.
In Cloud Shell, enter the following to make sure you are in the right folder and add your new file to Git.
$ cd ~/devops/default
$ git add --all
$ git commit -a -m "Added Kubernetes Support"
$ git push origin master
In the Management Console, from the Products and Services menu, go to the Cloud Build service. Notice you have a new build running.
Would be cool if the Kubernetes deployment is updated when a new image is ready. Let's make this happen.
Cloud Build can also be used for the continuous delivery pipeline. This pipeline will run each time a commit is pushed to the master branch of the default repository. The pipeline applies the new version of the manifest to the Kubernetes cluster.
To deploy the application in your Kubernetes cluster, Cloud Build needs the Kubernetes Engine Developer IAM Role. In Cloud Shell, execute:
$ PROJECT_NUMBER="$(gcloud projects describe ${PROJECT_ID} --format='get(projectNumber)')"
$ gcloud projects add-iam-policy-binding ${PROJECT_NUMBER} \
    --member=serviceAccount:${PROJECT_NUMBER}@cloudbuild.gserviceaccount.com \
    --role=roles/container.developer
Next, create a template for kubernetes manifest. This template is essentially a copy of our manifest with two variables (GOOGLE_CLOUD_PROJECT and COMMIT_SHA) that are going to be substituted by Cloud Build and a Service. Create a file kubernetes-config.yaml.tpl.
$ touch kubernetes-config.yaml.tpl
$ cloudshell edit kubernetes-config.yaml.tpl
And paste the following code:
---
apiVersion: apps/v1
kind: Deployment
metadata:
  name: devops-deployment
  labels:
    app: devops
    tier: frontend
spec:
  replicas: 1
  selector:
    matchLabels:
      app: devops
      tier: frontend
  template:
    metadata:
      labels:
        app: devops
        tier: frontend
    spec:
      containers:
      - name: devops-demo
        image: gcr.io/GOOGLE_CLOUD_PROJECT/devops-demo:COMMIT_SHA
        ports:
        - containerPort: 8080
---
apiVersion: v1
kind: Service
metadata:
  name: devops-deployment
  labels:
    app: devops
    tier: frontend
spec:
  type: LoadBalancer
  ports:
  - port: 80
    targetPort: 8080
  selector:
    app: devops
    tier: frontend
Open the cloudbuild.yaml.
$ cloudshell edit cloudbuild.yamlAnd add two new steps to the end of the file:
# This step generates the new manifest
- name: 'gcr.io/cloud-builders/gcloud'
  id: Generate manifest
  entrypoint: /bin/sh
  args:
  - '-c'
  - |
     sed "s/GOOGLE_CLOUD_PROJECT/${PROJECT_ID}/g" kubernetes-config.yaml.tpl | \
     sed "s/COMMIT_SHA/${SHORT_SHA}/g" > kubernetes-config.yaml
# This step deploys the new version of our container image
# in the Kubernetes Engine cluster.
- name: 'gcr.io/cloud-builders/kubectl'
  id: Deploy
  args:
  - 'apply'
  - '-f'
  - 'kubernetes-config.yaml'
  env:
  - 'CLOUDSDK_COMPUTE_ZONE=europe-west1-b'
  - 'CLOUDSDK_CONTAINER_CLUSTER=devops-cluster'
In Cloud Shell, enter the following to make sure you are in the right folder and add your new file to Git.
$ cd ~/devops/default
$ git add --all
$ git commit -a -m "Added CD"
$ git push origin master
In the Management Console, from the Products and Services menu, go to the Cloud Build service. Notice you have a new build running.
When the build is successful, in the Management Console, from the Products and Services menu, go to the Container Registry service. Remember the newly built image tag.
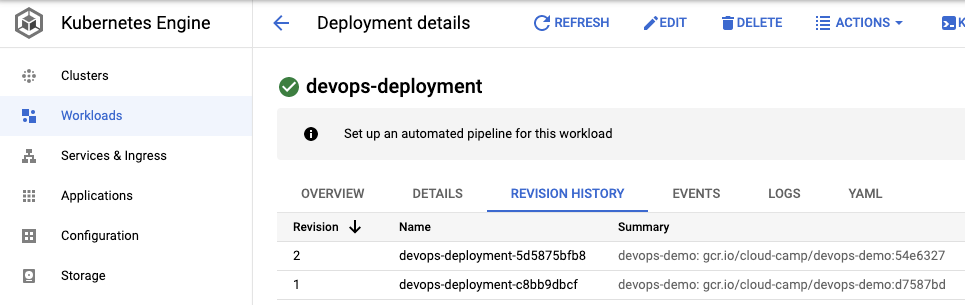
Then, in the Management Console, from the Products and Services menu, go to the Kubernetes Engine. Click the Workloads link in the navigation menu to the left.
Select your devops-deployment and go to the Revision History tab. Notice you have a new revision deployed.
Cool. But Cloud Build is declarative and you can't create a sophisticated delivery pipeline with it. Let's add Spinnaker!
But before that - enter the following to delete the deployment.
$ kubectl delete deployment devops-deployment
$ kubectl delete services devops-deployment
Install Spinnaker
Spinnaker for Google Cloud gives you a way to set up and manage Spinnaker in a production-ready configuration, optimized for Google Cloud. Spinnaker for Google Cloud sets up many resources (GKE, Memorystore, Cloud Storage buckets and service accounts) required to run Spinnaker in Google Cloud, integrates Spinnaker with related services such as Cloud Build, Pub/Sub, etc.
Clone the Spinnaker for GCP repository:
$ cd ~
$ git clone https://github.com/GoogleCloudPlatform/spinnaker-for-gcp.git ~/cloudshell_open/spinnaker-for-gcp
Explore the setup_properties.sh script, that generates required variables to setup Spinnaker:
$ less ~/cloudshell_open/spinnaker-for-gcp/scripts/install/setup_properties.shConfigure spinnaker installation properties:
$ export PROJECT_ID=$(gcloud config get-value project)
$ export DEPLOYMENT_NAME=devops-spin
$ export GKE_CLUSTER=devops-cluster
$ export ZONE=europe-west1-b
$ ~/cloudshell_open/spinnaker-for-gcp/scripts/install/setup_properties.sh
Examine the generated properties in cloud shell editor, modify them if you have any pre existing resource (like a bucket):
$ cloudshell edit ~/cloudshell_open/spinnaker-for-gcp/scripts/install/propertiesNote, that your user email will be added to Identity Aware Proxy if you are going to expose the installation (we won't be in this lab).
Next, install Spinnaker on our cluster:
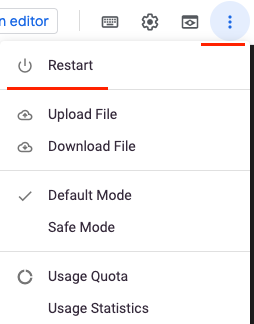
$ ~/cloudshell_open/spinnaker-for-gcp/scripts/install/setup.shRestart the cloud shell to load new environment:
Setup Spinnaker
The installation and managing resources in GKE is separated, so we need to add our account credentials to Spinnaker. As we're using the same cluster for both Spinnaker installation and deployment we can use the same account, but still it's a good idea to separate concerns.
To add your GKE cluster to Spinnaker you need to have it set as the current cluster context (we already have it done in previous steps). The default values should be correct.
$ ~/cloudshell_open/spinnaker-for-gcp/scripts/manage/add_gke_account.shTo speed up the deployment edit the hal config for devops-cluster-acct and add liveManifestCalls: true, which will query manifest status during pipeline executions using live data rather than the cache. This eliminates all time spent in the "force cache refresh" task in pipelines, greatly reducing execution time.
$ hal config provider kubernetes account edit devops-cluster-acct --live-manifest-calls=trueSetup Prometheus
We will be using the Prometheus Operator, that provides Kubernetes native deployment and management of Prometheus and related monitoring components.
Install a quickstart Prometheus operator:
$ kubectl apply -f https://raw.githubusercontent.com/prometheus-operator/prometheus-operator/v0.43.0/bundle.yamlProvision Prometheus using the Prometheus Operator.
$ cat <<EOF | kubectl apply -f -
apiVersion: monitoring.coreos.com/v1
kind: Prometheus
metadata:
  name: prometheus
  labels:
spec:
  image: "docker.io/prom/prometheus:v2.22.0"
  version: v2.12.0
  retention: 720h
  scrapeInterval: 15s
  serviceAccountName: prometheus
  serviceMonitorSelector:
    matchLabels:
      delivery: canary
  enableAdminAPI: false
  podMetadata:
    labels:
      app: prometheus
  containers:
    - name: sd-sidecar
      image: gcr.io/stackdriver-prometheus/stackdriver-prometheus-sidecar:0.8.0
      args:
        - --stackdriver.project-id=${GOOGLE_CLOUD_PROJECT}
        - --prometheus.wal-directory=/prometheus/wal
        - --stackdriver.kubernetes.location=europe-west1
        - --stackdriver.kubernetes.cluster-name=devops-cluster
      ports:
        - name: sidecar
          containerPort: 9091
      volumeMounts:
        - name: prometheus-prometheus-db
          mountPath: /prometheus
---
apiVersion: rbac.authorization.k8s.io/v1
kind: ClusterRole
metadata:
  name: prometheus
  labels:
    app: prometheus
rules:
  - apiGroups: [""]
    resources:
      - nodes
      - services
      - endpoints
      - pods
      - nodes/proxy
    verbs: ["get", "list", "watch"]
  - apiGroups: [""]
    resources:
      - configmaps
    verbs: ["get"]
  - nonResourceURLs: ["/metrics"]
    verbs: ["get"]
---
apiVersion: rbac.authorization.k8s.io/v1
kind: ClusterRoleBinding
metadata:
  name: prometheus-default
  labels:
    app: prometheus
roleRef:
  apiGroup: rbac.authorization.k8s.io
  kind: ClusterRole
  name: prometheus
subjects:
  - kind: ServiceAccount
    name: prometheus
    namespace: default
---
apiVersion: v1
kind: Service
metadata:
  name: prometheus
  annotations:
    prometheus.io/scrape: 'true'
  labels:
    app: prometheus
spec:
  selector:
    app: prometheus
  ports:
    - name: http-prometheus
      protocol: TCP
      port: 9090
---
apiVersion: v1
kind: ServiceAccount
metadata:
  name: prometheus
  namespace: default
  labels:
    app: prometheus
EOFSetup Kayenta
Then, in Spinnaker you need to configure the automated canary analysis feature, called Kayenta.
$ hal config canary google enable
$ hal config canary google account add devops-kayenta --project ${GOOGLE_CLOUD_PROJECT}
$ hal config canary google edit --stackdriver-enabled=true
Push and apply the configuration changes to Spinnaker:
$ ~/cloudshell_open/spinnaker-for-gcp/scripts/manage/push_and_apply.shModify the application
Our application needs to include Prometheus metrics for canary analysis. The metrics are going to be simple random values that are higher for production and lower for canary, simulating a "fix" for some operation execution times.
Edit our application.
$ cd ~/devops/default
$ cloudshell edit main.go
In the Cloud Editor replace everything with:
package main

import (
        "fmt"
        "log"
        "math/rand"
        "net/http"
        "os"
        "time"

        "github.com/prometheus/client_golang/prometheus"
        "github.com/prometheus/client_golang/prometheus/promhttp"
)

type Server struct{}

var (
        checksTimer = prometheus.NewGauge(prometheus.GaugeOpts{
                Name: "checks_timer",
                Help: "A measure of how long it takes to perform the 'operation'.",
        })
)

func (s *Server) ServeHTTP(w http.ResponseWriter, r *http.Request) {
        environment := "production"
        if en := os.Getenv("DEVOPS_ENV"); en != "" {
                environment = en
        }
        w.WriteHeader(http.StatusOK)
        w.Header().Set("Content-Type", "application/json")
        w.Write([]byte(fmt.Sprintf(`{"message": "hello from %s"}`, environment)))
}

func main() {
        rand.Seed(time.Now().Unix())

        environment := "production"
        if en := os.Getenv("DEVOPS_ENV"); en != "" {
                environment = en
        }

        prometheus.MustRegister(checksTimer)
        s := &Server{}
        http.Handle("/", s)
        http.Handle("/metrics", promhttp.Handler())

        go func() {
                for {
                        if environment != "production" {
                                checksTimer.Set(rand.Float64() * 15)
                        } else {
                                checksTimer.Set(rand.Float64()*25 + 10)
                        }

                        time.Sleep(time.Second)
                }
        }()
        log.Fatal(http.ListenAndServe(":8080", nil))
}
Download missing packages:
$ go mod tidyNext let's create our CD pipeline using a canary deployment pattern. Canary deployments are a pattern for rolling out releases to a subset of users or servers. The idea is to first deploy the change to a small subset of servers, test it, and then roll the change out to the rest of the servers. The canary deployment serves as an early warning indicator with less impact on downtime: if the canary deployment fails, the rest of the servers aren't impacted.
Connect to Spinnaker installation:
$ ~/cloudshell_open/spinnaker-for-gcp/scripts/manage/connect_unsecured.shThen click the Web Preview icon and select Preview on port 8080
You can explore the UI, but currently it's going to be empty.
Reconfigure Cloud Build
Reconfigure the cloudbuild.yaml to only build and push artifacts. We will use a special 'publish artifacts' step instead of pushing images our self:
$ cd ~/devops/default
$ cloudshell edit cloudbuild.yaml
And replace everything with the following code:
steps:
# This step runs the unit tests on the app
- name: 'golang:1.15'
  id: Test
  entrypoint: /bin/bash
  args:
  - -c
  - go test ./
  - -v
  - -short

# This step compiles the app
- name: 'golang:1.15'
  id: Build App
  env:
  - 'CGO_ENABLED=0'
  - 'GOOS=linux'
  - 'GOARCH=amd64'
  entrypoint: /bin/bash
  args:
  - -c
  - >-
    go build -a -ldflags '-w -s -extldflags "-static"' -o app .

# This step builds the container image.
- name: 'gcr.io/cloud-builders/docker'
  id: Build Image
  args:
  - 'build'
  - '-t'
  - 'gcr.io/$PROJECT_ID/devops-demo:$SHORT_SHA'
  - '.'

# This step publishes artifact (container image) to Container Registry
images: ['gcr.io/$PROJECT_ID/devops-demo:$SHORT_SHA']
In Cloud Shell, enter the following to make sure you are in the right folder and add your modified file to Git. But don't push just yet!
$ cd ~/devops/default
$ git add --all
$ git commit -a -m "Modified CI"
Create Spinnaker Pipeline
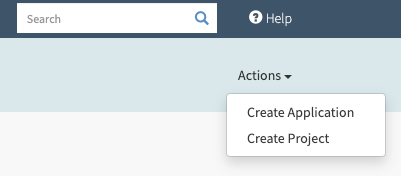
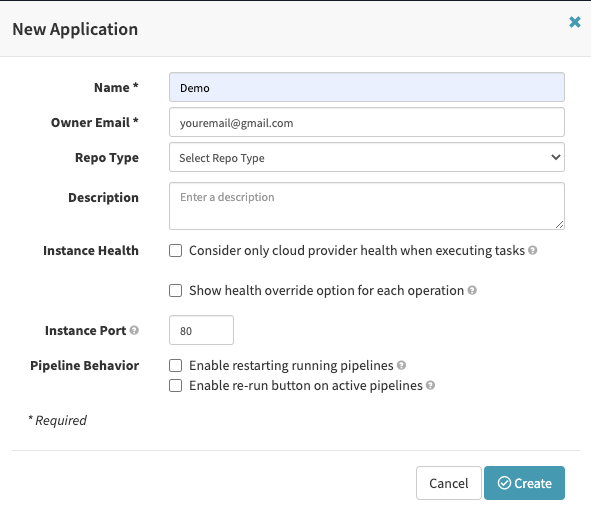
Go to Spinnaker Web UI and click Actions → Create Application in the top right corner.
In the next screen enter the application name and your email address. You can leave other fields as default.
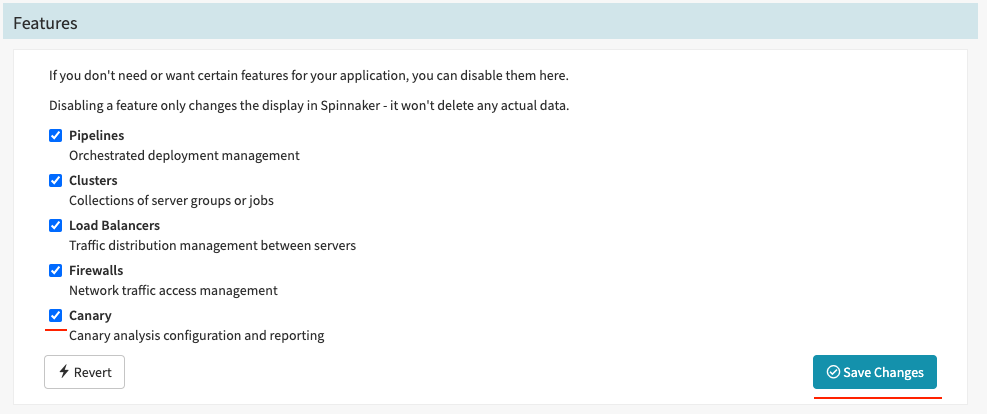
Click Config.
Scroll down to the Features and enable Canary reporting. Save changes.
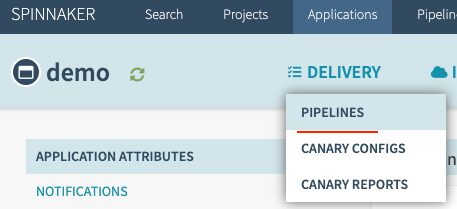
Go to Delivery → Pipelines and Configure a new Pipeline.
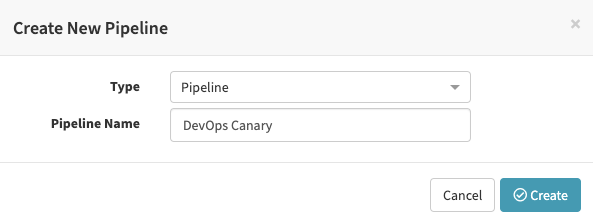
Set a name for your pipeline as "DevOps Canary" and click Create.
Configuration stage
First, set up the Configuration stage.
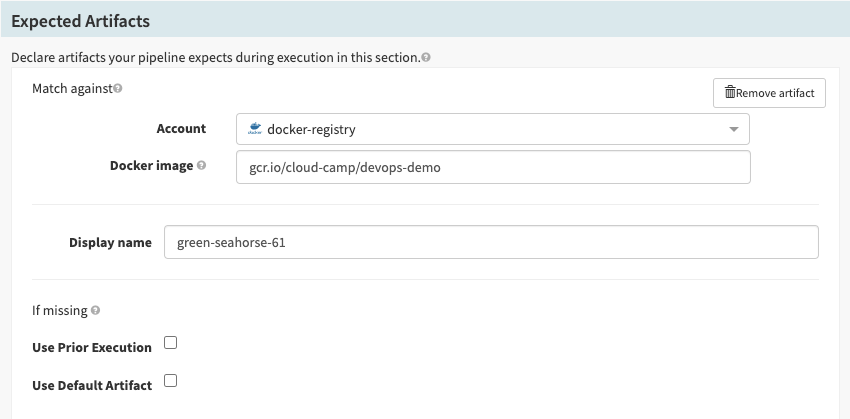
In the Expected Artifacts section click Add Artifact. Select:
- Account: docker-registry
- Docker image: gcr.io/YOUR_PROJECT_ID/devops-demo
- Leave rest as default.
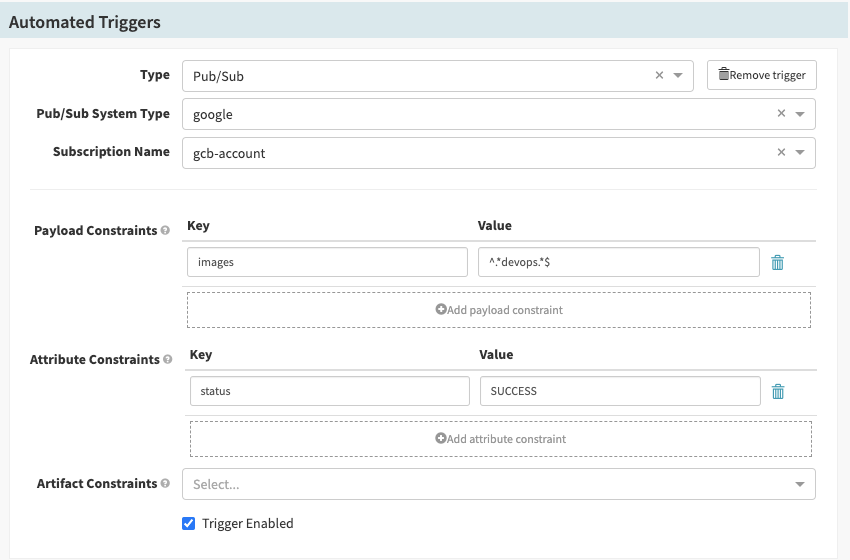
In the Automated Triggers section click Add Trigger. Select:
- Type: Pub/Sub
- Pub/Sub System Type: google
- Subscription Name: gcb-account
- In the Attribute Constraints field, enter
statusin the Key, andSUCCESS(all upper case) in the Value field. - In the Payload Constraints field, enter
imagesin the Key, and^.*devops.*$in the Value field. This will match only if the image produced by the Cloud Build pipeline contains "devops" (as we have devops-demo). More information about Cloud Build object's properties can be found here.
Click the Save Changes button in the bottom right corner. If you get an error message - wait a few seconds and retry. You should get a success message:
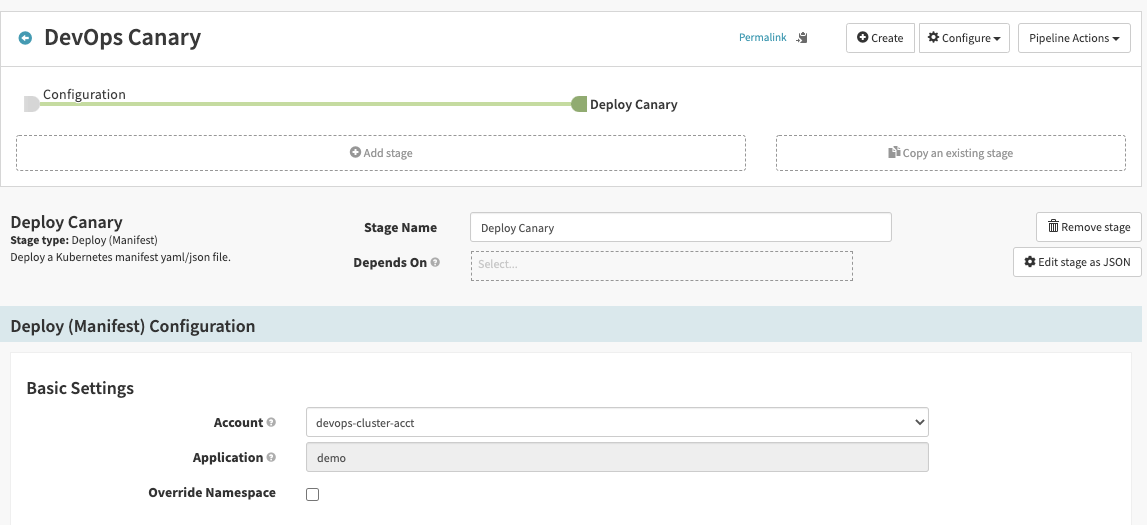
Deploy Canary stage
Building off of Configuration, click Add Stage and create a Deploy (Manifest) stage.
- For Stage Name, enter Deploy Canary.
- In Basic Settings, for Account, select devops-cluster-acct.
In the Manifest Configuration section, Manifest Source select Text.
Enter the following manifest, replacing GOOGLE_CLOUD_PROJECT with your project's id.
apiVersion: apps/v1
kind: Deployment
metadata:
labels:
app: devops-canary
tier: frontend
name: devops-deployment-canary
namespace: default
spec:
replicas: 1
selector:
matchLabels:
app: devops-canary
tier: frontend
template:
metadata:
labels:
app: devops-canary
tier: frontend
spec:
containers:
- image: gcr.io/GOOGLE_CLOUD_PROJECT/devops-demo
name: devops-demo
env:
- name: DEVOPS_ENV
value: "canary"
ports:
- containerPort: 8080
---
apiVersion: v1
kind: Service
metadata:
labels:
app: devops-canary
tier: frontend
name: devops-deployment-canary
namespace: default
spec:
ports:
- port: 80
targetPort: 8080
name: web
selector:
app: devops-canary
tier: frontend
type: LoadBalancer
---
apiVersion: monitoring.coreos.com/v1
kind: ServiceMonitor
metadata:
labels:
delivery: canary
name: devops-deployment-monitor-canary
namespace: default
spec:
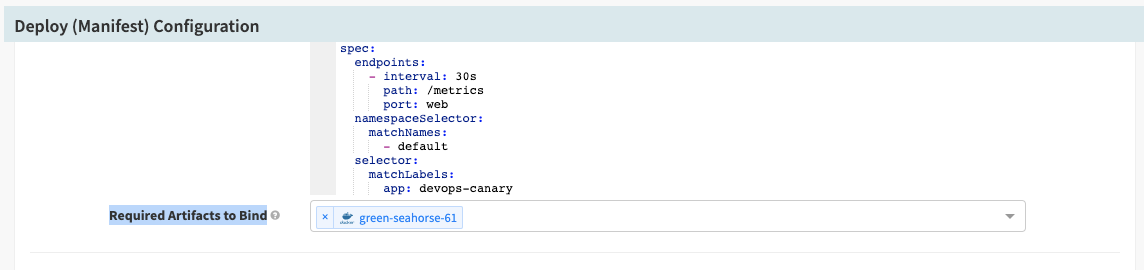
endpoints:
- interval: 30s
path: /metrics
port: web
namespaceSelector:
matchNames:
- default
selector:
matchLabels:
app: devops-canary
tier: frontend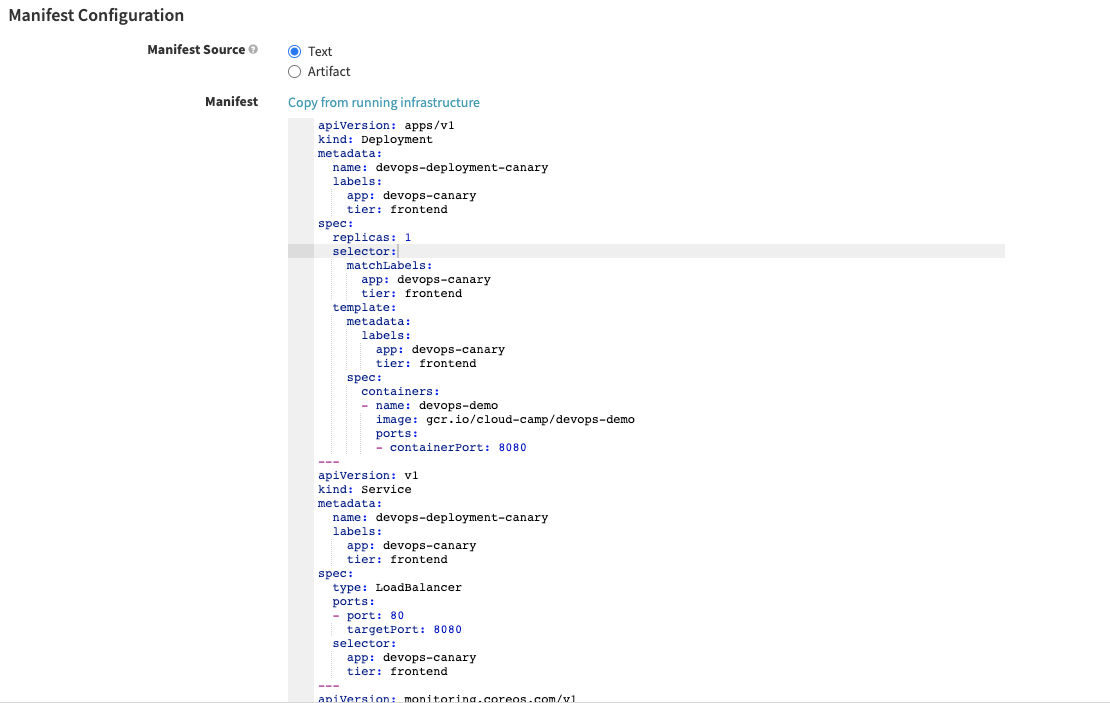
Scroll down to Required Artifacts to Bind and select your Docker image artifact name from the previous step.
Click the Save Changes button in the bottom right corner. If you get an error message - wait a few seconds and retry. You should get a success message:
Let's trigger the pipeline. Go to Cloud Shell and push to Cloud Sources:
$ cd ~/devops/default
$ git push origin master
Go to Cloud Build and check if the pipeline is running.
Wait ~ 1 minute for the build to finish and go to Spinnaker's Delivery → Pipelines.
You should see your delivery pipeline running:
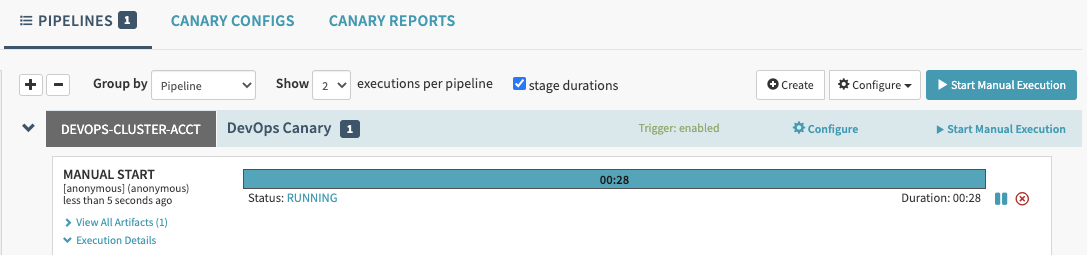
Click on the Execution Details to see the progress:

Soon the pipeline will be finished.
Explore the metrics in Stackdriver
The application is running and the metrics should be scraped by Prometheus and exported to Cloud Operations. Let's verify that.
Navigate to the Operations → Monitoring → Metrics Explorer.
In the Metrics Explorer, search for k8s_container Resource type and select it.
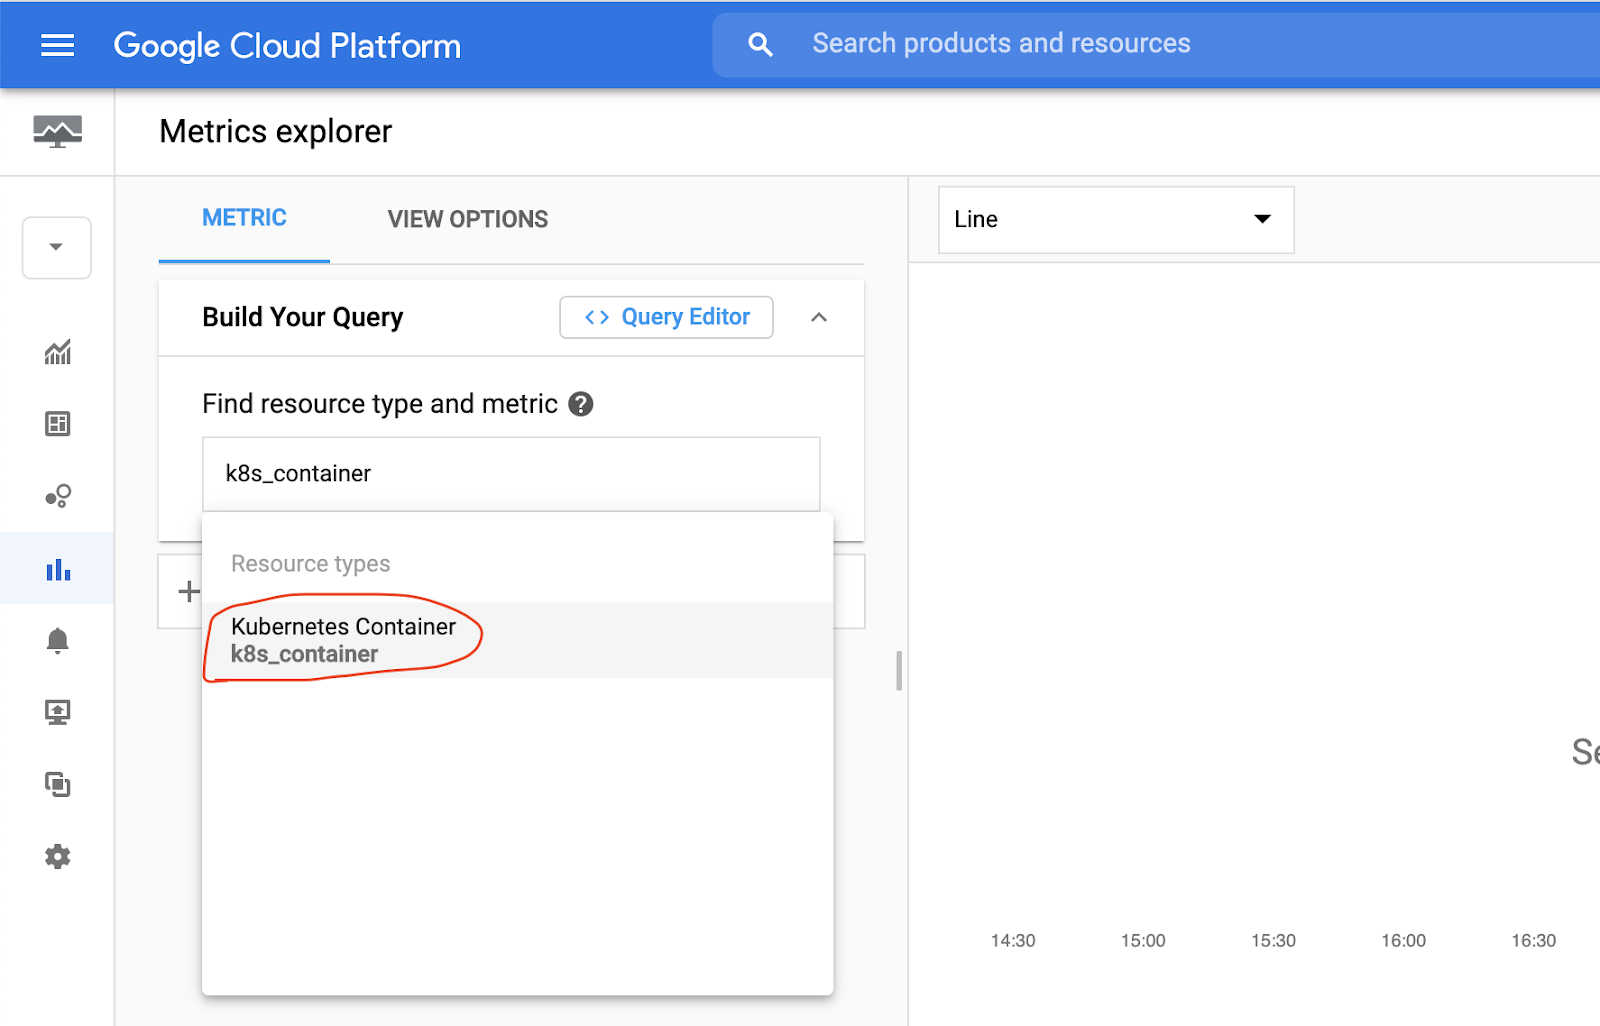
Then, in metrics search for checks_timer to find some metrics collected by the Prometheus Agent from our Golang application.

Select external/prometheus/checks_timer to plot the metrics.
Leave Filter empty.
In Group by, group by pod_name.
In Aggregation, select mean.
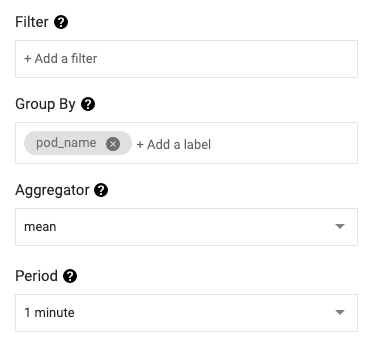
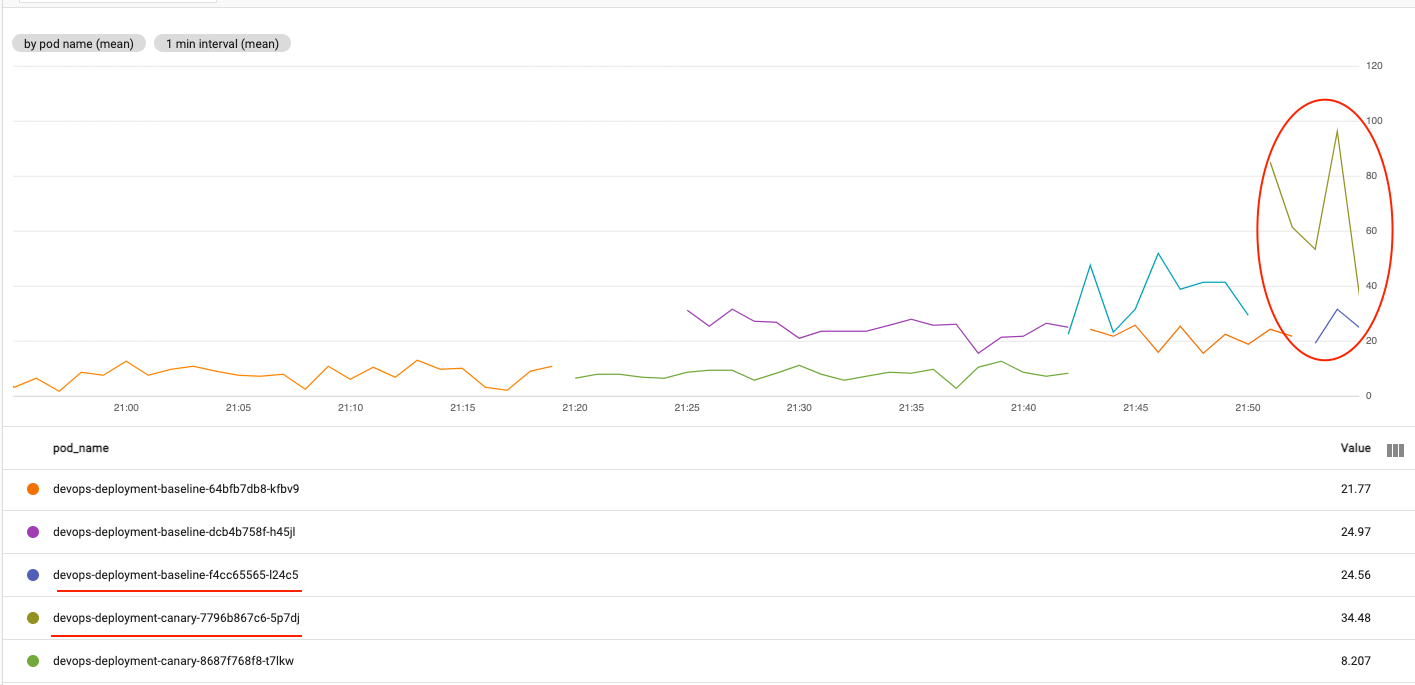
This should build a graph of our simulated application performance, i.e. the time it takes to do some important operation.
Now you are ready to create a production deployment and canary analysis.
Create production deployment
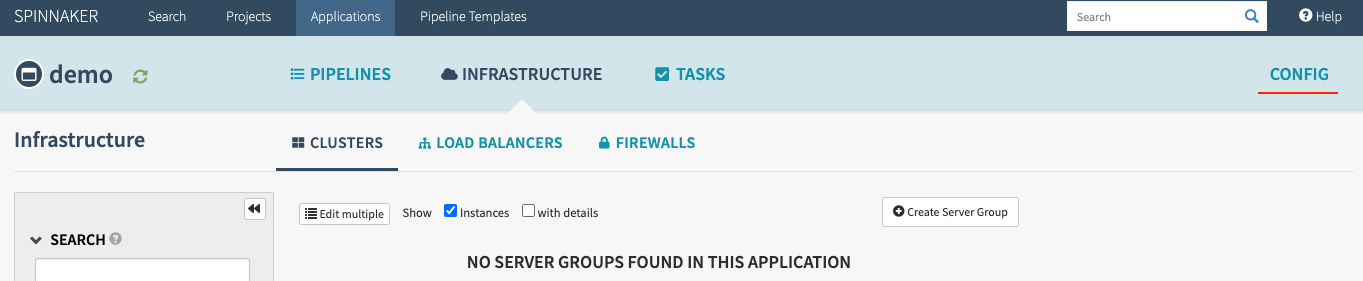
Go to Infrastructure → Clusters and click Create Server Group.
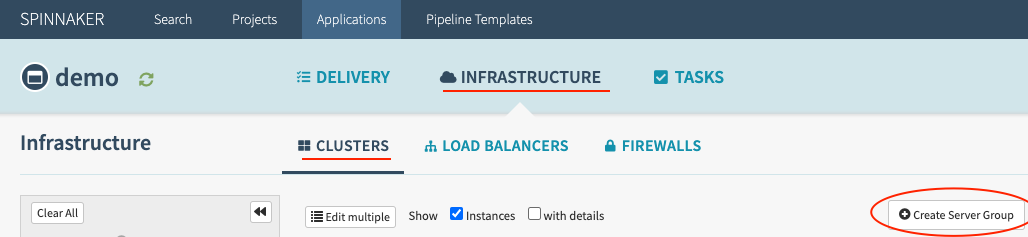
In Basic Settings, for Account, select devops-cluster-acct.
In the Manifest section paste the following, replacing the GOOGLE_CLOUD_PROJECT and TAG to your project's id and latest tag from GCR.
apiVersion: apps/v1
kind: Deployment
metadata:
  name: devops-deployment-production
  namespace: default
  labels:
    app: devops
    tier: frontend
spec:
  replicas: 3
  selector:
    matchLabels:
      app: devops
      tier: frontend
  template:
    metadata:
      labels:
        app: devops
        tier: frontend
    spec:
      containers:
      - name: devops-demo
        image: gcr.io/GOOGLE_CLOUD_PROJECT/devops-demo:TAG
        ports:
        - containerPort: 8080
---
apiVersion: v1
kind: Service
metadata:
  name: devops-deployment-production
  namespace: default
  labels:
    app: devops
    tier: frontend
spec:
  type: LoadBalancer
  ports:
  - port: 80
    targetPort: 8080
    name: web
  selector:
    app: devops
    tier: frontend
Click Create. And wait till the application deploys and stabilizes. This will be our production that we're going to use as a baseline.
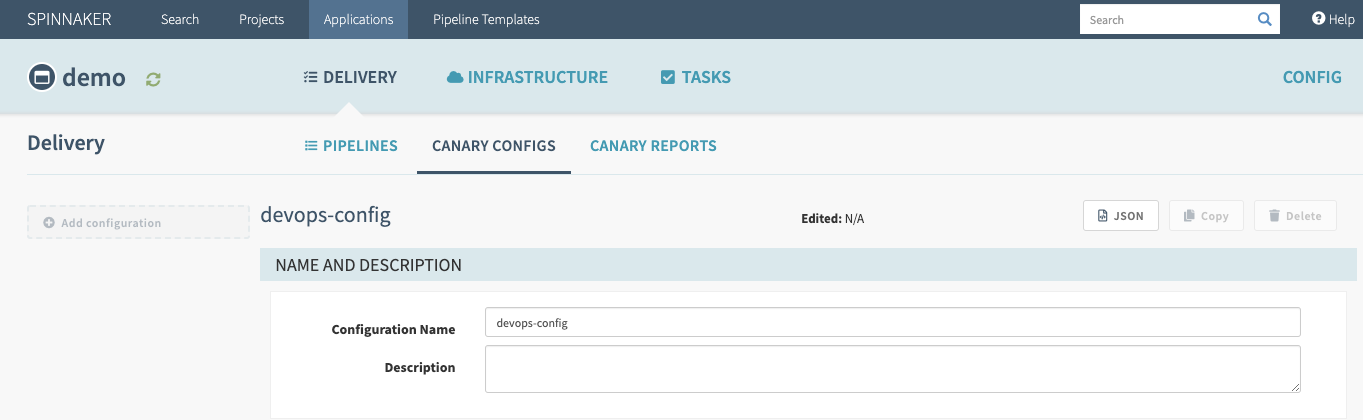
Add canary configuration
Click on Delivery, and Canary Configs. On the left, click on Add Configuration. For the Configuration Name, call it devops-config.
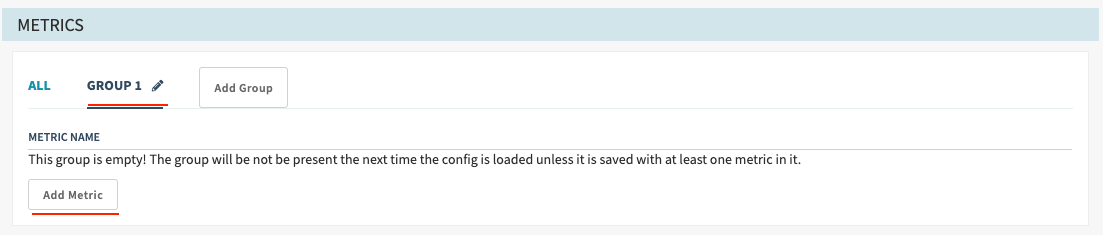
In the Metrics section, select Group 1, and click on Add Metric.
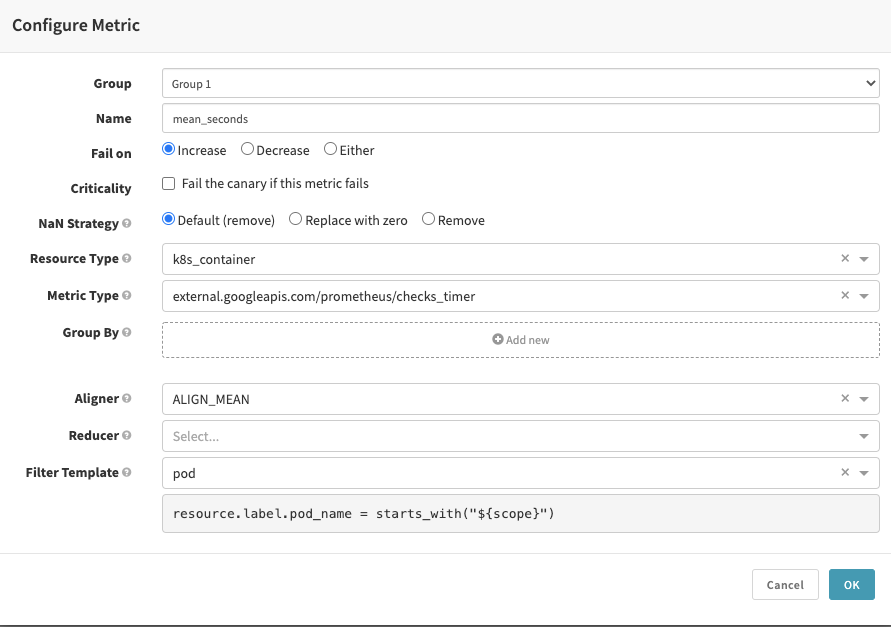
- In the dialog box, in the Name field, enter mean_seconds.
- In the Fail On field, select Increase.
- For the NaN Strategy, leave the Default (remove).
- For Resource Type select k8s_container.
- For Metric Type add a few letters of checks_timer, and select external.googleapis.com/prometheus/checks_timer.
- For Aligner select ALIGN_MEAN.
- In Filter Template, select Create New. For the new Filter Template:
- Under the Name field enter pod
- For the Template enter resource.label.pod_name = starts_with("${scope}")
For Scoring, since we have one group, we will make that value 100.

Click the Save Changes button in the bottom right corner. If you get an error message - wait a few seconds and retry. You should get a success message:
Find Baseline stage
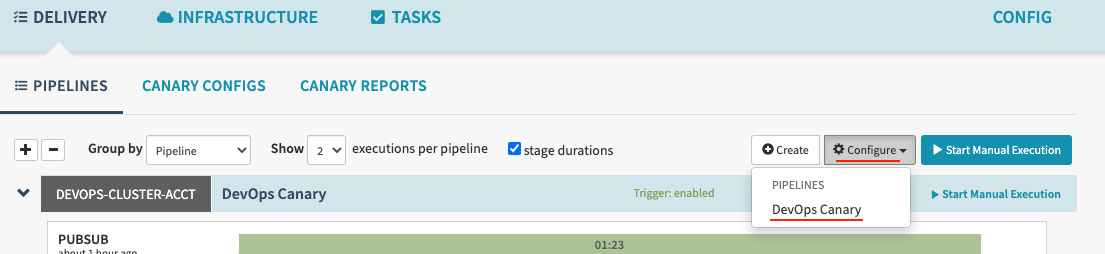
Go back to Pipelines, and click Configure to configure your pipeline.
While Selecting Deploy Canary, click on Add Stage.
Select Find Artifacts From Resource (Manifest).
For Stage Name enter Find Baseline.
In the Find Artifacts from Resource (Manifest) Configuration:
- In Account enter devops-cluster-acct.
- In Namespace enter default.
- In Kind enter deployment.
For Selector select "Choose a static target". For the Name, enter devops-deployment-production.
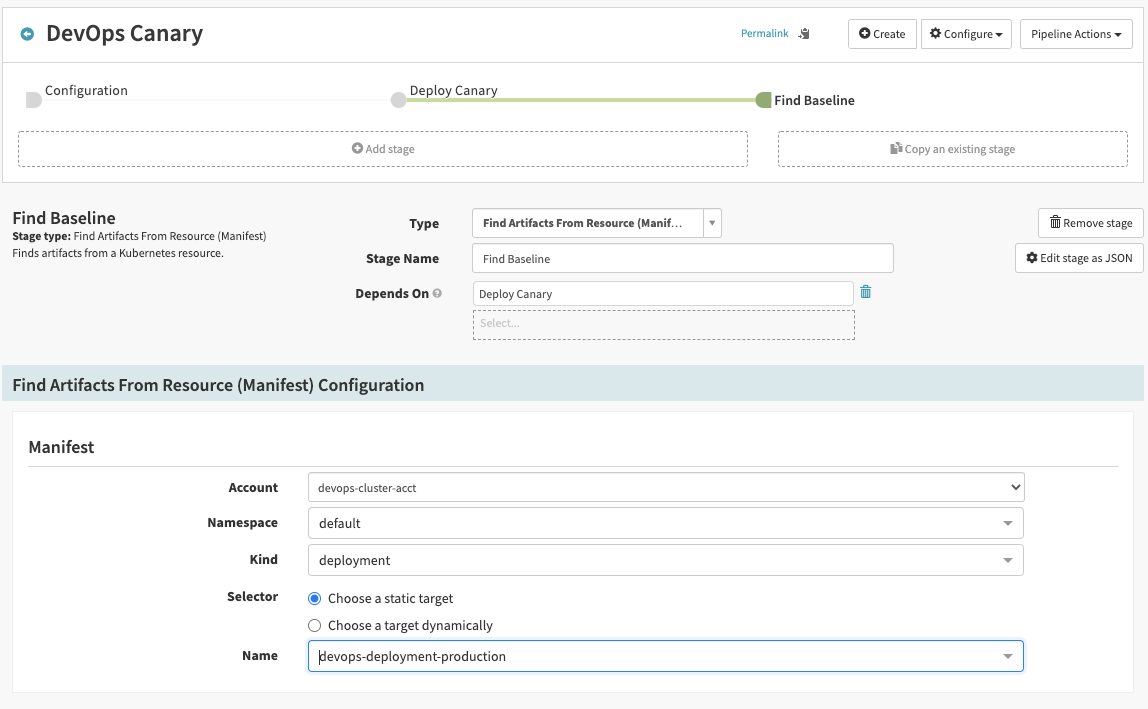
Click the Save Changes button in the bottom right corner. If you get an error message - wait a few seconds and retry. You should get a success message:
Deploy Baseline stage
You might be tempted to compare the canary deployment against your current production deployment. Instead always compare the canary against an equivalent baseline, deployed at the same time.
The baseline uses the same version and configuration that is currently running in production, but is otherwise identical to the canary:
- Same time of deployment
- Same size of deployment
- Same type and amount of traffic
In this way, you control for version and configuration only, and you reduce factors that could affect the analysis, like the cache warmup time, the heap size, and so on.
While Selecting Find Baseline, click on Add Stage.
Select Deploy (Manifest).
For Stage Name enter Deploy Baseline.
In Basic Settings, for Account, enter devops-cluster-acct.
In the Manifest Source select Text and enter the following manifest.
apiVersion: apps/v1
kind: Deployment
metadata:
  labels:
    app: devops-canary-baseline
    tier: frontend
  name: devops-deployment-baseline
  namespace: default
spec:
  replicas: 1
  selector:
    matchLabels:
      app: devops-baseline
      tier: frontend
  template:
    metadata:
      labels:
        app: devops-baseline
        tier: frontend
    spec:
      containers:
        - image: '${#stage(''Find Baseline'').context["artifacts"][0]["reference"]}'
          name: devops-demo
          ports:
            - containerPort: 8080
---
apiVersion: v1
kind: Service
metadata:
  labels:
    app: devops-baseline
    tier: frontend
  name: devops-deployment-baseline
  namespace: default
spec:
  ports:
    - port: 80
      targetPort: 8080
      name: web
  selector:
    app: devops-baseline
    tier: frontend
  type: LoadBalancer
---
apiVersion: monitoring.coreos.com/v1
kind: ServiceMonitor
metadata:
  labels:
    delivery: canary
  name: devops-deployment-monitor-baseline
  namespace: default
spec:
  endpoints:
    - interval: 30s
      path: /metrics
      port: web
  namespaceSelector:
    matchNames:
      - default
  selector:
    matchLabels:
      app: devops-baseline
      tier: frontend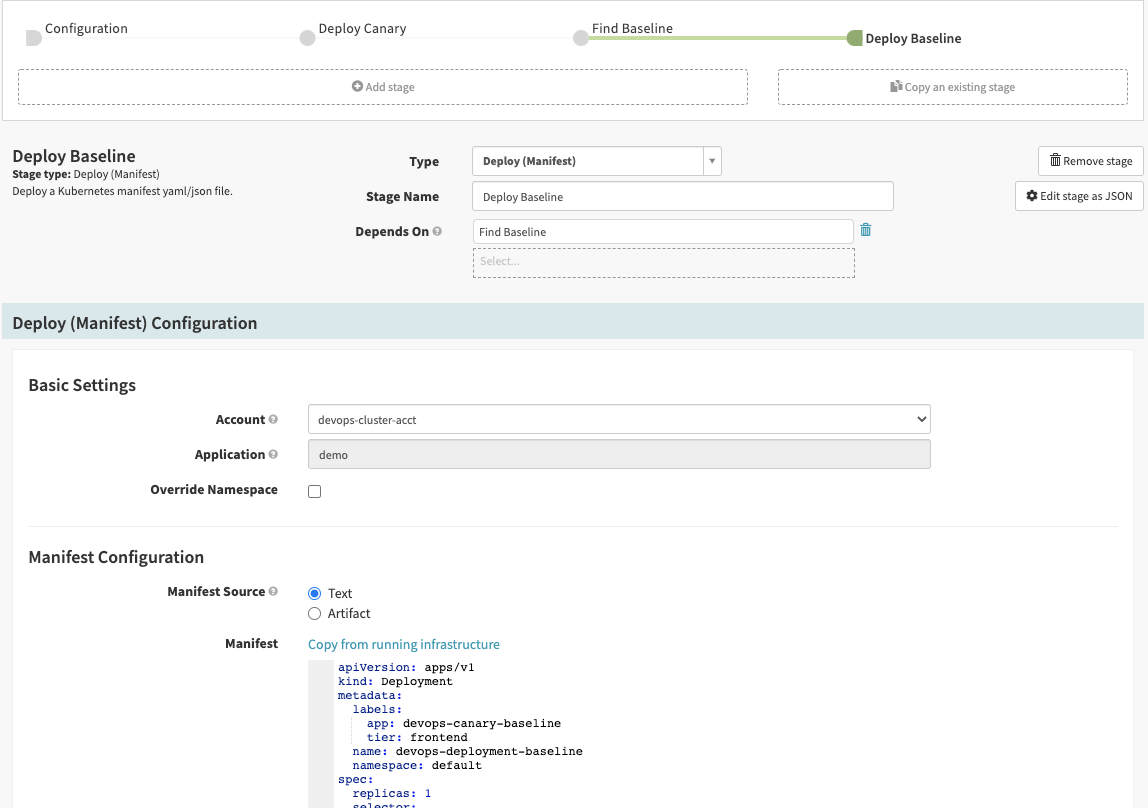
Click the Save Changes button in the bottom right corner. If you get an error message - wait a few seconds and retry. You should get a success message:
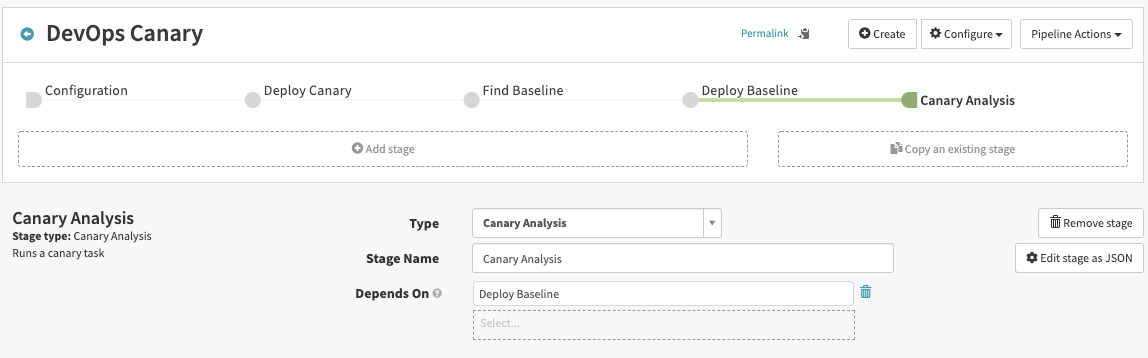
Canary Analysis stage
While Selecting Deploy Baseline, click on Add Stage.
Select Canary Analysis.
For Stage Name enter a new name or leave it as Canary Analysis.
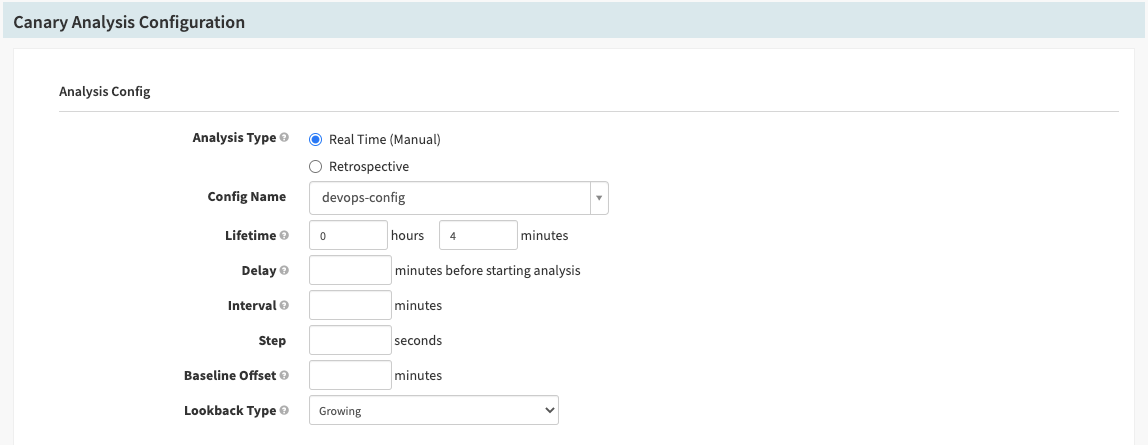
In the Canary Analysis Configuration and Analysis Config section:
- In Analysis Type, select Real Time (Manual).
- In Config Name, select the config you just created devops-config.
- In Lifetime, select 0 hours 4 minutes (a shorter round won't show much difference).
- Ensure that Lookback Type is Growing.
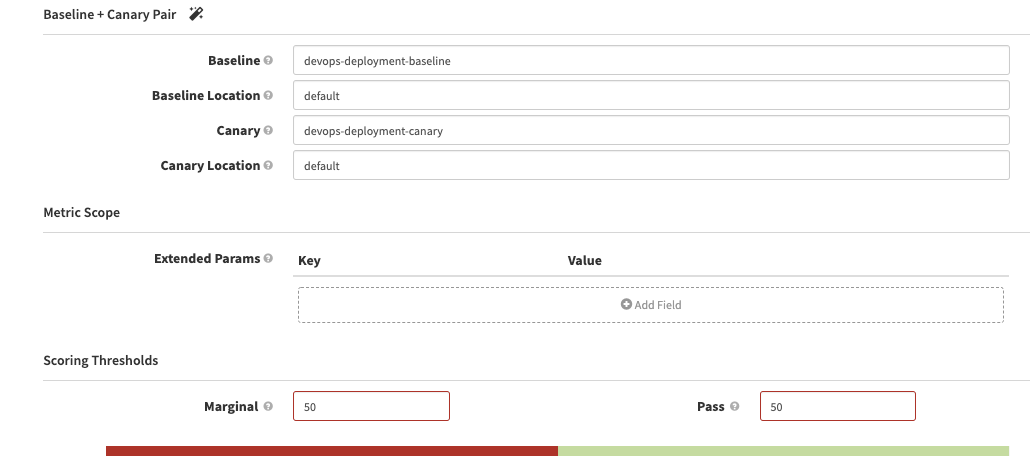
In Baseline+Canary Pair:
- In Baseline add devops-deployment-baseline
- In Baseline Location enter default
- In Canary add devops-deployment-canary
- In Canary Location enter default
- In Scoring Thresholds, marginal should be 50, and pass should be 50
Scroll to Advanced Settings and in Metrics Account select devops-kayenta.
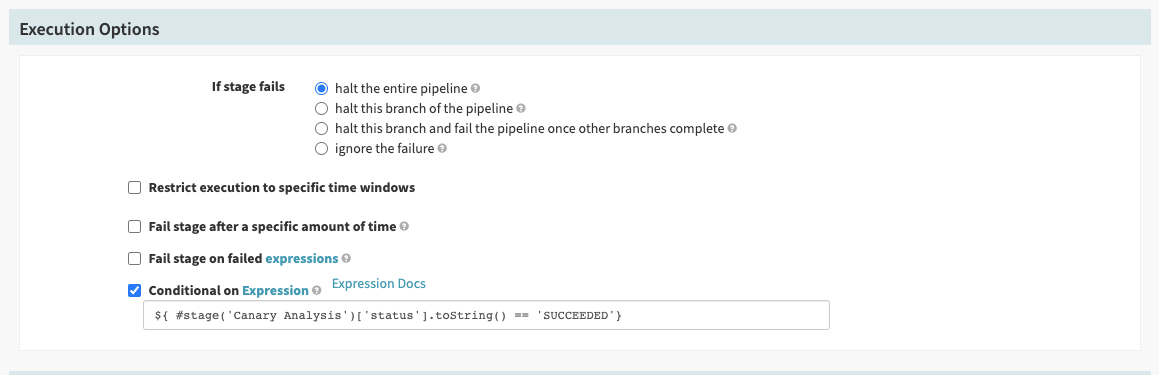
Scroll down to Execution Options, and select ignore the failure. This is needed so that the later stages still run, so we can delete the canary.

Click the Save Changes button in the bottom right corner. If you get an error message - wait a few seconds and retry. You should get a success message:
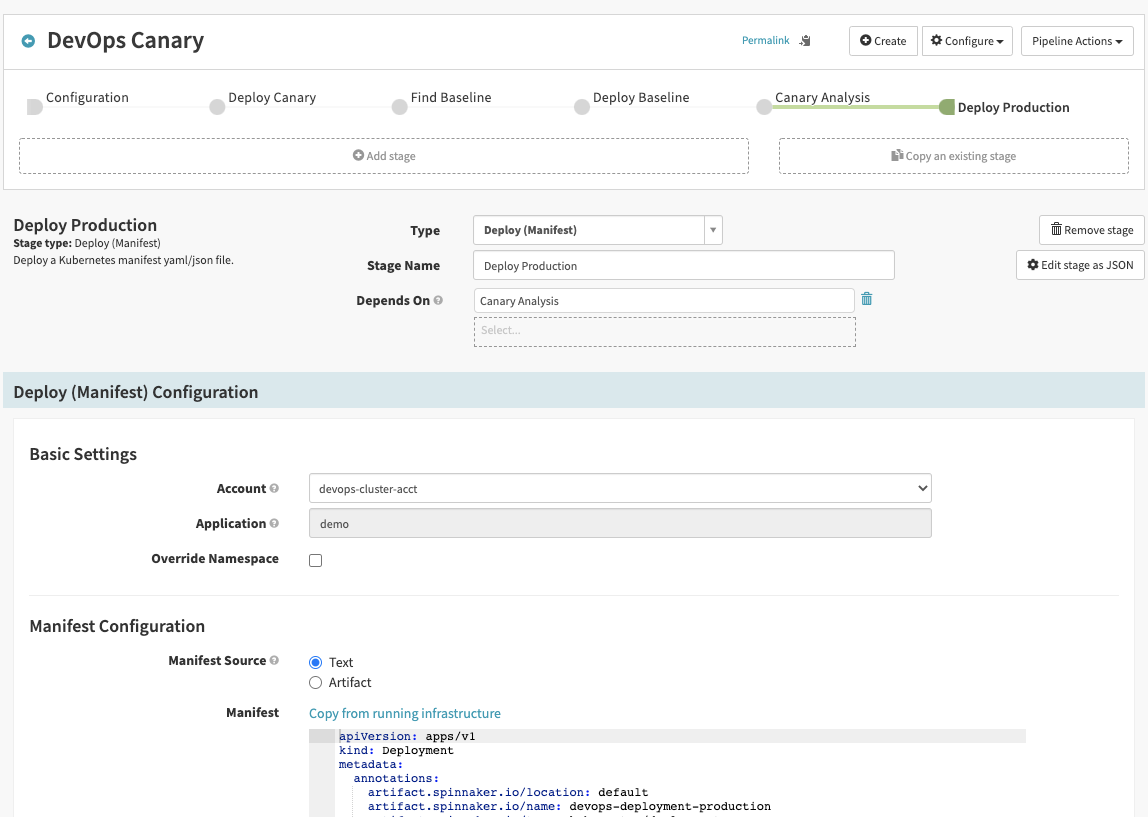
Deploy Production stage
While Selecting Canary Analysis, click on Add Stage.
Select Deploy (Manifest).
For Stage Name enter Deploy Production.
In Basic Settings, for Account, enter devops-cluster-acct.
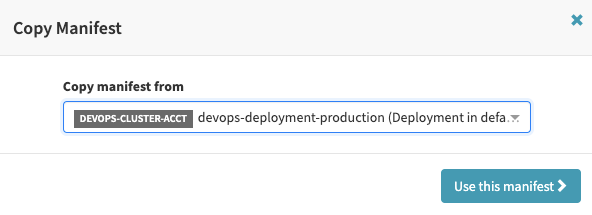
In the Manifest Source select Text and click Copy from running infrastructure.
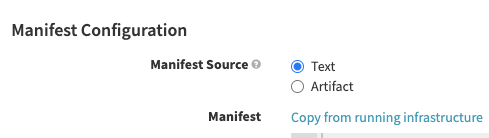
In the pop up find the devops-deployment-production (Deployment in default) and click use this manifest. Wait for up to 30 seconds for the operation to complete.
...
    spec:
      containers:
        - image: gcr.io/your-project-here/devops-demo
          name: devops-demo
          ports:
            - containerPort: 8080
Scroll to the Required Artifacts to Bind and select our pipeline image artifact.
Scroll down to Execution Options and to ensure that you deploy to production only if the canary analysis succeeds (as we ignore canary failures), change the Conditional on Expression parameter to ${ #stage('Canary Analysis')['status'].toString() == 'SUCCEEDED'}

Click the Save Changes button in the bottom right corner. If you get an error message - wait a few seconds and retry. You should get a success message:
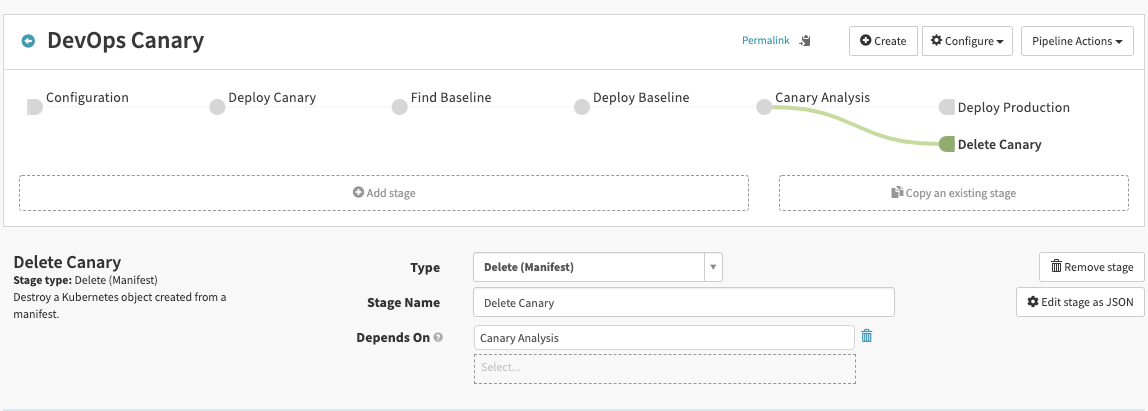
Delete Canary stage
While Selecting Canary Analysis, click on Add Stage.
Select Delete (Manifest).
For Stage Name enter Delete Canary.
In Delete (Manifest) Configuration
- for Account, enter devops-cluster-acct.
- Namespace - default.
- Selector - Match target(s) by label.
- For Kinds select
deployment - In Labels add a key
app, kindEQUALSand valuedevops-canary

Click the Save Changes button in the bottom right corner. If you get an error message - wait a few seconds and retry. You should get a success message:
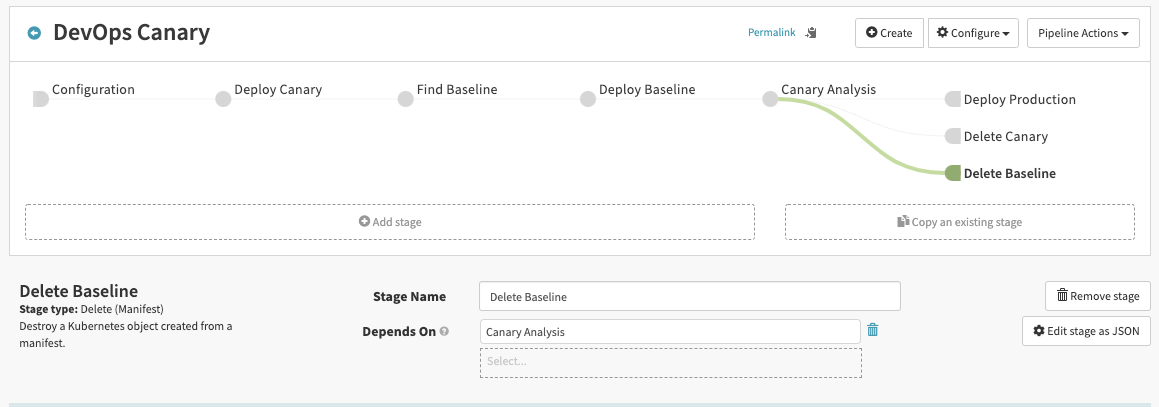
Delete Baseline stage
Repeat for Baseline. While Selecting Canary Analysis, click on Add Stage.
Select Delete (Manifest).
For Stage Name enter Delete Baseline.
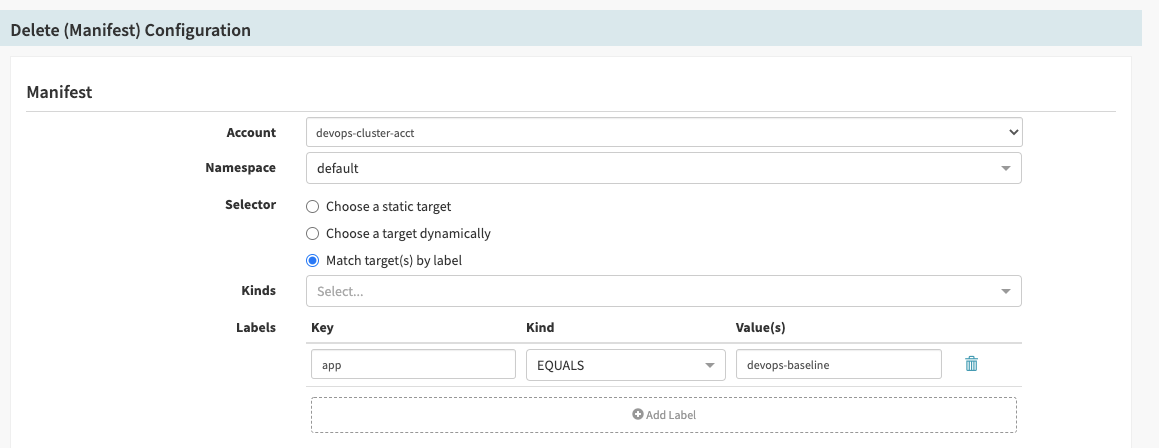
In Delete (Manifest) Configuration
- for Account, enter devops-cluster-acct.
- Namespace - default.
- Selector - Match target(s) by label.
- For Kinds select
deployment - In Labels add a key
app, kindEQUALSand valuedevops-baseline
Your final pipeline should look like this:
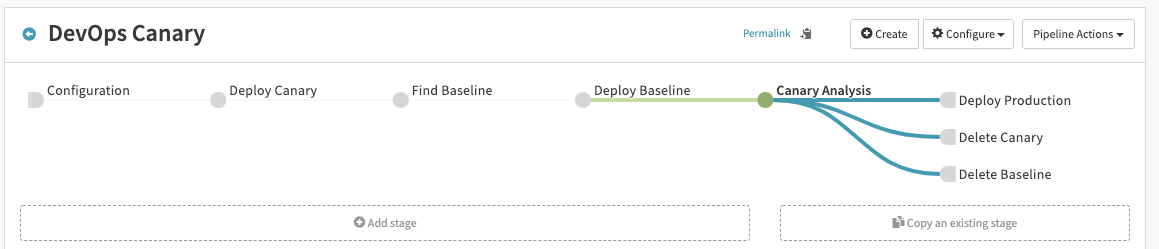
With our configuration the canary will look like an improved version and therefore will be promoted to production.
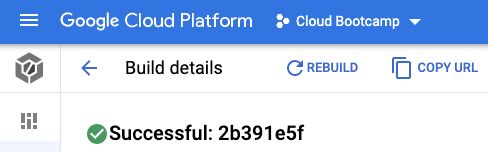
Let's trigger the pipeline. Open a new tab and go to Cloud Build History:
Select your latest build and click Rebuild.
Wait ~ 1 minute for the build to finish and go to Spinnaker's Delivery → Pipelines. Wait till Spinnaker runs the analysis.
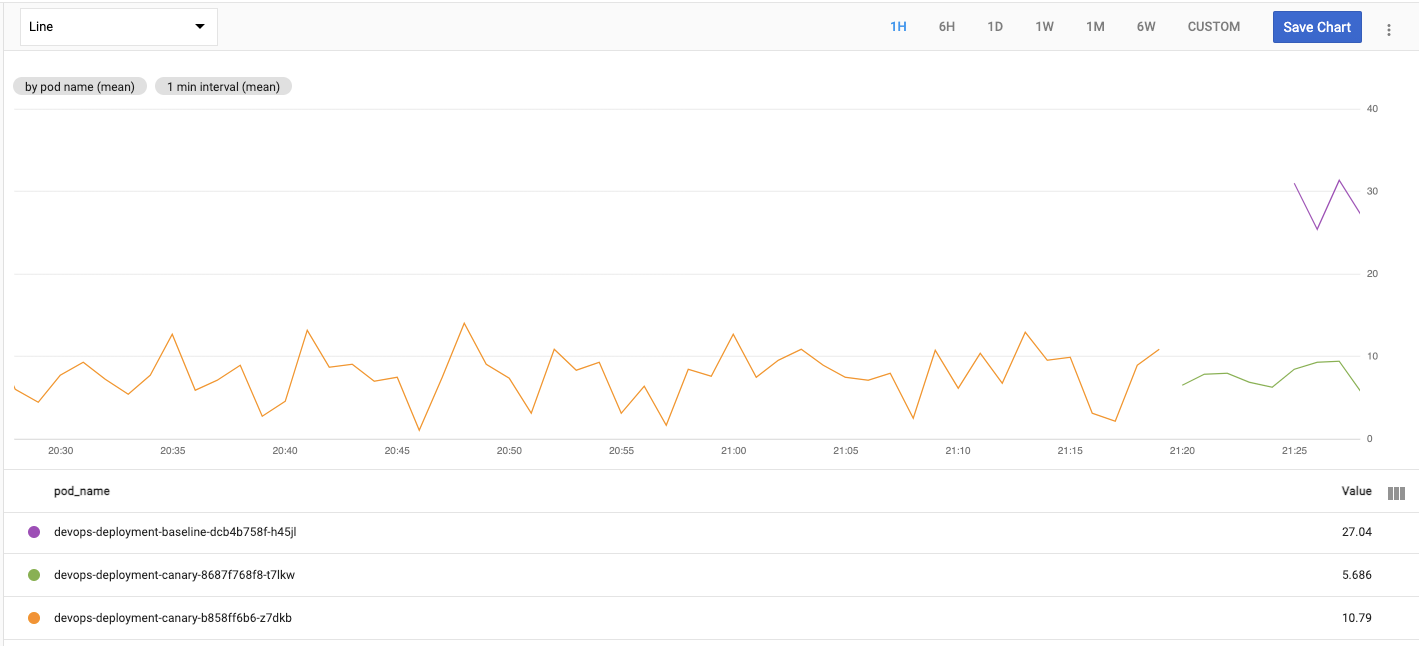
While you're waiting - after baseline is deployed, go to the monitoring tab if you've left it open and verify that both canary and baseline metrics are being collected. You should see our first canary pod and a new one, as well as a baseline pod.
Soon your pipeline will finish.
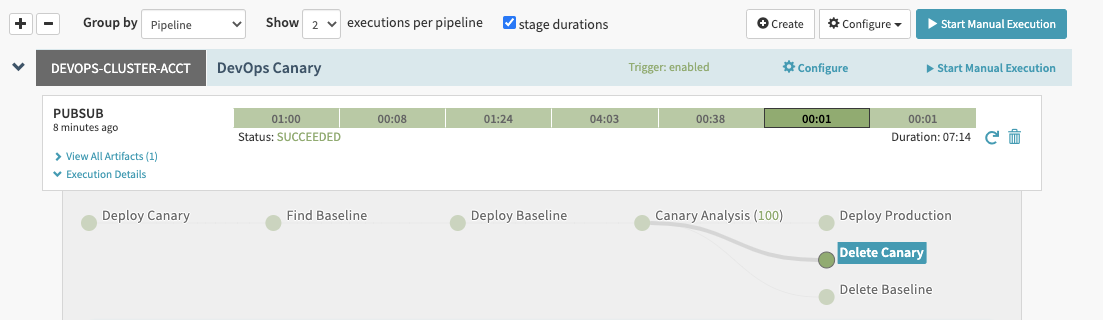
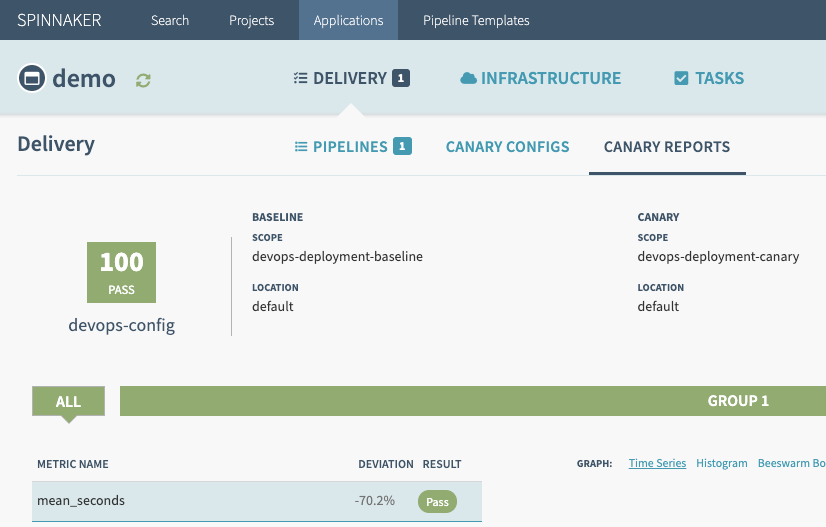
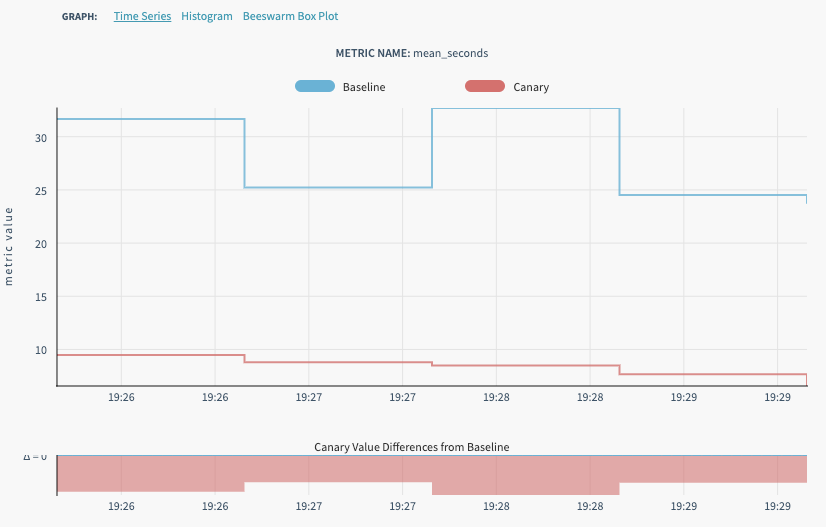
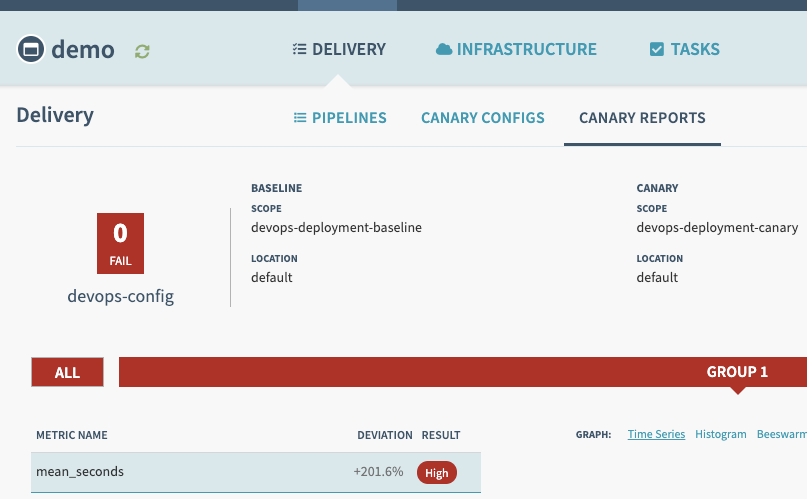
When the pipeline completes go to the Canary Reports.
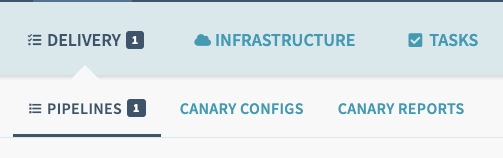
Click the latest analysis and explore the results.
Edit our application.
$ cd ~/devops/default
$ cloudshell edit main.go
In the Cloud Editor find the lines at the end of the file:
if environment != "production" {
    checksTimer.Set(rand.Float64() * 15)
} else {
    checksTimer.Set(rand.Float64()*25 + 10)
}
And replace them with:
if environment != "production" {
    checksTimer.Set(rand.Float64()*100 + 20)
} else {
    checksTimer.Set(rand.Float64()*25 + 10)
}
In Cloud Shell, enter the following to make sure you are in the right folder and add the modified file to Git.
$ cd ~/devops/default
$ git add --all
$ git commit -a -m "Bad application optimization"
$ git push origin master
Wait ~ 1 minute for the build to finish and go to Spinnaker's Delivery → Pipelines. Wait till Spinnaker runs the analysis.
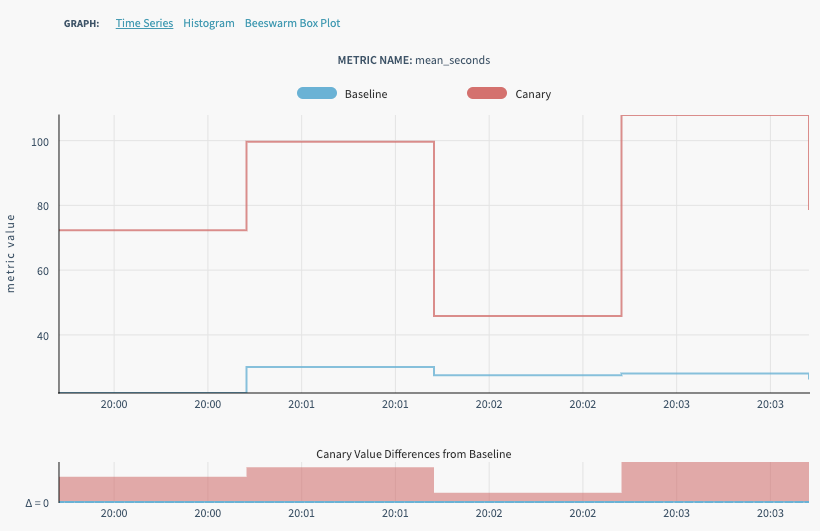
While you're waiting - after baseline is deployed, go to the monitoring tab if you've left it open and verify that both canary and baseline metrics are being collected. You should see that the new canary has worse "performance" than baseline.
Soon your pipeline will finish.

When the pipeline completes go to the Canary Reports. Click the latest analysis and explore the results.
When we have configured the pipeline, we can save it for future use or sharing with colleagues. For that we can use the spin utility. Go to Cloud Shell and run:
$ spin pipeline list --application demo | jq .[].nameWe have one pipeline named DevOps Canary. Let's save it.
$ spin pipeline get --name "DevOps Canary" --application demo > pipeline.jsonNow we can edit this pipeline as JSON or apply it to another Spinnaker installation in GKE. Provided the application name stays the same all we need to do is:
$ sed -i "s/OLD_PROJECT_ID/NEW_PROJECT_ID/g" pipeline.json
$ spin pipeline save --file pipeline.json
Also, instead of doing the copy-paste of the pipeline we can use it to create a pipeline template.
As it needs a lot of manual editing of the pipeline file, we're not going to do it here. Refer to this Pipeline Templates documentation for details
You can explore the Spinnaker UI a bit, and proceed to clean up when you are ready.
To Clean everything up first, generate the deletion script.
$ ~/cloudshell_open/spinnaker-for-gcp/scripts/manage/generate_deletion_script.sh$ cloudshell edit ~/cloudshell_open/spinnaker-for-gcp/scripts/manage/delete-all_${GOOGLE_CLOUD_PROJECT}_devops-cluster_devops-spin.shFine the last two lines starting with:
Deleting service account xxxxxxxx-compute@developer.gserviceaccount.com in YOUR_PROJECT_NAME..."and remove them and save the file.
Now run the script:
$ ~/cloudshell_open/spinnaker-for-gcp/scripts/manage/delete-all_${GOOGLE_CLOUD_PROJECT}_devops-cluster_devops-spin.shGo to the Compute Engine and make sure the virtual machines are shutting down or gone. Check Disks for any leftover Persistent Volumes.
Delete Halyard installation and configuration:
$ sudo bash ~/.hal/uninstall.shTo delete the image from registry enter the following. Replace your project ID where applicable.
$ gcloud container images list-tags \
    gcr.io/${GOOGLE_CLOUD_PROJECT}/devops-demo \
    --format="value(tags)" | \
    xargs -I {} gcloud container images delete \
    --force-delete-tags --quiet \
    gcr.io/${GOOGLE_CLOUD_PROJECT}/devops-demo:{}
In the Management Console, from the Products and Services menu, go to the Container Registry service. You should see your image is gone. If not - delete the rest manually.
Remove the permission granted to Cloud Build to connect to GKE.
$ PROJECT_NUMBER="$(gcloud projects describe ${GOOGLE_CLOUD_PROJECT} \
    --format='get(projectNumber)')"
$ gcloud projects remove-iam-policy-binding ${PROJECT_NUMBER} \
    --member=serviceAccount:${PROJECT_NUMBER}@cloudbuild.gserviceaccount.com \
    --role=roles/container.developer
Delete the Cloud Build Triggers.
$ gcloud beta builds triggers delete -q \
    `gcloud beta builds triggers list --filter triggerTemplate.repoName=default --format 'get(id)'`
Finally, delete your repository:
$ gcloud source repos delete defaultTo restore default state of GCE Service Account:
$ export GCE_SA=$(gcloud iam service-accounts list --filter='email ~ [0-9]*-compute@.*' --format='value(email)')
$ export PROJECT_ID=$(gcloud info --format='value(config.project)')
$ gcloud projects add-iam-policy-binding $PROJECT_ID  --role roles/editor \
    --member serviceAccount:$GCE_SA
The following command will take all source archives from all builds and delete them from cloud storage:
$ gcloud builds list | awk 'NR > 1 {print $4}' | while read line; do gsutil rm $line; doneExit the cloud shell :)